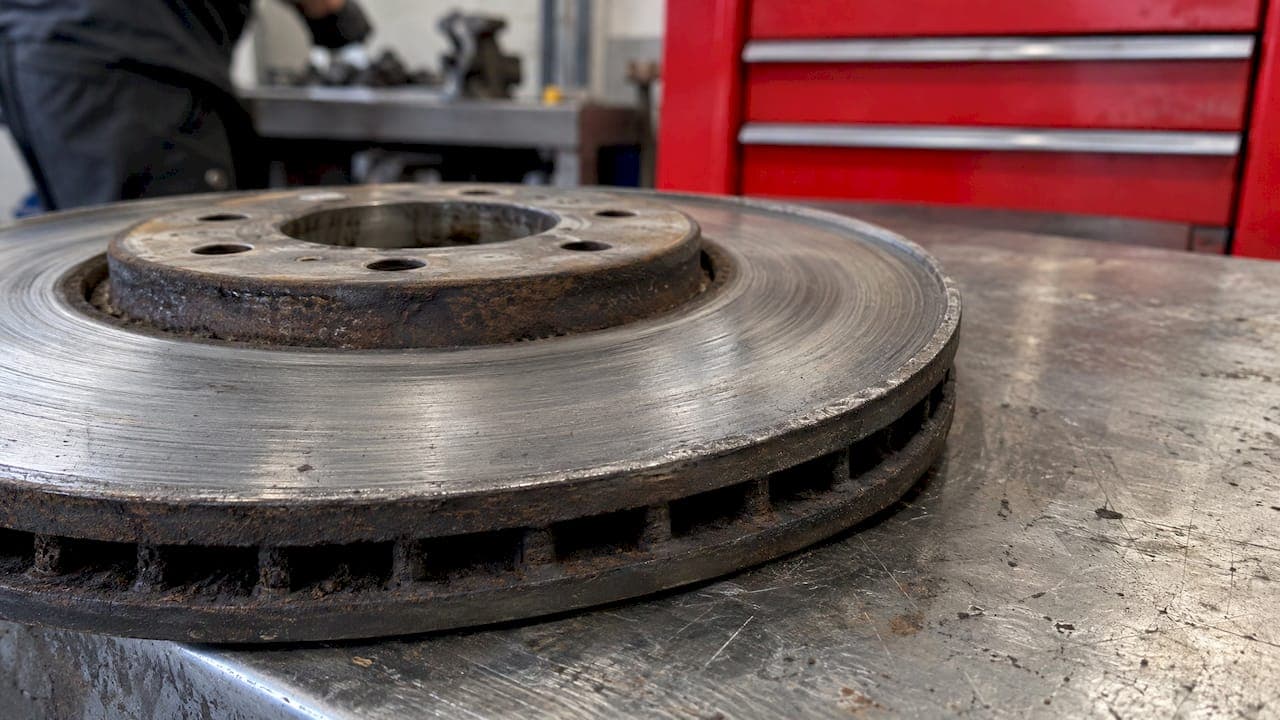
Rotor lip removal means taking off the raised ridge at the outer edge of a brake rotor. It is usually done so that a rotor can be pulled off the hub, or so that new pads fit over worn ones. The lip is not the deciding factor. Rotor thickness is. Measure first. If the rotor is above the maker's minimum thickness, the lip can be cleaned off. If it is not, the rotor is replaced.
This guide covers what a lip is, how to inspect it, which tools remove it, how to free a stuck rotor, and when replacement is the better job.
TL;DR
- A wear lip forms because pads sweep only the middle of the rotor face. The outer rim keeps its original thickness.
- A lip that catches a fingernail is a signal to measure. It is not a verdict on the rotor.
- Measure thickness with a micrometer and compare the thinnest reading with the minimum on the rotor or in the vehicle maker's specification.
- Remove a lip only if the rotor stays above minimum thickness afterward. Otherwise replace the rotors as an axle pair.
- Stuck rotors usually have rust bonding them to the hub. Penetrating oil, patience and even force free most of them.
Table of Contents
- What a rotor wear lip is
- Measure before anything else
- Measure, resurface, remove the lip or replace
- Tools that remove a rotor lip
- Removing a lip safely
- Removing a stuck or rusted rotor
- Perspective: why we replace instead of machining
- Replacing instead: what to fit
- After the work: bed-in and checks
- Mistakes to avoid
- FAQ
- Sources
What a rotor wear lip is
A wear lip is a ridge at the outer edge of the rotor. Brake pads cover only the centre portion of the braking surface. The rim stays at its original thickness while the swept area wears down. The result is a step between the worn face and the edge.
Some lip is normal. A small ridge near the outer edge is common as the friction surface wears. A pronounced ridge can mean the rotor is approaching its discard thickness.
How to tell if the lip needs attention
Run a fingernail from the swept face toward the edge. A lip that catches the nail is roughly 0.5 to 1 mm high. That is the point to measure the rotor against the minimum thickness.
Lip height does not decide whether a rotor is safe. The decision comes from a micrometer reading taken at several points, away from the rust lip, and compared with the maker's minimum discard thickness, as J&A Tire's rotor inspection guidance describes.
Check the cause before blaming the lip. Brake noise can come from pads, calipers or suspension. Diagnosis comes first. For noise questions, see the guide on wheel bearing versus brake noise and the one on what pad wear tells you.

Measure before anything else
The measurement decides the job. Skipping it risks removing material from a rotor that has none to spare.
What is needed
- A rotor micrometer or brake micrometer
- The minimum thickness, stamped on the rotor (often marked MIN TH) or listed by the vehicle maker
- A clean rotor face
- A dial indicator with a magnetic base, if runout is being checked
Steps
- Clean the rotor face so rust and dirt do not distort readings.
- Measure about 3/8 inch from the edge, at six to eight points around the rotor.
- Record the thinnest reading.
- Compare it with the stamped or specified minimum.
- If the rotor is within 0.5 mm of minimum, replacement with the next set of pads is best practice.
A visual check cannot find every problem. Runout needs a securely mounted dial indicator, and thickness variation can cause pedal pulsation. When symptoms exist or the tools are not available, a professional measurement is the right step, per the same J&A Tire guidance. The DBC guide to a four-point micrometer workflow covers the measuring routine in more detail.
Measure, resurface, remove the lip or replace
| Situation | Action |
|---|---|
| Small lip, thickness well above minimum, no cracks | Clean the lip if needed for the job, then refit |
| Lip catches a nail, thickness above minimum, pads being changed | Measure, then remove the lip only if the rotor stays above minimum |
| Thickness within 0.5 mm of minimum | Replace with the next set of pads |
| Below minimum thickness | Replace |
| Cracks, heavy pitting, large heat checks, blue-black burnt spots | Replace |
| Thickness varies, pedal pulses | Have it measured by a professional |
Resurfacing and lip removal both take off material. Resurfacing is acceptable only if the rotor stays above the discard specification. Replacement is the sensible option for heavy pitting, clear radial cracks, large heat checks or blue-black burnt spots.
Modern rotors are made lean. Machining them is often impractical, because lost mass or thickness makes them prone to warping when hot. That is a reason many shops replace instead of machining.
Rotors are replaced in axle pairs, so braking stays balanced left to right. The DBC page on replacing rotors without pads lists the thickness and runout figures to ask for.
Tools that remove a rotor lip
Three tool types are in common use.
Hub-mounted lip removers
Some tools bolt onto the hub and spin the disc against a fixed scraper. Models such as the Laser 7839 and Sealey VS0216 work this way. The tool holds the scraper at the edge while the rotor turns. This gives an even cut around the whole circumference.
Hand scrapers
A hand scraper suits targeted work on a small ridge. The Laser 8515 is an example. Control is lower than with a hub-mounted tool. Work slowly and check the edge often.
Wire wheels and flap wheels
Drill-mounted wire wheels and flap wheels clean rust from rotor hats and disc edges. Variable speed allows gentle work near the braking surface. These clean rust. They are not meant to remove significant metal. For surface rust on the face, the DBC article on rotor rust as surface film or damage explains what is normal.
Removing a lip safely
- Loosen the lug nuts with the wheel on the ground.
- Raise the vehicle and support it on jack stands. Never work under a vehicle held by a jack alone.
- Remove the wheel, caliper and caliper bracket as needed.
- Measure the rotor first, as described above.
- If the rotor has enough material, remove only the lip. Take light passes and re-measure.
- Re-check thickness at several positions. It must stay above the manufacturer's minimum.
- Clean the hub and mounting surfaces so the rotor sits flat.
- Refit the rotor, caliper and wheel. Tighten lug nuts evenly in a star pattern.
Wheel nut torque matters. Uneven clamping can distort a rotor. Many passenger cars call for 110 to 140 Nm, but the vehicle's own specification applies. Use a torque wrench and check the owner's manual.
If the rotor is below minimum, cracked or heat-damaged, stop and replace it. A technician should handle any rotor that cannot be measured or that shows damage.
Removing a stuck or rusted rotor
Most lip removal jobs start because the rotor will not come off. The lip is only part of the problem. In most cases, rust bonds the rotor to the hub.
- Remove the caliper and bracket first. The rotor cannot slide off while they are in place.
- Spray penetrating oil into the seam where the rotor meets the hub, and into the centre bore.
- Let it soak. Fifteen to twenty minutes is the minimum. Longer is fine.
- Tap around the outer edge with a rubber mallet. Use gentle taps, not heavy blows.
- If the rotor has threaded holes, thread in two bolts evenly to push it off the hub.
- Pull the rotor straight off.
Keep force off the caliper, hoses, wheel studs, bearings and ABS sensors. Do not strike the braking surface of a rotor that is being reused. If the rotor stays stuck after repeated soaking, take the vehicle to a shop.
On rotors held by a small retaining screw or lock ring, remove that first. Check the hub for a lip at the rotor's inner diameter as well. Rust there holds the rotor in place even after the lip at the outer edge is cleaned.
Prevent the next stuck rotor
Clean the hub face with a wire brush before fitting a new rotor. Dirt and rust on the hub cause runout and can lock the rotor in place. Canadian winters add road salt, which speeds up rust. Cleaning the hub at every rotor or pad change keeps the next removal easy.
Perspective: why we replace instead of machining
Lip removal is a short-term fix. It makes a worn rotor easier to remove or lets new pads sit properly. It does not restore lost thickness.
We build cross-drilled rotors for Canadian vehicle owners who want braking that holds up. Our rotors are engineered to resist warping and to last. A new rotor starts at full thickness, so there is no lip to cut and no machining to take away material.
When a rotor is near its minimum, we recommend replacing the pair along with new pads. Hub condition, pad choice and torque all affect how long the new set lasts. Measure, compare with the maker's figure, and decide from the number.
Sam
Replacing instead: what to fit
When the lip shows the rotor is close to its limit, replacement is the cleaner result. Fit rotors and pads as a set, on both sides of the axle.
DBC sells brake kits with cross-drilled rotors designed for cars, trucks and performance vehicles. Product lines include Performance XDB, Premium Black Kote and Performance SS. Pricing is inclusive, with no hidden fees. Orders over $100 ship free in Canada. Expedited shipping is $29.99 per order. Fitment is by vehicle, so the make page is the place to start.
Browse brake kits, front brake rotors or brake pads. Select the vehicle on the make page to see matching parts. If hub bearings are worn, the wheel bearings and hubs collection covers that part of the job.
After the work: bed-in and checks
New pads and rotors need a bed-in period. This typically means gentle braking for the first 200 km so contact and performance settle.
- Avoid hard stops from speed during the bed-in distance.
- Check lug nut torque after the first drive.
- Listen for noise. New-brake sounds are covered in the guide on noise after a brake job.
- For drilled rotors specifically, see the noise diagnosis guide.
- Pedal pulsation can come from thickness variation or runout. The article on the rotor warping myth explains what to measure.
- Heavy use raises rotor temperature. See the guide on heat dissipation.
Mistakes to avoid
- Cutting a lip without measuring first.
- Judging the rotor by lip height alone.
- Replacing one rotor instead of the axle pair.
- Hammering on the braking surface or near the caliper.
- Skipping hub cleaning.
- Tightening lug nuts by feel instead of with a torque wrench.
- Assuming the lip is the source of noise without checking pads, calipers and suspension.
FAQ
Is it safe to drive with a lip on the rotor?
A small lip is common and does not mean the rotor is unsafe. Safety depends on thickness. Measure the rotor and compare the thinnest reading with the minimum. If it is at or below that figure, replace it.
Can the lip be removed without taking the rotor off?
Hub-mounted tools spin the rotor in place against a scraper, so the rotor stays on the vehicle. The caliper and pads still need to be out of the way. Measure thickness before and after.
Does lip removal make new pads last longer?
A lip can stop new pads from sitting flat on the rotor face. Removing it helps the pad fit. It does not add thickness back to the rotor. Pad life then depends on pad material, driving and rotor condition.
What if the rotor will not come off the hub?
Soak the seam with penetrating oil for at least 15 to 20 minutes. Tap around the edge with a rubber mallet. If the rotor has threaded holes, use two bolts to push it off evenly. If it stays stuck, a shop can free it without damage.
When should a rotor be replaced instead?
Replace it when it is below minimum thickness, within 0.5 mm of it at pad change, cracked, heavily pitted or burnt. Replace rotors in axle pairs.
Sources
- How to Inspect Brake Rotors for Safe Stops, J&A Tire
- Brake disc minimum thickness (MIN TH) explained, Autonext
- How to Inspect Brake Rotors for Wear and Damage, Albury Brake & Clutch Centre
- Best Brake Disc Lip Removal Tools for Rotor and Hub
- Cleaning rust off brake rotors: step-by-step
- Your Corner Wrench: Don't bother with machining your brake rotors, Driving.ca
- How to Remove a Stuck or Seized Brake Rotor