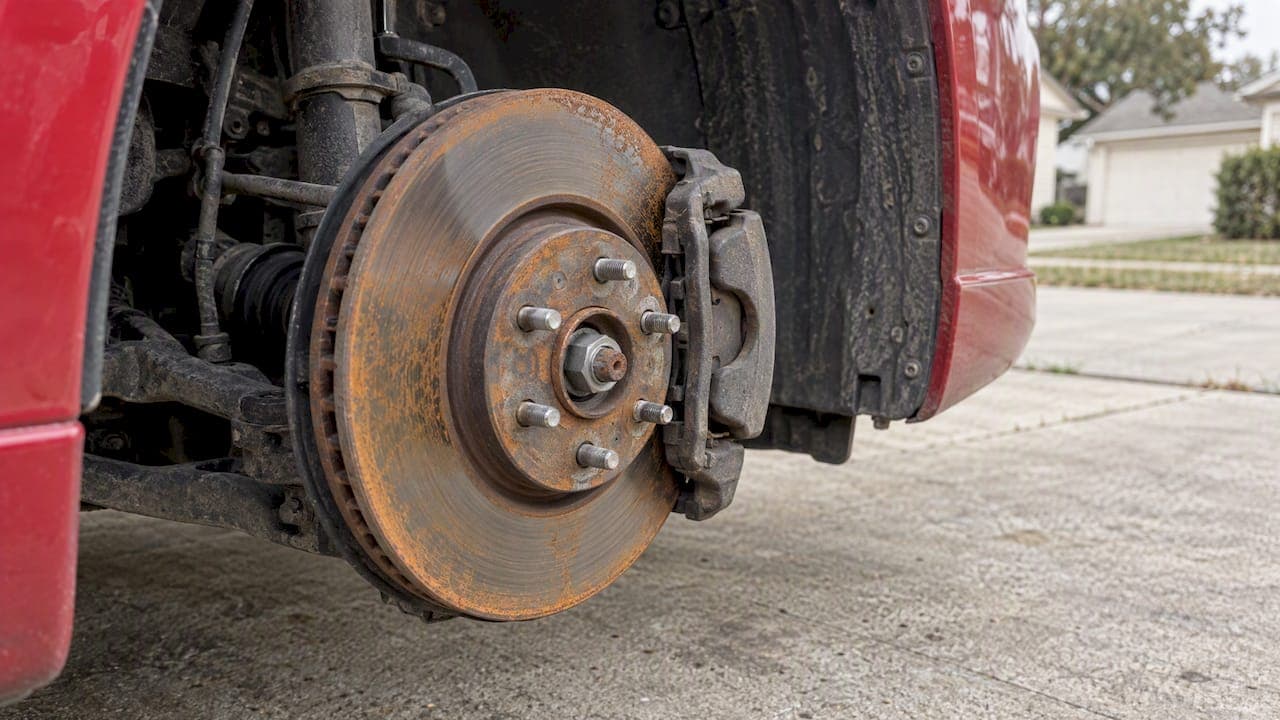
Most light rust on brake rotors cleans off after a short drive. The orange film that builds up after rain or a car wash is usually surface rust, and normal braking scrapes it away within a few stops. If it does not clear, or you notice grinding, vibration or pulling, follow the DIY cleaning steps below or get the rotor inspected. Never apply oil or lubricant to the rotor friction surface at any point.
TL;DR:
- Check pad thickness, rotor thickness against its minimum specification, pitting, grooves, and caliper slides; deep pitting or minimum thickness calls for replacement.
- Test at low speed with four or five controlled, moderate stops; persistent grinding, pulsation, or pulling means stop driving and inspect the brake system.
- Wheel off cleaning takes 30 to 45 minutes per wheel; use brake cleaner and 120 to 220 grit abrasive, and keep oil off friction surfaces.
- A seized rotor may release after a 15 to 30 minute penetrating spray soak and gentle taps; if it remains stuck, have a shop handle it.
- After rain or washing, a short drive dries rotors; vehicles parked for long periods benefit from weekly or biweekly drives, and salt should be rinsed away.
Table of Contents
- Surface rust or a serious problem? How to tell
- Try this first: a short drive with controlled stops
- Step-by-step DIY rotor cleaning with the wheel off
- How to free a stuck rotor safely
- Preventing rotor rust before it starts
- What manufacturer guidance confirms
- What most DIYers should actually do first
- When it's time to replace instead of clean
- FAQ
- Sources
Surface rust or a serious problem? How to tell
Rust location tells you most of what you need to know. Light orange discoloration on the flat braking surface is usually cosmetic and clears with driving. Rust or corrosion on the rotor hat, the edges, or the hub mounting face is a different matter and points to moisture sitting undisturbed for longer periods.
A quick inspection with the wheel off answers the rest of the question. Check pad thickness, look for pitting or grooves on the friction face, and confirm the caliper slides move freely without binding.
- Pitting deeper than light surface marks, or a rotor below minimum thickness specification, means replacement rather than cleaning.
- Persistent grinding, a pulsating brake pedal, or the car pulling to one side while braking are reasons to stop driving and inspect further.
- A wheel that runs noticeably hotter than the others after a drive can signal a dragging caliper or a stuck slide, not just rust.
Try this first: a short drive with controlled stops
Flash rust forms fast after washing, rain, or a few days parked, and it sits only on the friction face where the pads make contact. Pads scrape that layer off within the first several stops of normal driving, which is why a short test drive solves most cases without tools.
- Find a quiet street or empty lot with room for several stops.
- Accelerate to a moderate speed, then brake to a stop firmly but not hard, repeating this four or five times.
- Listen and feel for grinding, pulsation, or pulling during each stop.
Pro Tip: Do the test drive at low speed in a controlled area first; rust-covered pads bite less predictably until the surface clears.
If the pedal feels normal and the noise fades by the third or fourth stop, the rust is gone. If grinding or pulsation continues past that point, stop driving on it and move to inspection.
Step-by-step DIY rotor cleaning with the wheel off
When a short drive does not clear the rust, cleaning the rotor directly is the next step. This takes basic tools and about 30 to 45 minutes per wheel.
Tools and supplies:
- Jack and rated jack stands
- Brake parts cleaner
- 120 to 220 grit sandpaper or fine steel wool
- Lint-free rags
- Torque wrench
- Anti-seize compound (for hub contact points only)
Steps:
- Lift the vehicle and support it securely on jack stands, never on a jack alone.
- Remove the wheel and set it aside.
- Inspect the pads, hardware, and caliper slides before touching the rotor.
- Spray the rotor generously with brake cleaner and wipe with a lint-free rag.
- If rust remains, lightly abrade the friction face with 120 to 220 grit sandpaper or fine steel wool, working evenly across the surface.
- Spray and wipe again to remove any grit or residue.
- Reinstall the wheel and torque the lug nuts to the manufacturer's spec.
- Road-test with the same controlled stops used in the drive-test.
Flash rust typically clears within three to four moderate braking stops, which is why most DIYers never need to go past the drive-test stage.
Two warnings matter more than the steps themselves. Never let oil, grease, or lubricant touch the friction face, since any contamination there reduces stopping power. Anti-seize belongs only on the rotor hat or hub mounting surface, never on the braking surface or the pads.
How to free a stuck rotor safely
A rotor that will not come off the hub is a different issue from surface rust, usually caused by corrosion built up between the rotor hat and the hub flange. Tapping gently with a rubber mallet around the hat while the rotor is still loosely seated is the usual starting point.
- Spray a penetrating lubricant at the hub-to-rotor junction and let it sit for 15 to 30 minutes before trying again.
- Repeat the soak-and-tap cycle two or three times rather than forcing it on the first attempt.
- Avoid heavy impact near the wheel bearing or ABS sensor, since both are easy to damage with excessive force.
Pro Tip: Tap in a pattern around the rotor's circumference rather than hammering one spot, which spreads the force and avoids bending the hat.
If the rotor still will not budge after a few soak cycles, heat or mechanical pullers are sometimes used in a shop setting, but both carry a real risk of damaging the hub or bearing if handled incorrectly. That is the point to book a shop inspection instead of continuing on your own.
Preventing rotor rust before it starts
A few habits cut down how often rust becomes a problem at all.
- Take a short drive after washing the car or driving through rain so the rotors dry evenly under normal braking.
- Rinse salt and road grime off the undercarriage regularly, especially after winter driving.
- For a vehicle that sits for extended periods, a short drive every week or two keeps the pads scraping the rotors clean.
- Grease caliper slide pins annually, applying it to the pin itself and never to the pad or rotor contact area.
- Replace pads before they wear down to bare backing, since worn pads leave more of the rotor face exposed to moisture.
At replacement time, coated rotors or rotors with galvanized hardware resist corrosion better on non-friction surfaces. The friction face itself should never carry any coating, since that surface needs direct metal-to-pad contact to work.
What manufacturer guidance confirms
Inspection priorities stay consistent across manufacturer and repair sources: check pad thickness, compare rotor thickness against the minimum spec, and confirm caliper slides move freely. The safety rule repeated everywhere is the same one covered above: no contaminants on the friction surface, and anti-seize only at the hub or hat. For a full soak-and-free routine on a seized rotor, the stuck rotor removal guide walks through the process in more depth.
What most DIYers should actually do first

The order of operations matters more than any single technique. Diagnose first, test-drive second, clean by hand only if the drive-test fails, and treat any sign of structural corrosion, deep pitting, or pedal pulsation as a reason to stop and get a proper inspection.
Rust on the friction face is rarely worth gambling on. If pitting goes past a light surface mark or the rotor measures near its minimum thickness, replacing it costs less than finding out the hard way that it was not just surface rust. When in doubt, a shop with a micrometer settles the question in minutes.
— Sam
When it's time to replace instead of clean
Deep pitting, grooves you can feel with a fingernail, or a rotor reading at or below minimum thickness are all signs that cleaning will not fix the problem. Repeated rust returning on the same rotor after multiple cleanings is another sign the surface has degraded past the point of being worth saving.
We build our Performance XDB, Premium Black Kote, and Performance SS rotor lines with cross-drilling engineered to resist warping and hold up to repeated heat cycles, with guaranteed fitment and no hidden fees added at checkout. Pricing details and shipping policies are available on our website.
Before you order, measure your current rotor thickness against the manufacturer spec and confirm your vehicle's fitment. From there, browse our brake rotor collection or check complete brake kits if you're replacing pads at the same time.
FAQ
What is a good rust remover for brake discs?
Brake parts cleaner combined with fine sandpaper or steel wool in the 120 to 220 grit range removes stubborn surface rust effectively. Avoid household rust removers or anything oil-based, since residue left on the friction face reduces braking performance.
Does WD-40 remove rust?
WD-40 works as a penetrating spray to help free seized or corroded metal parts, but it is not a substitute for brake cleaner on the rotor's friction surface. Any oil-based product left on the braking surface can contaminate pad contact and needs to be fully removed with brake cleaner afterward.
How do I remove a brake rotor from my car?
Lift and secure the vehicle on jack stands, remove the wheel, then pull the rotor off the hub, tapping gently with a mallet if it resists. If it stays stuck, a 15 to 30 minute soak with penetrating spray and repeated gentle taps usually frees it without damaging the hub.
What dissolves rust without scrubbing?
Light flash rust on a rotor's friction face often clears on its own with normal braking during a short drive, since the pads scrape it off with each stop. For rust in tighter spots like the hub flange, a penetrating spray left to soak for a set period loosens corrosion without needing heavy abrasion.
Sources
- What's the best way to clean brake rotors? (WD‑40 guidance)
- Remove rust from brake rotors (Mechanics Stack Exchange)