
A brake disc (also called a rotor) is the flat metal disc that your brake pads clamp against to slow the vehicle. When you press the brake pedal, hydraulic pressure pushes the caliper's pistons against the pads, which grip the spinning disc and convert kinetic energy into heat. If your discs are worn, cracked, or below the manufacturer's minimum thickness, stopping distances increase and vehicle control suffers.
Here is what to do right now:
- Check for symptoms: grinding noise, pedal pulsation, steering vibration, or a burning smell after braking.
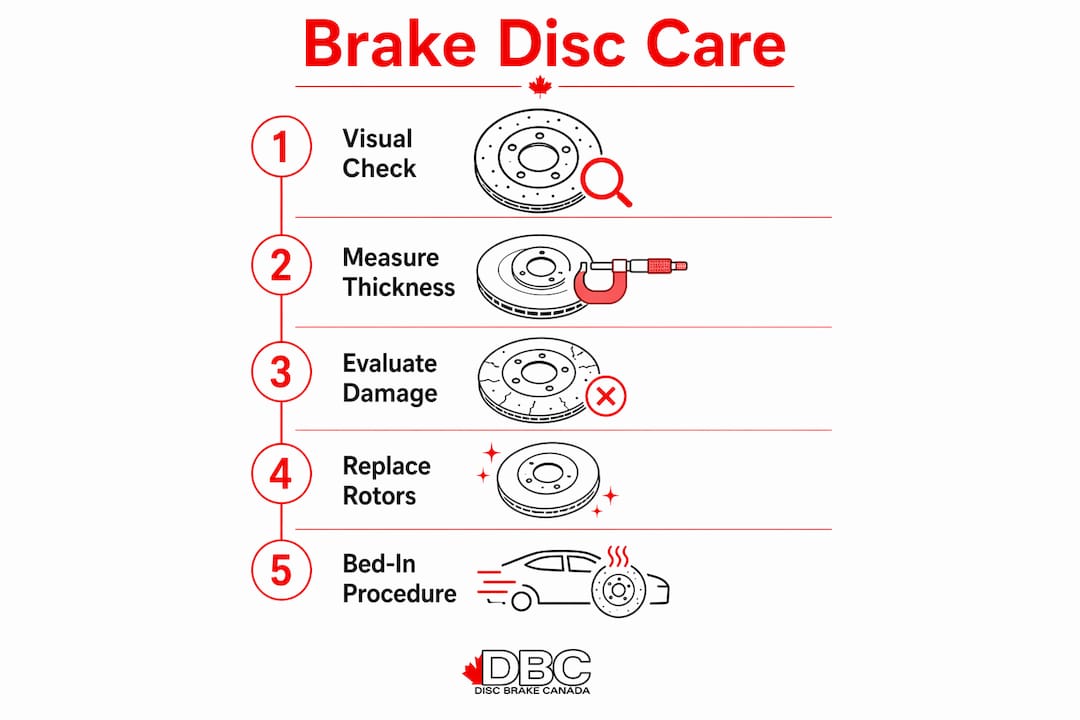
- Inspect visually: look through the wheel spokes for deep grooves, blueing, or cracks on the disc face.
- Measure rotor thickness: the minimum spec is stamped on the disc edge or hub. Use a micrometer or vernier calliper to confirm.
- Book service if in doubt: front brakes handle the majority of total braking force and wear faster than rear brakes, so they need attention first.
- Canadian option: DBC Brakes (CrossDrilledRotors.ca) offers fitment-specific cross-drilled rotors, with transparent pricing and free shipping on orders over $100.
Table of Contents
- How does a brake disc actually work?
- What types of brake discs are available?
- How do you know when a brake disc is damaged or worn?
- When should you replace a brake disc?
- What does brake disc replacement cost in Canada?
- How to bed in new brake discs correctly
- How to choose the right replacement brake disc
- What happens during a professional brake disc replacement?
- DIY checks vs. professional service: a practical timeline
- How dangerous is driving with worn brake discs?
- How to find a qualified mechanic for brake disc service
- Disposing of old brake discs in Canada
- Key takeaways
- The trade-offs most drivers miss
- DBC Brakes: cross-drilled rotors built for Canadian roads
- Useful sources and further reading
How does a brake disc actually work?
The disc converts the vehicle's forward momentum into heat through friction. When the caliper squeezes the pads against both faces of the spinning rotor, that friction force creates a braking torque at the wheel. The heat generated must escape quickly; a disc that cannot shed heat fast enough will warp, fade, or crack.
Several components work together in this system. The caliper houses the pistons and pads. The hub centres the disc on the axle. Wheel bearings carry the load while allowing the disc to spin freely. Brake fluid transmits pedal pressure hydraulically to the caliper pistons. Each part affects how well the disc performs and how evenly it wears.
Weight transfer during braking shifts the vehicle's mass forward, loading the front axle. That load increases the friction demand on front rotors, which is why front discs typically wear at a noticeably faster rate than rear discs on most passenger vehicles.
Front-heavy wear is not a defect. It is a predictable consequence of physics, and it means front discs usually need replacement one to two service intervals before the rears on the same vehicle.
What types of brake discs are available?
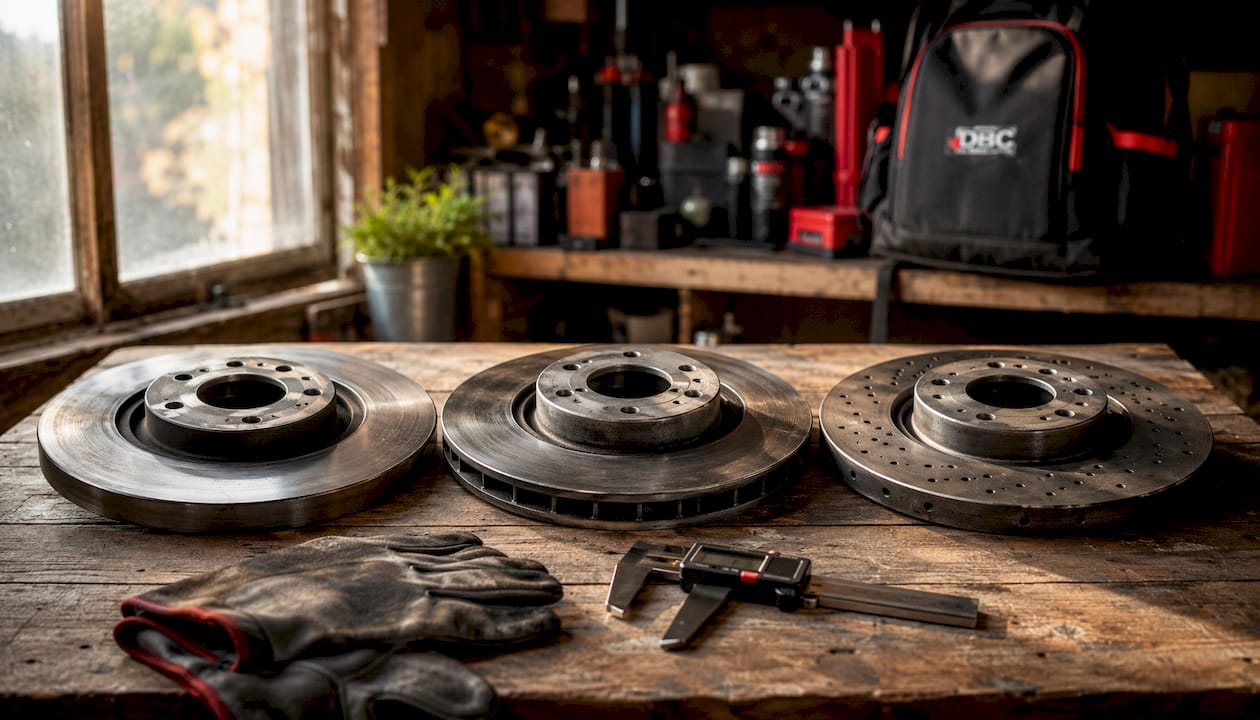
The right disc type depends on how and where you drive. Most passenger cars use ventilated front rotors and solid rear rotors from the factory, but aftermarket options add drilled, slotted, and coated variants.
| Type | Best for | Heat handling | Trade-offs |
|---|---|---|---|
| Solid | Light city driving, rear axles | Moderate | Least expensive; slower heat dissipation |
| Ventilated | Most passenger cars, front axles | Good | Standard choice; internal vanes circulate air |
| Cross-drilled | Performance, spirited driving | Very good | Reduces heat buildup; risk of cracking under extreme track use |
| Slotted | Towing, heavy vehicles, track | Good | Clears gas and debris; slightly higher pad wear |
| Drilled and slotted | Enthusiast and performance use | Excellent | Best all-round heat and debris management |
| Coated/zinc-washed | Canadian climate, daily drivers | Standard | Resists road-salt corrosion; cleaner appearance |
Solid rotors are the baseline. They work well for light urban use but can overheat under sustained heavy braking. Ventilated rotors have internal cooling vanes that draw air through the disc as it spins, which is why they are standard on front axles of most cars sold in Canada.
Cross-drilled rotors reduce surface heat and weight. The holes allow hot gases to escape from the pad-disc interface, which improves bite consistency. For Canadian drivers who tow trailers or drive mountain passes, drilled rotor features are worth considering. Pure track use is a different story: repeated thermal cycling can propagate cracks from the drill holes, so slotted-only designs are often preferred for closed-circuit racing.
Coated rotors are particularly practical in Canada. Road salt accelerates surface rust on bare cast iron, and a zinc or geomet coating protects the hat and non-friction areas between drives. The friction surface itself wears clean with normal use, but the hat and vane edges stay protected.
How do you know when a brake disc is damaged or worn?
Some symptoms require stopping immediately. Others give you a short window to book service. Knowing the difference matters.
Stop driving and seek service now if you notice:
- A grinding or metal-on-metal screech that persists through the full brake application (pads are gone; metal is contacting the disc).
- Smoke or a strong burning smell from the wheel area after normal driving.
- Severe pedal pulsation that makes controlled stopping difficult.
- The vehicle pulling sharply to one side under braking.
Book service within a few days if you notice:
- A high-pitched squeal that stops when you release the pedal (wear indicator touching the disc).
- Mild steering-wheel vibration during braking.
- A longer-than-usual stopping distance on dry pavement.
- Visible deep grooves or scoring on the disc face when viewed through the wheel spokes.
Visual checks you can do without tools:
- Look through the wheel spokes at the disc face. Shallow surface rust after rain is normal and clears with a few brake applications. Deep grooves, cracks radiating from the centre, or a blue-tinged disc face are not normal.
- Check the disc edge for a pronounced lip. A raised lip means the friction area has worn down relative to the outer edge, a sign the disc is near or past its service limit.
- Basic visual inspection of scoring, thickness, and pedal feel can identify most rotor problems before they become unsafe.
When should you replace a brake disc?
Replace a disc when it falls below the manufacturer's minimum thickness, shows visible damage, or produces symptoms that do not clear after a pad replacement. Typical passenger car rotors last 70,000–100,000 km under normal driving, but towing, mountain driving, and aggressive braking shorten that considerably.
How to measure rotor thickness
- Park on a level surface, apply the parking brake, and loosen the wheel nuts before jacking up the vehicle.
- Remove the wheel and locate the minimum thickness specification stamped on the disc edge, hat, or hub face. It is usually expressed in millimetres (e.g., "MIN 22 mm").
- Use a vernier calliper or micrometer to measure the disc thickness at three to four points around the friction surface, avoiding the outer lip.
- If any measurement is at or below the stamped minimum, the disc must be replaced regardless of appearance.
- If measurements are above minimum but the disc shows grooves deeper than 1.5 mm, consult a technician about resurfacing.
Resurfacing vs. replacement: Resurfacing is acceptable when the rotor is above minimum thickness and the damage is surface-level. Once a disc is turned (machined flat), it loses material and may reach minimum thickness sooner. If the disc is already close to minimum, replacement is the better value.
Always replace discs in pairs on the same axle. Replacing only one rotor creates an imbalance in braking force that can pull the vehicle sideways during a stop.
What does brake disc replacement cost in Canada?
Costs vary by vehicle, region, and whether you choose OEM or aftermarket parts. The ranges below reflect typical Canadian pricing in 2026 and should be treated as starting points, not fixed quotes.
Typical Canadian cost ranges:
- Rotors (parts only): $60–$150 per rotor for standard aftermarket; $150–$350+ for OEM or premium coated options on trucks and SUVs.
- Labour: $80–$160 per axle at most independent shops; dealerships typically run higher.
- Pads (if replaced at the same time): $40–$120 per axle for aftermarket; more for OEM.
- Full front axle service (rotors + pads + labour): commonly $300–$600 at an independent shop, depending on vehicle and region.
What drives the price up:
- Larger vehicles (trucks, SUVs) use heavier, more expensive rotors.
- Vehicles with integrated parking brake drums in the rear rotor hat add complexity.
- Seized caliper slides or corroded hardware can add labour time.
- Dealership labour rates are typically 30–50% higher than independent shops.
Where to save money without cutting corners:
- Replace only the axle that is worn, not all four rotors at once, unless all are at or near minimum.
- Ask for an itemised quote that separates parts, labour, and any fluid service.
- Confirm whether new pads are included. Fitting new rotors with old pads is a false economy; the old pad surface will not mate cleanly to the new disc.
How to bed in new brake discs correctly
Proper bed-in (sometimes called "rodage" or break-in) is the single most overlooked step in a brake service. Skipping it causes uneven pad material transfer onto the rotor surface, which leads to vibration, noise, and reduced braking consistency.

Pro Tip: Many replacement rotor kits require a gentle bedding routine for the first 100–300 miles: several moderate stops from progressively higher speeds, with cooling time between each. Follow the specific sequence in your kit's instructions.
The bed-in period for most kits is often underestimated. Drivers who skip it and immediately drive normally frequently report brake shudder within the first few thousand kilometres, then assume the parts are defective. The parts are usually fine; the surface transfer layer was never properly established.
Critical installation mistakes to avoid:
- Grease on friction surfaces. Any general-purpose grease that contacts the pad face or rotor friction area must be cleaned immediately with dedicated brake cleaner. If contamination has soaked into the pad, the pad needs replacement. Lubricant contamination is one of the most common causes of brake fade and noise after a DIY service.
- Replacing only one disc on an axle. Always replace both discs on the same axle together.
- Incorrect torque. Wheel nuts and caliper bolts must be torqued to the vehicle manufacturer's specification. Under-torqued caliper bolts allow movement that causes noise and uneven wear.
- Skipping a runout check. Lateral runout above 0.05 mm on a newly fitted disc will cause pedal pulsation. A dial indicator check takes two minutes and confirms the disc is seated correctly.
Where to use lubricant: Apply high-temperature brake-specific lubricant to caliper slide pins and the back of the pad backing plate only. Never apply it to the pad face, rotor surface, or inside the caliper piston bore.
For a detailed installation walkthrough, the brake kit installation guide at CrossDrilledRotors.ca covers torque specs, runout checks, and bed-in sequences step by step.
How to choose the right replacement brake disc
Match the disc to the vehicle's use case first, then confirm fitment, then select the pad compound to suit the disc type.
Buyer checklist:
- Fitment: Use the vehicle's VIN or year/make/model/trim to confirm the correct disc diameter, bolt pattern, and hat offset. A fitment check for performance vehicles is especially important when upgrading to larger rotors.
- Minimum thickness spec: Confirm the replacement disc's minimum spec matches or exceeds the OEM requirement for your vehicle.
- Coating: For Canadian driving, a zinc or geomet-coated disc resists road-salt corrosion on non-friction surfaces. See the Canadian rotor buying guide for climate-specific recommendations.
- Warranty: Check the manufacturer's warranty period and what it covers. A warranty that excludes normal wear is standard; one that covers defects in materials and workmanship for at least one year is a reasonable baseline.
- Return policy: Confirm the supplier's return policy before ordering, particularly for online purchases where fitment errors are possible.
OEM vs. aftermarket: OEM rotors are manufactured to the vehicle maker's exact specification and are a safe default. Quality aftermarket rotors from established manufacturers often match OEM dimensions while offering coatings or designs not available from the factory. The risk with budget aftermarket parts is inconsistent metallurgy, which affects heat capacity and longevity.
Pad compatibility: When fitting new rotors, always fit new pads at the same time. The pad compound must be compatible with the disc material. Ceramic pads work well with coated rotors for low dust and quiet operation. Semi-metallic pads offer better bite at higher temperatures and suit towing or performance use. Replacing brake hardware kits (shims, pins, and clips) at the same time prevents noise from worn hardware transferring to new parts.
What happens during a professional brake disc replacement?
Most shops complete a front axle disc and pad replacement in 2–4 hours, depending on vehicle condition and complexity. Rear axles with integrated parking brake mechanisms take longer.
A thorough shop procedure follows these steps:
- Lift and secure the vehicle on jack stands or a hoist; remove the wheel.
- Inspect the caliper and hardware for seized slides, cracked boots, or fluid leaks before removing anything.
- Remove the caliper (without letting it hang by the brake hose) and the old pads.
- Measure the existing rotor with a micrometer to confirm whether resurfacing is viable or replacement is required.
- Remove the old rotor (a hub bolt or retaining screw may hold it in place on some vehicles).
- Clean the hub face to remove rust and debris; a clean mating surface prevents runout.
- Fit the new rotor, torque any retaining hardware, and check lateral runout with a dial indicator.
- Compress the caliper piston, fit new pads and hardware, and reinstall the caliper to the manufacturer's torque specification.
- Top up brake fluid and check for leaks at the caliper and lines.
- Reinstall the wheel and torque the wheel nuts in a star pattern to spec.
- Conduct a progressive test drive: post-installation checks include several moderate stops from increasing speeds to seat the pads and confirm correct operation before returning the vehicle.
Ask the shop to confirm they performed a runout check and a test drive. A quote that itemises parts, labour, and any brake fluid service is a sign of a thorough operation.
DIY checks vs. professional service: a practical timeline
Week 1 (symptoms appear): Do a visual check through the wheel spokes. Look for grooves, cracks, or a raised lip on the disc edge. Pump the brakes gently in a safe area and note any pulsation or pull.
Days 2–7: If symptoms are mild (light squeal, minor vibration), measure rotor thickness with a calliper. Compare to the stamped minimum. If above minimum and no cracks are visible, monitor and book an inspection within two weeks.
Immediate action: If grinding, metal-on-metal noise, smoke, or severe pull is present, do not continue driving. Arrange towing or drive directly to a shop at low speed on quiet roads.
DIY replacement is practical for drivers with intermediate mechanical skills, a floor jack, jack stands, and basic hand tools. Plan for 2–4 hours per axle and have the vehicle's torque specifications on hand before starting. The brake replacement safety checklist at CrossDrilledRotors.ca is a useful reference before starting any DIY brake work.
Professional service is the right call when the caliper shows signs of seizing, the brake lines look corroded, or the vehicle has an integrated rear parking brake that requires a special tool to retract the piston.
How dangerous is driving with worn brake discs?
Worn or damaged discs reduce braking force and increase stopping distances. The severity depends on how far past the service limit the disc has gone.
A disc at minimum thickness still provides legal stopping performance but has no safety margin left. A disc below minimum, or one with deep grooves or cracks, can fail to distribute pad pressure evenly, causing the vehicle to pull during braking. In a hard stop, an overheated or cracked disc can fracture, which is a loss-of-braking event with no warning.
Driving with metal-on-metal contact (pads fully worn through) damages the disc rapidly and can score the caliper piston face, turning a $150 rotor replacement into a $400–$600 caliper replacement as well. The cost of delay is almost always higher than the cost of timely service.
How to find a qualified mechanic for brake disc service
Brake work is safety-critical. The mechanic or shop you choose should meet a few basic criteria.
Look for a shop that employs technicians certified by the Automotive Service Excellence (ASE) programme or, in Canada, holds Red Seal certification through the Interprovincial Standards Programme. These credentials confirm the technician has passed standardised competency tests in brake systems.
Ask the shop directly whether they perform a runout check after fitting new rotors, and whether they road-test the vehicle before returning it. A shop that cannot answer both questions confidently is worth reconsidering. Request an itemised written estimate before authorising any work; it should list each part by name and part number, the labour time, and any fluid services.
Independent shops certified by the Canadian Automobile Association (CAA) or listed under provincial consumer protection programmes have agreed to dispute-resolution standards, which adds a layer of accountability. Dealerships offer OEM parts and factory-trained technicians but typically charge higher labour rates.
Disposing of old brake discs in Canada
Old brake discs are cast iron or steel and are fully recyclable through metal recycling programmes. Most municipal scrap metal depots in Canada accept them at no charge. Auto parts retailers such as Canadian Tire and NAPA Auto Parts often accept old rotors as scrap metal, though policies vary by location.
Do not place old rotors in household recycling bins. They are too heavy for standard collection equipment and will be rejected.
Brake dust on old rotors may contain residual friction material. Rinse the disc with water before transport to reduce airborne dust, and handle it with gloves. Some older vehicles (pre-2000) may have pads that contained asbestos fibres; if you are working on a vehicle of that era, treat the dust as a hazardous material and consult your provincial environmental authority for disposal guidance.
Provincial hazardous waste programmes (such as Ontario's Municipal Hazardous or Special Waste programme) handle brake fluid and contaminated pads. The rotors themselves, once clean, go to scrap metal.
Key takeaways
Front brakes handle roughly 80% of stopping force, wear faster than rear brakes, and should be the first point of inspection when any brake symptom appears.
| Point | Details |
|---|---|
| Inspect at first symptom | Check for grinding, pulsation, vibration, or visible scoring before the problem worsens. |
| Measure before deciding | Use a calliper to compare rotor thickness against the stamped minimum spec; replace if at or below that figure. |
| Always replace in pairs | Fitting one new rotor on an axle creates a braking imbalance; replace both sides together. |
| Match pads to new discs | New rotors need new pads; mismatched compounds cause uneven wear and noise. |
| Canadian conditions matter | Coated or zinc-washed rotors resist road-salt corrosion and are a practical choice for most Canadian drivers. |
| DBC Brakes for Canadian fitment | DBC Brakes (CrossDrilledRotors.ca) offers cross-drilled rotors with fitment lookup, transparent pricing, and free shipping over $100. |
The trade-offs most drivers miss
The conventional advice on brake discs focuses on when to replace them. What gets less attention is the cost of the decisions made around that replacement.
Fitting a new rotor without new pads is the most common false economy in brake service. The old pad surface has a wear pattern that does not match the new disc face. The result is uneven contact, accelerated disc wear, and noise that leads the driver to assume the new parts are defective. They are not. The pairing was wrong from the start.
The bed-in step is similarly undervalued. Drivers who skip the gentle initial braking sequence often report shudder within the first few thousand kilometres. A proper bed-in takes less than 15 minutes of careful driving and prevents the majority of post-installation complaints.
On the DIY versus shop question: the decision should turn on whether you have the correct torque specifications and a way to check runout, not just on whether you can remove a wheel. A disc installed without a runout check may feel fine for the first few weeks, then develop pedal pulsation as the slight misalignment becomes apparent under heat cycling. That is a second service visit that a dial indicator check would have prevented.
For Canadian drivers specifically, the salt and freeze-thaw cycle that corrodes brake hardware is worth factoring into the buying decision. A coated rotor costs modestly more than a bare cast-iron unit and typically looks and performs better after the first winter.
DBC Brakes: cross-drilled rotors built for Canadian roads
Canadian roads bring specific demands: road salt from October through April, temperature swings that stress bare metal, and long highway stretches where brake fade matters. DBC Brakes addresses those conditions directly with engineered cross-drilled rotors designed to resist warping and shed heat more effectively than standard solid units.

DBC Brakes (CrossDrilledRotors.ca) offers a fitment lookup by year, make, model, and trim so you can confirm the correct rotor before ordering. Pricing is listed without hidden fees, and orders over $100 ship free across Canada. Customer support is handled by knowledgeable staff, not automated responses, which matters when you have a fitment or pad-pairing question before placing an order.
To get started, visit CrossDrilledRotors.ca, enter your vehicle details in the fitment tool, and confirm the minimum thickness specification matches your vehicle's requirement. If you drive a Ford, the Ford-specific rotor page narrows the catalogue to your fitment immediately. Contact support before ordering if you have questions about pad compatibility or coating options for your driving conditions.
Useful sources and further reading
The resources below were used in preparing this article and provide additional technical detail for drivers who want to go further.
- CrossDrilledRotors.ca — Brake Kit Installation Guide: Step-by-step DIY installation with torque specs, runout checks, and bed-in sequences.
- CrossDrilledRotors.ca — Canadian Rotor Buying Guide: Climate-specific advice on coatings and rotor selection for Canadian road conditions.
- CrossDrilledRotors.ca — Brake Replacement Safety Checklist: Pre- and post-installation checklist for DIY and shop verification.
- Champion Parts — Brake Disc Installation and Removal: Technical guidance on disc removal, resurfacing limits, and the paired-replacement rule.
- PartCatalog — How to Replace a Disc Brake Kit: Comprehensive DIY guide covering time estimates, bed-in procedures, and post-installation checks.
- CRC Industries — How to Replace Brake Pads: Guidance on lubricant selection, caliper pin service, and what not to apply near friction surfaces.
- Wikipedia — Disc Brake: Technical overview of disc brake physics, caliper types, and ventilated disc design.