Brake kit installation is the process of replacing or upgrading a vehicle's braking components, including rotors, callipers, and pads, to improve stopping power and safety through a structured, step-by-step mechanical procedure. A complete DIY brake kit installation without a mechanic is achievable for most car owners with the right tools, a clean workspace, and a clear brake kit installation guide to follow. This article covers every stage of the process: tool selection, sequential installation, verification, and the bedding procedure that most guides skip. A full performance brake kit installation on one axle takes 3–6 hours for experienced DIYers, plus roughly one hour for bedding. That time investment is worth it when the result is a brake system you understand completely.
What tools and materials do you need for brake kit installation?
The right tools make the difference between a safe installation and a costly mistake. Gathering everything before you lift the vehicle saves time and prevents mid-job interruptions.
Essential tools
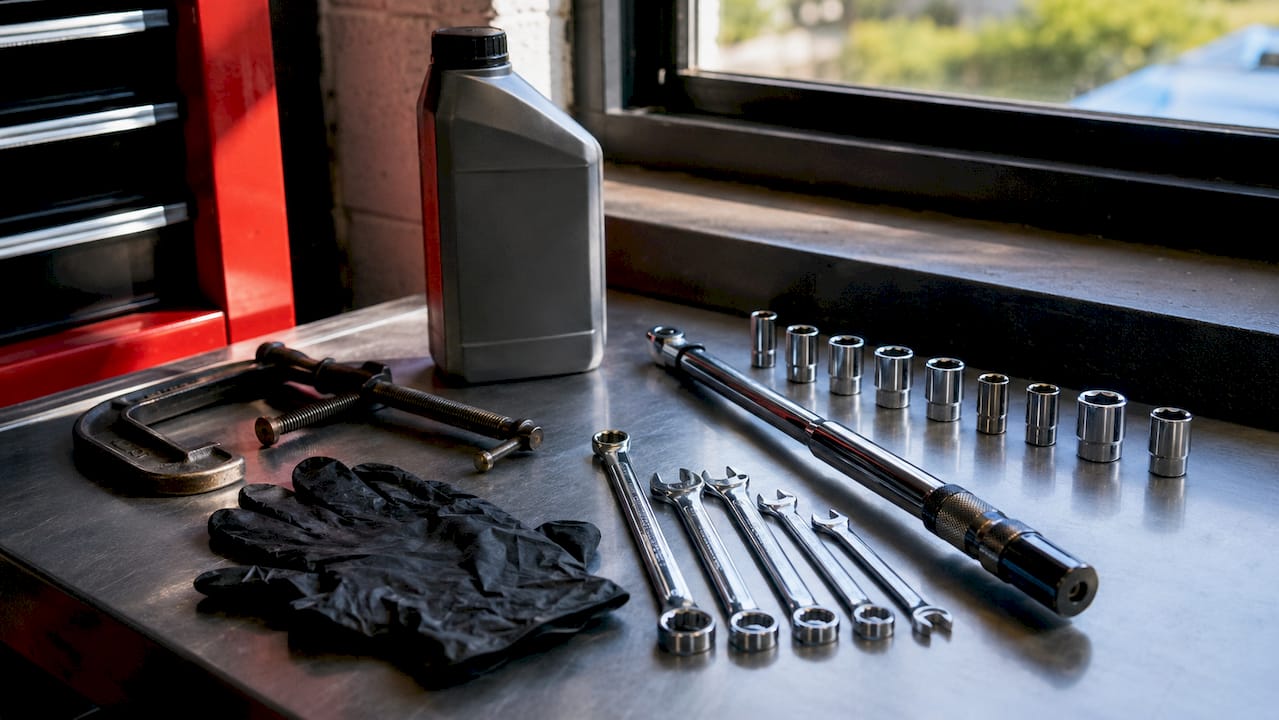
Essential tools for a professional home install include a calibrated torque wrench rated from 10 to 100+ ft-lb, a C-clamp or dedicated piston retractor, and a brake bleeding kit. A wire brush, a rubber mallet, and a set of metric and imperial sockets round out the mechanical side. You also need a sturdy floor jack and two rated jack stands. Never rely on a floor jack alone to support the vehicle.
Consumables and fluids
| Item | Specification | Purpose |
|---|---|---|
| Brake fluid | DOT 4 or DOT 5.1 | Hydraulic pressure and vapour lock prevention |
| High-temp brake grease | Copper or ceramic compound | Calliper slide pins and pad backing plates |
| Brake cleaner | Aerosol, non-chlorinated | Degreasing rotors and hub faces |
| Thread locker | Medium strength | Calliper bracket bolts |
DOT 4 brake fluid carries a minimum dry boiling point of 446°F (230°C). That rating matters for performance kits because heat buildup under hard braking can cause vapour lock in fluid that does not meet spec.
Safety equipment
Wear nitrile gloves and safety glasses throughout the job. Brake dust and brake cleaner fumes are both harmful with prolonged exposure. Keep a fire extinguisher nearby if you are working near any heat source.
Pro Tip: Buy an extra litre of brake fluid before you start. Bleeding a full system often uses more fluid than expected, and running dry mid-bleed introduces air into the lines.
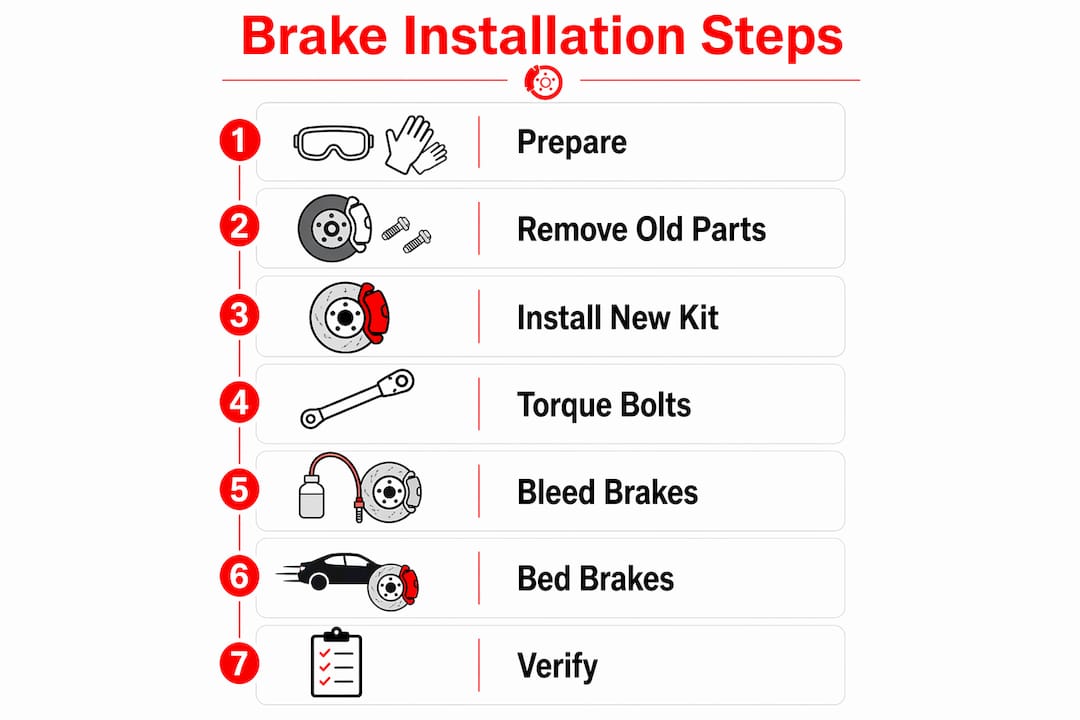
Step-by-step brake kit installation process
This sequence covers one axle. Complete both sides before moving to the bedding procedure.
- Loosen the lug nuts. With the vehicle still on the ground, break the lug nuts loose by one turn. Do not remove them yet.
- Lift and support the vehicle. Jack the vehicle at the manufacturer's specified lift point. Place jack stands under the frame rails. Lower the vehicle onto the stands.
- Remove the wheel. Finish removing the lug nuts and pull the wheel clear.
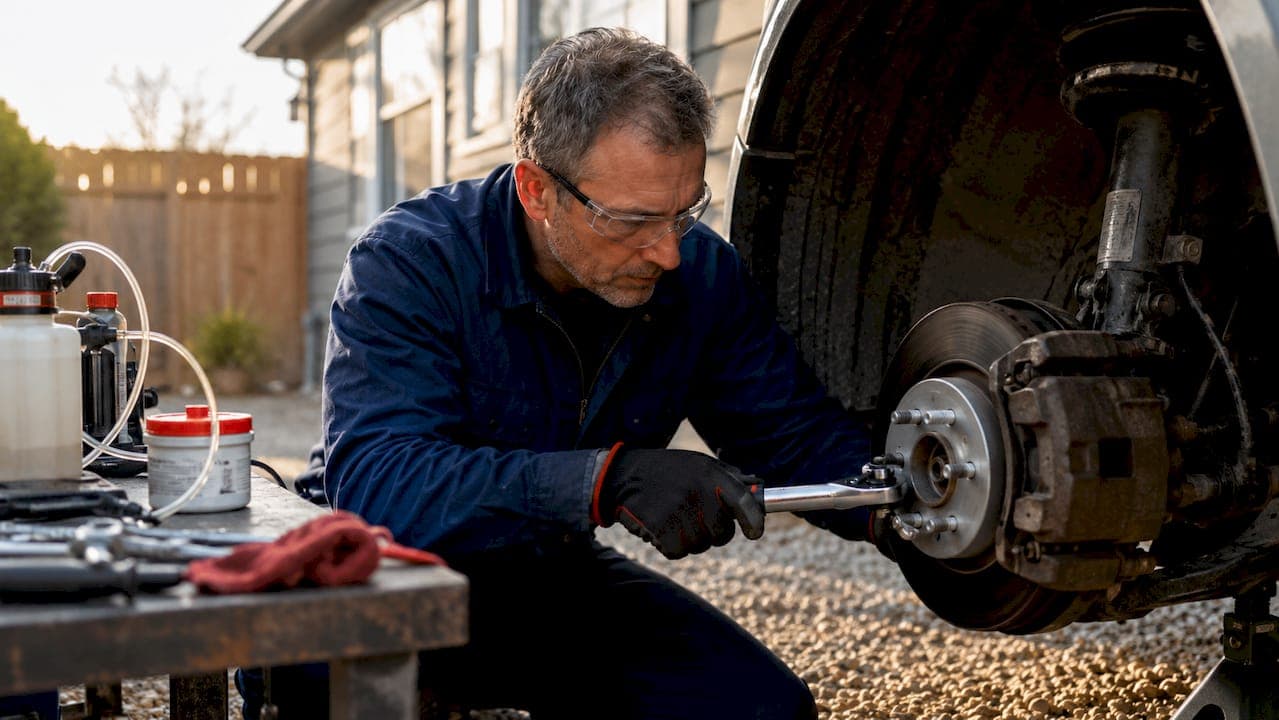
- Support the calliper before removal. Hang a bungee cord or zip tie from the spring or strut to support the calliper. Calipers must never hang by the brake hose because the hydraulic line can tear internally without showing visible damage.
- Remove the calliper bolts and slide the calliper off. Set it on the support you rigged in the previous step. Do not let it swing.
- Remove the calliper bracket. Note the bolt torque spec from your kit's instruction sheet before you discard the old hardware.
- Remove the old rotor. It may be held by a single Phillips screw. If it is seized, tap it from behind with a rubber mallet.
- Clean the hub face. Use a wire brush to remove all rust and debris. Even 0.005 inches of rust on the hub face can cause lateral rotor runout, which produces the steering-wheel vibration drivers often misdiagnose as a wheel balance problem.
- Mount the new rotor. Seat it flat against the hub. Use one lug nut to hold the rotor in position while you verify it sits flush. Using a lug nut to hold the rotor flat against the hub is a simple technique that prevents runout before the wheel goes back on.
- Install the calliper bracket. Hand-thread all bolts first, then torque to spec in a crisscross pattern.
- Install the brake pads. Apply a thin layer of high-temp grease to the pad backing plates and slide pins. Do not get grease on the pad friction surface or the rotor face.
- Compress the calliper piston. Use a C-clamp or piston retractor to push the piston back into the bore. Open the brake fluid reservoir cap first to prevent pressure buildup.
- Reinstall the calliper. Hand-thread the bolts before tightening. Torque to the manufacturer's specification.
- Reinstall the wheel. Torque the lug nuts in a star pattern to the vehicle manufacturer's spec.
- Bleed the brakes. Follow the manufacturer's bleeding sequence, which typically starts at the wheel farthest from the master cylinder. Top up the reservoir as you go.
Pro Tip: Pump the brake pedal firmly several times before moving the vehicle. The pedal should feel firm and return to full height. A soft or spongy pedal means air remains in the system.
Torque reference table
| Component | Typical torque range | Pattern |
|---|---|---|
| Calliper bracket bolts | 80–100 ft-lb | Crisscross |
| Calliper slide pin bolts | 25–44 ft-lb | Sequential |
| Lug nuts | 80–120 ft-lb | Star pattern |
Always confirm torque values against your specific vehicle's service manual. The figures above are general references only.
How to verify proper brake installation and troubleshoot common issues
Verification is not optional. A brake system that feels fine in the driveway can fail under load if installation errors go unchecked.
Check rotor lateral runout. Mount a dial indicator against the rotor face and rotate the rotor by hand. Rotor lateral runout must stay below 0.07mm to prevent vibration under braking. Runout above that threshold means the hub face was not cleaned thoroughly or the rotor is not seated flat.
Verify all torque specs. Go back over every bolt with the torque wrench. Bolts that were hand-tightened and not finalised are the most common cause of calliper movement and uneven pad wear.
Common issues and their causes:
- Soft or spongy pedal. Air in the hydraulic line. Bleed the system again, starting from the farthest wheel.
- Brake pedal sinks to the floor. Incomplete bleeding or a leak at a bleed nipple. Inspect all fittings before driving.
- Grinding noise after installation. Pad backing plate contacting the rotor. Check that grease was applied to the correct surfaces and that the pads are seated in the bracket correctly.
- Vibration under braking. Rotor runout or uneven hub surface. Remove the rotor and re-clean the hub face.
- Uneven pad wear after bedding. Calliper slide pins were not lubricated or are seized. Remove, clean, and re-grease the pins.
Pro Tip: Hand-thread every calliper bolt before applying torque. Cross-threading a calliper bolt into an aluminium bracket destroys the thread and requires a helicoil repair or bracket replacement.
Brake systems are safety-critical. If uncertain at any installation step, stop and consult a certified mechanic. Hydraulic failure or braking loss at speed is not a recoverable situation.
What is brake bedding and how do you do it correctly?
Brake bedding is the controlled process of depositing a thin, even layer of pad material onto the rotor surface. This transfer layer is what gives a new brake kit its full stopping power. Skipping the bedding procedure leads to poor bite, noise, and uneven pad transfer, which reduces braking performance and can damage the rotor surface permanently.
The bedding procedure must happen immediately after installation, on a quiet road with no traffic behind you.
- Accelerate to 50 km/h. Apply moderate brake pressure to slow to 10 km/h. Do not come to a complete stop.
- Repeat five times. Allow 30 seconds between each stop for the brakes to cool slightly.
- Accelerate to 80 km/h. Apply firm brake pressure to slow to 10 km/h. Again, do not stop completely.
- Repeat five times. You may notice light smoke and a slight burning smell. This is normal pad material transferring to the rotor.
- Allow a 10-minute cool-down. Drive gently without using the brakes hard. Do not park and leave the vehicle stationary with the brakes applied, as this can cause uneven pad deposits.
After bedding, the rotor surface should show a light grey, even coating. Uneven or patchy deposits indicate the procedure was rushed or the pads were not seated correctly before starting.
The bedding procedure creates a transfer layer and must be completed immediately after installation for best performance. Driving normally before bedding is complete glazes the pad surface and reduces friction permanently.
Key takeaways
Successful brake kit installation depends on hub preparation, correct torque, proper bleeding, and a completed bedding procedure before normal driving resumes.
| Point | Details |
|---|---|
| Hub cleaning is non-negotiable | Even minor rust on the hub face causes rotor runout and braking vibration. |
| Torque to spec, not by feel | Use a calibrated torque wrench and a crisscross pattern on all bracket bolts. |
| Never hang a calliper by its hose | Support the calliper with a bungee cord to protect the hydraulic line. |
| Bleed until the pedal is firm | A soft pedal after installation means air remains in the system. |
| Complete the bedding procedure | Skipping bedding causes noise, poor bite, and permanent rotor surface damage. |
Why patience is the most underrated brake installation tool
Having done a fair number of brake jobs, the step that separates a clean install from a comeback job is almost always hub preparation. Most DIYers spend 20 minutes on the mechanical work and 30 seconds on the hub face. That ratio should be reversed. Meticulous hub surface cleaning is the single biggest factor in preventing rotor runout, and runout is the root cause of most post-install vibration complaints.
The other thing I see skipped constantly is hand-threading bolts before torquing. It takes 10 seconds per bolt and prevents cross-threading, which is an expensive mistake on an aluminium calliper bracket. The same logic applies to supporting the calliper properly during removal. A torn brake hose is not visible from the outside, and it will fail under pressure at the worst possible moment.
The brake kit that best suits your driving style and vehicle is more important than the most expensive option available. Compatibility with your vehicle's exact year, make, and model is the primary factor for installation success. A mismatched kit creates fitment problems that no amount of careful installation can fix.
If you reach a point in the job where something does not look right or the pedal feel is not correct after two bleeds, stop. A certified mechanic can diagnose the issue in less time than it takes to guess. Brakes are not the place to push through uncertainty.
— Sam
Canadian brake kits and installation supplies from Crossdrilledrotors

Crossdrilledrotors is a Canadian brake specialist offering vehicle-specific brake kits for a wide range of makes and models. Their cross-drilled rotors are engineered to resist warping under heat, and each kit is matched to your vehicle's exact year, make, and model. Kits are available for Ford vehicles, Volkswagen Fastback models, Porsche 356B, and many others. Free shipping applies to orders over $100, and support comes from knowledgeable staff rather than automated responses. For a full catalogue of compatible kits, visit Crossdrilledrotors.
FAQ
How long does a brake kit installation take?
A complete performance brake kit installation on one axle takes 3–6 hours for experienced DIYers, plus approximately one hour for the bedding procedure.
What brake fluid should I use for a performance kit?
Use DOT 4 or DOT 5.1 brake fluid. DOT 4 carries a minimum dry boiling point of 446°F, which prevents vapour lock under the heat generated by performance braking.
Can I install a brake kit without a mechanic?
Yes. A DIY brake kit installation is achievable with a calibrated torque wrench, a piston retractor, a brake bleeding kit, and a clear step-by-step brake replacement guide. Stop and consult a certified mechanic if the pedal remains soft after two full bleeds.
What causes vibration after a brake kit installation?
Rotor lateral runout above 0.07mm is the most common cause. This is almost always the result of rust or debris left on the hub face before the rotor was mounted.
Do I need to bed new brakes after installation?
Yes. The bedding procedure deposits an even transfer layer of pad material onto the rotor. Skipping it causes poor bite, noise, and uneven wear that reduces braking performance permanently.