
Start with pads and fluid. That single change covers most of what street drivers need from a brake upgrade, and it costs a fraction of a big-brake kit. If rotors are worn or warped, replace them at the same time. Reserve a full big-brake kit (BBK) for vehicles that see repeated high-heat braking: track days, mountain descents, towing, or heavy loads that push stock components past their thermal limit.
Start here checklist:
- Pads: swap to a sport-street compound matched to your tyre grip level
- Fluid: replace with a high-temperature DOT 4 or DOT 5.1 fluid before any spirited driving
- Lines (optional but worthwhile): stainless-steel braided lines firm up pedal feel immediately
DBC Brakes carries cross-drilled rotor kits built for Canadian buyers, with inclusive pricing and free shipping on orders over $100. Most street-level brake upgrades are affordable, and the gains in feel and fade resistance are immediate.
Key takeaways
Brake upgrades deliver the best results when components are changed in the correct order, starting with pads and fluid before moving to rotors or a big-brake kit.
| Point | Details |
|---|---|
| Start with pads and fluid | These two changes address most street-driving brake complaints at a fraction of the cost of a BBK. |
| Replace rotors when worn or heat-stressed | Swap rotors when at minimum thickness, warped, or when upgrading to a higher-heat pad compound. |
| BBKs add thermal capacity, not shorter stops | For roughly 95% of street cars, a BBK does not reduce single-stop stopping distance; it is justified for track, towing, and mountain use. |
| Bed in every new pad and rotor set | A correct bed-in protocol and fresh high-boiling-point fluid resolve most perceived brake problems without hardware changes. |
| DBC Brakes for Canadian buyers | DBC cross-drilled rotor kits ship free within Canada on orders over $100, with inclusive pricing and no hidden fees. |
Table of Contents
- What should you upgrade first on your brakes?
- How do brake components actually affect stopping performance?
- Which rotor type is right for your driving?
- What do brake upgrades cost in Canada, and how long does it take?
- How do you choose the right brake upgrade for your vehicle?
- How do you install brake upgrades safely and bed them in correctly?
- Why DBC cross-drilled rotor kits are recommended for Canadian buyers
- What are the most important brake upgrade actions to take?
- What the upgrade order gets right that most guides miss
- Stop paying more for less stopping power
- Sources
What should you upgrade first on your brakes?
The right order matters. Spending money on rotors before replacing worn pads wastes the investment. The priority sequence below is ranked by cost-to-impact ratio, based on layered upgrade strategy guidance that consistently produces the best results for street drivers.
- Brake pads — the single largest factor in bite, fade resistance, and cold-start feel. Compound selection alone changes how the car stops.
- Brake fluid — upgrading to a higher dry-boiling-point fluid is the most cost-effective first step for any performance or track-prep build. Degraded fluid causes a soft, spongy pedal under heat.
- Stainless-steel brake lines — rubber lines expand slightly under pressure; braided lines eliminate that flex and firm up the pedal with no other changes.
- Rotors — replace when worn past minimum thickness, warped, or when moving to a higher-performance pad compound that generates more heat.
- Calipers / big-brake kit — justified only when the stock system runs out of thermal headroom repeatedly, not for a single hard stop.
Pro Tip: If your rotors are already at or near minimum thickness, skip straight to a rotor-and-pad combo rather than buying pads alone. Bedding new pads onto worn rotors produces uneven transfer layers and pulsing.
How do brake components actually affect stopping performance?
Each component in the system does a specific job. Changing one without understanding how it interacts with the others leads to mismatched setups and sometimes worse performance.
Brake pads
Pad compound is the single biggest variable in how a brake system feels and performs. The SAE J866 friction classification system uses two letters to describe cold and hot friction coefficients, giving a consistent way to compare compounds across manufacturers.
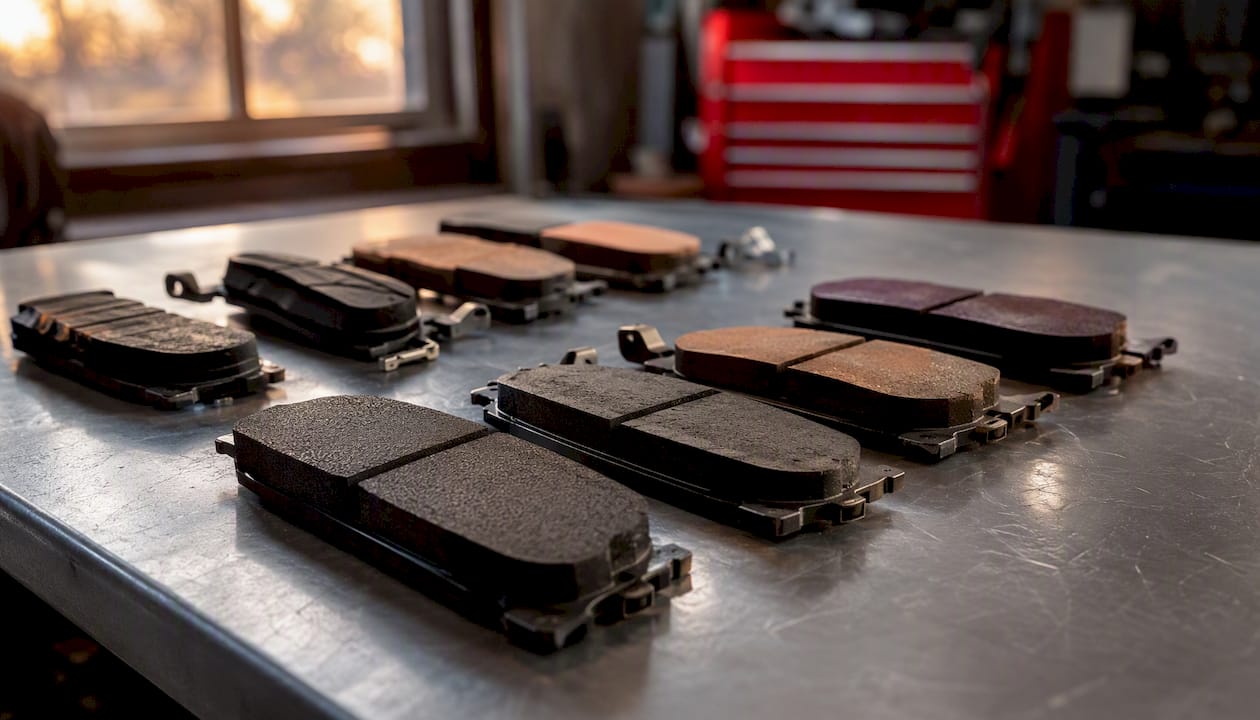
Street compounds prioritise low dust, low noise, and good cold bite. They work well from the first press in cold Canadian winters. Sport-street compounds trade some cold-weather friendliness for better fade resistance above 400°C. Full track compounds need heat to work at all and will feel wooden on a cold morning commute. Dust and noise increase as compound aggression increases.
Rotors
Full-face rotors offer the most friction surface area and are the most durable choice for street use. Slotted rotors channel gas and debris away from the pad face, which helps maintain consistent bite during hard use. Drilled rotors reduce weight and improve heat dissipation but sacrifice some surface area and carry a higher crack risk under repeated thermal cycling. Two-piece floating rotors separate the hat from the disc, allowing independent thermal expansion and reducing rotor warp on high-heat applications.
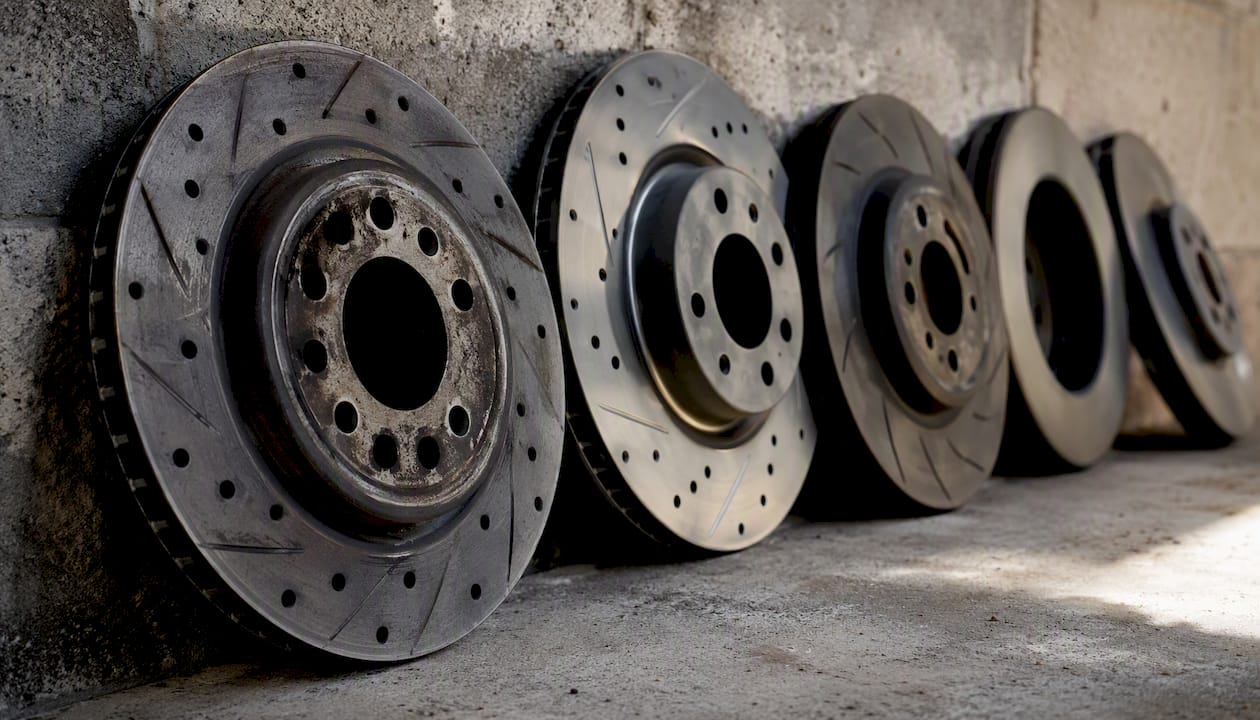
For a detailed breakdown of which rotor design suits your use case, see the quick guide to rotor types in the next section.
Calipers and big-brake kits
A BBK increases rotor diameter, caliper piston area, and pad volume. The larger rotor creates more leverage (mechanical advantage), and the greater pad volume means more material before fade sets in. However, for roughly 95% of street-driven vehicles, a BBK will not reduce one-time stopping distance compared with a well-maintained stock system. Tyres and ABS calibration control peak deceleration on most modern cars. BBKs add thermal capacity and pedal consistency under repeated heavy braking, which is exactly what track days and mountain passes demand.
Piston count and rotor diameter must match vehicle weight and wheel size. More pistons are not automatically better. A kit sized for a 1,800 kg SUV installed on a 1,200 kg sports car can upset brake balance and trigger ABS intervention earlier than stock. For a full breakdown of caliper types, the brake caliper types guide covers fixed vs floating designs and piston configurations.
Brake lines
Rubber brake lines expand slightly under hydraulic pressure. That expansion absorbs pedal travel before it reaches the caliper. Stainless-steel braided lines with PTFE inner liners eliminate that expansion. The result is a firmer, more linear pedal with no change to pads, rotors, or fluid. Lines also last longer and resist cracking from UV exposure and road salt, which matters in Canadian winters. Note that some provincial safety inspections flag non-OEM lines; confirm with your shop before installation.
Brake fluid
DOT ratings define minimum dry and wet boiling points. DOT 3 is the baseline. DOT 4 raises the dry boiling point to at least 230°C. DOT 5.1 raises it further to at least 260°C. Racing fluids (often labelled DOT 4 Racing or DOT 5.1 Racing) push dry boiling points above 300°C. Higher dry-boiling-point fluids are a cost-effective first step for performance driving, and the service interval for track-use fluid is typically every season or every 24,000 km, whichever comes first. Fluid absorbs moisture over time, which lowers the wet boiling point and causes the soft pedal feel many drivers mistake for a pad or rotor problem.
Pro Tip: Match pad compound to tyre grip. A track-compound pad on street tyres will lock the wheels before the brakes fade, which defeats the purpose of the upgrade. The tyre is the limiting factor in deceleration, not the pad.
Statistic callout: Brake fluid condition is one of the most overlooked variables in brake feel. Moisture absorption begins the moment a system is opened, and wet boiling points can drop significantly below dry ratings within a single season of track use, contributing directly to pedal fade under repeated hard stops.
Hardware and maintenance
Slide pins, anti-rattle clips, and shims are consumables. Reusing corroded slide pins causes uneven pad wear and dragging. Replace them with every pad swap. If you are increasing caliper piston area with a BBK, the master cylinder and proportioning valve may need recalibration to maintain front-to-rear brake balance. EV owners face an additional consideration: regenerative braking systems handle most light deceleration, which means friction brakes see less use and pads can glaze over time. Check pad condition more frequently on EVs, and confirm that any aftermarket caliper is compatible with the vehicle's brake-by-wire system. For a full list of what a kit typically includes, the brake kit contents guide is a useful reference.
Which rotor type is right for your driving?
Rotor design affects heat management, surface area, weight, and durability. The right choice depends on how and where you drive.
| Rotor type | Primary advantage | Main trade-off |
|---|---|---|
| Full-face (plain) | Maximum friction surface, most durable | Heaviest; slower heat shedding at track pace |
| Slotted | Clears gas and debris; consistent bite in hard use | Slightly higher pad wear; audible under light braking |
| Drilled | Lighter; improved heat dissipation | Reduced surface area; crack risk under repeated thermal cycling |
| Drilled + slotted | Combined gas venting and debris clearing | Same crack risk as drilled; higher cost |
| Two-piece floating | Allows independent thermal expansion; resists warp | Significantly higher cost; overkill for street use |
| Carbon-ceramic | Extreme heat resistance; very light | Very high cost; requires heat to reach operating range; not suited to cold street use |
Pro Tip: Drilled rotors look aggressive, but on a street car that never reaches sustained high temperatures, the holes reduce friction surface without delivering the heat-management benefit they provide at track pace. Full-face or slotted rotors are the more practical choice for most Canadian daily drivers.
What do brake upgrades cost in Canada, and how long does it take?
Budget and timeline vary by upgrade level. The ranges below are general estimates in CAD for parts and labour in the Canadian market; actual prices depend on vehicle make, shop location, and whether you source parts locally or online.
Typical parts cost ranges (CAD):
- Performance brake pads (per axle): $60–$200
- One-piece performance rotors (per axle): $100–$350
- Two-piece floating rotors (per axle): $400–$900+
- Stainless-steel braided brake lines (full set): $80–$200
- High-performance brake fluid (per litre): $20–$60
- Entry-level big-brake kit (front axle): $800–$2,000
- Full BBK (front + rear, track-spec): $2,500–$6,000+
Choosing which components justify higher spend depends on your driving profile. A daily driver rarely needs two-piece rotors. A car that sees four or more track days per year may find them worthwhile.
Labour time estimates:
- Pad and rotor swap (both front axles): 1.5–2.5 hours at a shop
- Full four-corner pad and rotor replacement: 2.5–4 hours
- Brake line replacement (full set): 2–3 hours, including bleed
- Big-brake kit installation (front): 3–5 hours, including fitment check and bleed
- Full BBK front and rear: 6–10 hours depending on vehicle
Canadian shops vary in labour rates and lead times. Budget $100–$180/hour for shop labour in most urban centres. Book ahead if you are planning a BBK install; some shops require a pre-installation fitment check to confirm wheel clearance before ordering parts.
Shipping and customs notes: DBC Brakes ships within Canada with free shipping on orders over $100, and pricing is inclusive with no hidden fees. Imported components from US or European suppliers may attract customs duties and brokerage fees at the border, which can add $50–$150 or more to the landed cost of a kit. Factor that into any price comparison.
Timeline from order to full break-in:
- Parts sourcing and shipping: 2–7 business days for Canadian stock; 1–3 weeks for special-order or imported kits
- Shop installation: same-day to next-day for pad/rotor swaps; 1–2 days for a full BBK
- Bed-in period: 100–200 km of mixed light and moderate braking before full performance is available
- Follow-up check: torque and fluid inspection recommended at 50–100 km post-install
How do you choose the right brake upgrade for your vehicle?
The right upgrade depends on driving profile, current symptoms, and vehicle fitment. Work through these questions before buying.
Step 1: Define your driving profile
- Daily commuter with occasional spirited driving: pads and fluid are sufficient
- Regular towing or hauling heavy loads: upgrade pads to a higher-temp compound and consider slotted rotors
- Occasional track days (1–3 per year): high-temp fluid, sport-street pads, and stainless lines; rotors if worn
- Frequent track use or time-attack: full brake system review including BBK fitment assessment
Step 2: Assess current symptoms
- Mushy or spongy pedal: fluid or lines first
- Pulsing or vibration under braking: warped or worn rotors
- Fade after repeated hard stops: compound and fluid upgrade
- Squealing or grinding: pad replacement immediately
Step 3: Check fitment before ordering
- Measure wheel inner diameter; a BBK rotor must clear the wheel with at least 3–5 mm of clearance
- Confirm OE rotor diameter and hub bolt pattern before ordering a replacement or upgrade rotor
- Check pad availability for any caliper you are considering; some track-spec calipers have limited pad options in Canada
- Verify master cylinder compatibility if changing caliper piston area; a significant increase in piston area without a larger master cylinder can reduce pedal travel and feel
For a structured fitment checklist, the brake kit compatibility guide covers adapter brackets, wheel clearance, and hub specs in detail.
Red flags that indicate a shop consultation is needed:
- Wheel interference with the new rotor or caliper
- ABS warning light after installation
- Brake pedal goes to the floor after bleeding
- Uneven brake bias causing pull under hard braking
If you are also planning power upgrades, the relationship between increased output and braking demand is worth understanding. A stage 2 hardware upgrade that raises power output meaningfully will increase the thermal load on the brake system, which can push a stock setup past its limits faster.
How do you install brake upgrades safely and bed them in correctly?
Installation sequence and bed-in procedure directly affect how well the upgrade performs. Skipping either step produces uneven pad transfer layers, pulsing, and reduced fade resistance.
Pad and rotor swap: high-level steps
- Lift and support the vehicle on jack stands; never work under a vehicle on a jack alone
- Remove the wheel and caliper; hang the caliper with a wire hook, never let it hang by the brake line
- Remove the old rotor; clean the hub face with a wire brush to remove rust scale
- Install the new rotor; torque the retaining screw or bolt to spec
- Install new hardware (anti-rattle clips, slide pins) before fitting the new pads
- Compress the caliper piston carefully; check that the master cylinder reservoir does not overflow
- Reinstall the caliper to torque spec; reinstall the wheel to torque spec
- Pump the brake pedal until firm before moving the vehicle
For a BBK installation, the same sequence applies with additional steps: bracket fitment, caliper alignment, and a full system bleed with fresh fluid.
Bed-in procedure
Bedding deposits a thin, even layer of pad material onto the rotor surface. Without it, the first hard stop glazes the rotor unevenly and causes pulsing.
- Find a safe, empty road or parking area
- Accelerate to 60 km/h; apply moderate brake pressure to slow to 10 km/h without stopping fully
- Repeat 6–8 times, allowing 30–60 seconds between applications for cooling
- Accelerate to 80 km/h; apply firm brake pressure to slow to 10 km/h, again without stopping fully
- Repeat 4–6 times with cooling intervals
- Allow the brakes to cool completely before parking; do not apply the handbrake while rotors are hot
Bed-in and fluid condition are often overlooked, yet they directly affect repeatability and feel. A correct bed-in protocol and fresh, high-boiling-point fluid will resolve many perceived brake problems without any hardware changes. Source: OG Racing
Safety warnings
- Never mix DOT 3/4/5.1 (glycol-based) with DOT 5 (silicone-based) fluid; they are incompatible
- Increasing caliper piston area without recalibrating the proportioning valve can shift brake bias forward and cause rear-wheel lockup
- Boiling fluid produces a compressible vapour bubble in the line; the pedal goes to the floor with no warning. Use fluid rated for your actual operating temperature, not just the minimum DOT spec
- EV owners: confirm that aftermarket calipers are compatible with the vehicle's brake-by-wire or regenerative braking system before installation; some systems require recalibration after any caliper change
Pro Tip: After 50–100 km of normal driving post-install, re-torque all wheel bolts and caliper bolts, and perform a visual fluid check. Thermal cycling can slightly loosen fasteners, and a small bleed at this point catches any air introduced during installation.
Why DBC cross-drilled rotor kits are recommended for Canadian buyers
DBC Brakes engineers its cross-drilled rotor kits specifically to resist warping under thermal cycling, which is the most common failure mode for stock rotors on vehicles driven hard or used for towing. The cross-drilled pattern improves heat dissipation and reduces rotor mass compared with a full-face replacement, without the crack risk of purely decorative drilling.
Kit highlights:
- Engineered cross-drilled design for warp resistance and improved cooling
- Compatible with a wide range of cars, trucks, and performance vehicles; confirm fitment by make, model, and year at Crossdrilledrotors
- Inclusive pricing with no hidden fees; free shipping within Canada on orders over $100
- Typical delivery: 2–7 business days for in-stock Canadian inventory
- Kits pair directly with pad upgrades, stainless lines, and fluid changes for a complete system upgrade
For daily drivers, a DBC cross-drilled rotor kit combined with a sport-street pad compound and fresh DOT 4 fluid covers the full upgrade path without the cost or fitment complexity of a BBK. For vehicles that see occasional track use, the same kit with a higher-temp fluid and a track-oriented pad compound handles the additional thermal load.
Pro Tip: Bring your OE rotor diameter, hub bolt pattern, and wheel inner diameter measurement to your installer before ordering. That information confirms clearance and bracket compatibility in one conversation, avoiding a return trip.
What are the most important brake upgrade actions to take?
Upgrading your brakes produces the best results when changes are made in the right order and matched to actual driving demands.
- Start with pads and fluid. These two changes address the majority of street-driving brake complaints and cost far less than rotors or a BBK.
- Replace rotors when worn or warped, or when moving to a higher-heat pad compound that exceeds the thermal rating of the stock rotor.
- Add stainless-steel lines for a firmer pedal feel; particularly worthwhile on older vehicles with original rubber lines.
- Reserve a BBK for repeated high-heat use. BBKs primarily add thermal capacity, not shorter single-stop distances. They are justified for track use, towing, and mountain driving, not for street-only vehicles.
- Bed in every new pad and rotor set before relying on the system at full performance. Skip this step and the rotors will pulse.
- Service fluid every season for track-use vehicles, or every 24,000 km for street use. Moisture-saturated fluid is the most common cause of a soft pedal under heat.
What the upgrade order gets right that most guides miss
Most brake upgrade articles spend the bulk of their word count on big-brake kits. The engineering case for a BBK is real, but it applies to a narrow slice of drivers. The majority of people who feel their brakes are underperforming are driving on degraded fluid and stock pads that have never been matched to their driving style.
The pad-first, fluid-second sequence is not a budget compromise. It is the correct sequence for any vehicle that does not regularly exceed the thermal limits of its stock hardware. A sport-street compound on fresh DOT 4 fluid, bedded in properly, will feel dramatically different from a stock setup on two-year-old fluid. That difference costs under $300 in most cases.
BBKs earn their place on vehicles where the stock system genuinely runs out of thermal headroom: repeated track sessions, sustained mountain descents, or heavy towing. For those applications, choosing the smallest kit that meets the performance criteria reduces weight and cost penalties without sacrificing the thermal capacity gain. Oversizing a BBK adds unsprung weight, requires larger wheels, and can upset brake balance without delivering any measurable benefit over a correctly sized kit.
The other point most guides understate: tyre grip limits peak deceleration before the brakes do on most modern cars. Upgrading brakes on a car with worn or low-grip tyres produces no measurable improvement in stopping distance. Address tyres first if they are the weak link.
Stop paying more for less stopping power
DBC Brakes offers cross-drilled rotor kits engineered for Canadian driving conditions, with inclusive pricing that covers everything upfront. No hidden fees, no brokerage surprises, and free shipping within Canada on orders over $100.

The kits are compatible with a wide range of cars, trucks, and performance vehicles. They pair directly with pad upgrades, stainless lines, and fluid changes for a complete system build. For daily drivers, a DBC kit with a sport-street pad and fresh fluid covers the full upgrade path. For track-use vehicles, the same rotor design handles higher thermal loads without the cost or fitment complexity of a full BBK.
Check fitment by make, model, and year, then order directly at Crossdrilledrotors.
Sources
The following sources were used to build this guide. They cover both the engineering analysis and the practical shopping side of brake upgrades.
- Everything You Need To Know About Brake Upgrades
- Brake Upgrade Path Explained: Pads vs Rotors vs Big Brake Kits
- Are Big Brake Kits Worth It? Complete BBK Engineering Analysis Guide – AME Motorsport
- Big Brake Kit Guide: Components, Fitment & Performance | TEI BRAKES
- Big Brake Kits Explained | Fast Car