
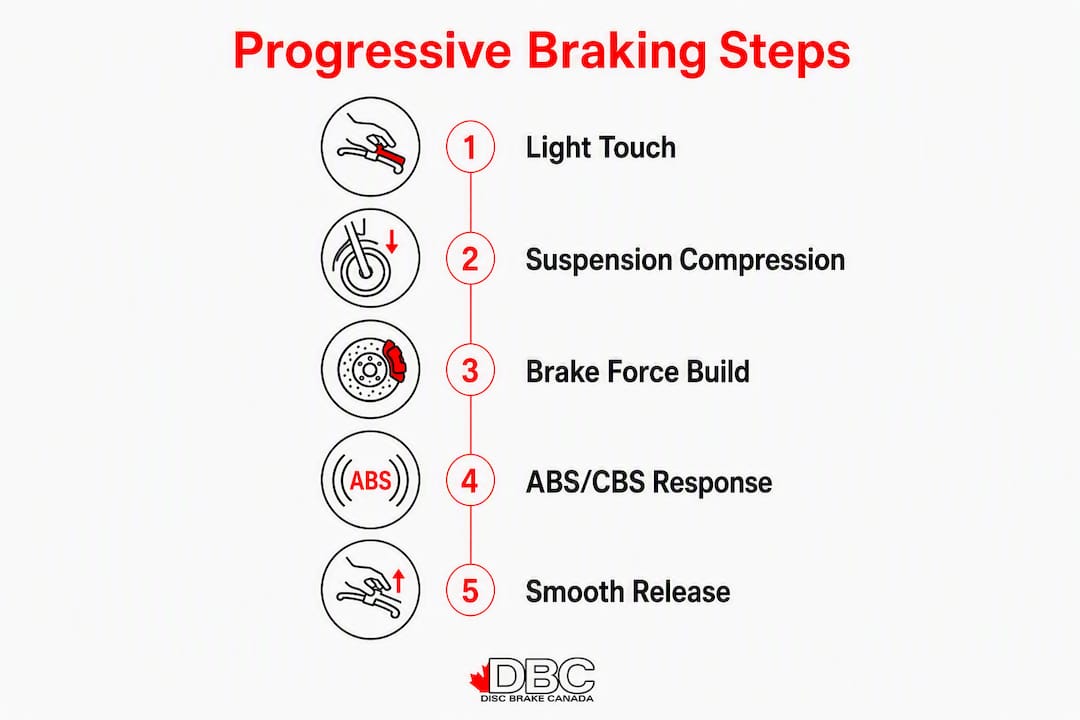
Progressive braking is a staged, smooth increase of brake force — starting with a light initial touch, building steadily, then easing off to roll to a stop — so the suspension and tyres load predictably at every phase. It is the standard technique taught in driver and motorcycle training programmes across Canada, and it is the foundation of safe, controlled stopping.
Three benefits stand out:
- Improved stability and control. A staged brake input lets weight transfer forward gradually, keeping the vehicle balanced and steerable throughout the stop.
- Reduced component and tyre wear. Smoother braking patterns avoid the repeated high-energy, high-slip events that wear pads, rotors, and tyres faster.
- Clearer warning to following traffic. Progressive deceleration activates brake lights in a predictable, graduated way, reducing the risk of rear-end collisions.
TL;DR: Practise the light initial touch (roughly 20% pressure for the first half-second), then build smoothly. Skipping that first phase is what causes skids and premature ABS activation.
Table of Contents
- How does progressive braking work?
- How to apply progressive braking step by step
- How progressive braking differs between motorcycles and cars
- Common mistakes when learning progressive braking
- Three drills to build progressive braking skill
- What the evidence says about progressive braking
- Key takeaways
- The technique most learners get wrong on day one
- Useful sources and Canadian training resources
How does progressive braking work?
The physics start the moment you touch the brake. Weight shifts forward, compressing the front suspension and increasing the load on the front tyre's contact patch. That contact patch is what generates grip. Apply force too quickly and the tyre cannot build grip fast enough — the result is wheel lock, a skid, or an ABS intervention that robs you of steering control.
Progressive braking sequences this load deliberately: a light initial touch allows the suspension to compress and the tyre to seat into the road surface, then a smooth build takes the system to maximum force once grip is established. The tyre contact patch expands as load increases — but only if the load arrives progressively.
ABS and CBS behaviour changes depending on how the input arrives. ABS monitors wheel deceleration rate. A sudden, hard input can spike that rate past the ABS threshold before the tyre has loaded, triggering a pulse that interrupts braking and steering. A smooth build keeps the deceleration rate below the threshold until the tyre is fully loaded, so ABS activates only when it is genuinely needed. CBS (combined braking systems, common on motorcycles) distributes force between front and rear automatically, but it still responds better to a progressive input than to a grab.
| Brake input | Suspension response | Tyre load | ABS/CBS interaction |
|---|---|---|---|
| Light (initial touch, ~20%) | Begins to compress | Contact patch starts loading | Below threshold — no intervention |
| Medium (build phase, ~50–70%) | Fully compressed | Contact patch fully loaded | Near threshold — controlled |
| Firm (maximum, ~80–100%) | Compressed and stable | Maximum grip available | Threshold reached — intervention only if tyre slips |
Pro Tip: ABS can mask poor technique. On ABS-equipped vehicles, a hard grab may not cause a skid, but it will trigger ABS pulses that extend stopping distance and reduce steering authority. Practising progressive braking builds the muscle memory that keeps you in control whether ABS fires or not.
How to apply progressive braking step by step
Pre-practice checklist
Before any practice session, confirm these conditions:
- Large, flat, empty area (a quiet car park works well)
- Dry surface for initial sessions; move to damp surfaces only after the technique is consistent
- Riders: full protective gear including helmet, gloves, jacket, and boots
- A spotter or cones to mark stopping targets
- A clear following gap of at least 4 seconds from any other vehicle
Car technique
- Identify the stop point and begin releasing the accelerator early. Forward planning reduces how hard you need to brake.
- Apply initial touch — roughly 20% pedal pressure for the first 0.5 seconds. You should feel the front of the car dip slightly as weight begins to transfer.
- Build steadily over the next 0.5–1 second to the force required for the stop. The pedal should feel progressively firmer as the brake caliper clamps harder.
- Hold or modulate at the required force until the vehicle slows to the target speed.
- Ease off in the final metre or two so the car rolls to a smooth stop rather than pitching forward.
The bite point — the moment the pads contact the rotor with meaningful force — is the cue to begin your build. Learn to feel it rather than guess it.
Motorcycle technique
- Roll off the throttle before touching either brake. Closing the throttle begins engine braking and settles the chassis.
- Apply initial front-lever contact — a gentle squeeze, not a grab. The front forks will begin to compress. This is your signal that the tyre is loading.
- Squeeze progressively over the next 0.5–1 second, increasing lever pressure as the forks compress further and grip builds.
- Modulate the rear brake simultaneously with light, steady foot pressure. The rear contributes stability, not primary stopping power.
- Maintain body position — slightly forward, arms relaxed. Tense arms transmit vibration and reduce lever feel.
- Ease both brakes as the bike slows to walking pace, and release the clutch to prevent stalling.
Pro Tip: On motorcycles, the front brake provides the majority of stopping power, but an abrupt front-lever grab overloads the contact patch before the forks have compressed. The fork compression is your confirmation that the tyre is seated and ready for more force.
How progressive braking differs between motorcycles and cars
The core principle is identical, but the controls, geometry, and risk profile are different enough to treat them separately.
Control interface. A car driver uses a pedal with the right foot, which allows consistent, measurable pressure. A motorcycle rider uses a hand lever for the front brake and a foot pedal for the rear — two independent inputs that must be coordinated while also managing throttle and clutch.
Chassis geometry and balance. A car's four-contact-point stance is inherently stable under braking. A motorcycle pitches forward on two points, and the rider's body position directly affects how the chassis loads. Sitting too far back during braking reduces front tyre load; sitting too far forward can overload it.
Braking power distribution. On most motorcycles, the front brake generates roughly 70–80% of stopping force. That front-heavy distribution makes the initial touch phase more critical on a bike than in a car — the margin for error is narrower.
Scenario snapshots:
Urban stop from 50 km/h. In a car, a smooth pedal build over 1.5–2 seconds stops the vehicle cleanly. On a motorcycle, the same stop requires throttle rollback first, then a coordinated front-lever squeeze and rear-pedal press, with the rider's weight slightly forward.
Wet surface. Both vehicles need a lighter initial touch and a slower build. On a motorcycle, wet roads reduce the contact patch's grip ceiling significantly, so the build phase must be extended and maximum force kept lower.
Braking into a corner. Cars can carry some braking into a corner entry, but trail braking requires practice. On a motorcycle, braking while leaned over loads the tyre laterally and longitudinally at the same time — a combination that can exceed grip limits quickly. Riders should complete most braking before the turn-in point.
Common mistakes when learning progressive braking
Grabbing the brake. The most frequent error, particularly under stress. Instant high force spikes tyre load before the contact patch can respond. Hard or grabby braking causes violent weight transfer and risks wheel lock. The corrective drill: practise 10 consecutive slow stops in an empty lot, focusing only on the first half-second. If the nose dips sharply, the initial touch was too hard.
Braking mid-turn. Applying significant brake force while cornering splits the tyre's grip between lateral and longitudinal demands. For cars, light trail braking is a learnable skill; for new riders, it is a reliable way to run wide. Correct by completing braking before the turn-in point.
Riding the rear brake. Keeping constant light pressure on the rear brake while riding generates heat, glazes pads, and reduces rear tyre grip. It is not the same as modulated rear braking during a stop. Release the rear brake fully when not actively stopping.
Expecting ABS to compensate. ABS prevents wheel lock; it does not shorten stopping distance on its own, and it cannot restore steering authority lost to a poorly loaded tyre. Progressive braking is still the correct technique on ABS-equipped vehicles.
Pro Tip: To retrain a grabbing habit, use a spotter standing to the side. Ask them to watch your brake lights. A single, abrupt flash means you grabbed. A gradual brightening means you built progressively. Ten stops with consistent gradual light activation is a measurable session goal.
Three drills to build progressive braking skill
Drill 1: Slow approach stops
Purpose: Build the initial touch habit at low speed where the consequences of error are minimal.
Setup: Mark two cones 20 metres apart in a flat, empty area. Approach the first cone at 20 km/h.
- At the first cone, apply initial light pressure for a brief moment.
- Build to a comfortable stop before the second cone.
- Monitor: does the vehicle nose-dip sharply at the first cone? If yes, reduce initial pressure.
- Repeat 10 times. Increase approach speed to 30 km/h only when the initial touch feels consistent.
Drill 2: Progressive emergency build
Purpose: Teach controlled high-force stops using a staged increase rather than a single grab.
Setup: Same cone layout. Approach at 40 km/h.
- At the first cone, apply initial touch as in Drill 1.
- Build rapidly but smoothly to maximum force over 0.5 seconds.
- Hold maximum force until the vehicle stops.
- Observer cue: watch for ABS activation (pulsing pedal or lever). If ABS fires on the first attempt, the build was too fast. Slow the build until ABS activates only near the stop point.
Safety note: Riders must wear full protective gear. Run this drill at 40 km/h maximum until the technique is consistent.
Drill 3: Variable-surface modulation
Purpose: Learn how much build is safe on reduced-traction surfaces.
Setup: A damp or slightly loose surface (a wet car park after light rain). Approach at 20 km/h only.
- Apply initial touch as normal.
- Build more slowly than on dry pavement — extend the build phase to 1.5–2 seconds.
- Note the point at which the vehicle begins to feel unstable. That is your traction ceiling for that surface.
- Repeat until you can identify the ceiling consistently without reaching it.
Practice safety checklist:
- Riders: helmet, gloves, jacket, boots — every session, every drill
- Clear the area of pedestrians and other vehicles before each run
- Use a spotter to observe brake-light behaviour and vehicle pitch
- Start each new drill at the lowest recommended speed; increase only after 10 consistent repetitions
- Check brake fluid condition before extended practice sessions — degraded fluid reduces pedal feel
Measuring improvement: Track stopping distance from a fixed approach speed across sessions. Smoother deceleration profiles reduce stopping distance over time. Passenger comfort feedback is a reliable secondary measure — if passengers stop bracing, the technique is working.
What the evidence says about progressive braking
Driving-school guidance consistently identifies progressive braking as superior to inconsistent or hard braking for passenger safety and comfort, reduced tyre and component wear, and improved vehicle stability. The technique also gives following drivers a clearer, more predictable signal — graduated brake-light activation reduces the likelihood of erratic speed changes that contribute to rear-end collisions.
The initial touch timing is commonly recommended to allow suspension compression and tyre loading before the build phase begins. Instructors describe this as the single most important habit to develop, because it is the phase most commonly skipped under pressure.
Defensive driving research frames progressive braking as an anticipation skill as much as a pedal technique. Skilled drivers use forward planning to reduce the frequency and severity of full stops, which extends component life and keeps passengers comfortable. Brake pads and tyres last longer when the vehicle avoids repeated high-energy, high-slip braking events.
For Canadian drivers and riders, provincial driver and motorcycle handbooks cover braking technique as part of the standard licence curriculum. Searching "motorcycle safety course [your province]" will surface certified MTO, ICBC, or SGI-approved programmes depending on your region. These courses include supervised braking drills with instructor feedback — the fastest way to build consistent technique.
Key evidence points:
- Progressive braking reduces tyre and brake component wear by avoiding high-slip braking events
- Smoother deceleration keeps the vehicle balanced for steering inputs during the stop
- ABS performs better with a progressive input than with a sudden grab
- Forward planning reduces the number of full stops, compounding the wear and comfort benefits
Key takeaways
Progressive braking — a staged light-touch, build, and ease sequence — is the most reliable technique for safe, controlled stops in both cars and motorcycles.
| Point | Details |
|---|---|
| Definition | Progressive braking stages brake force: light initial touch, smooth build, ease to stop. |
| Initial touch timing | Apply roughly 20% pressure for the first 0.5 seconds to let suspension and tyres load. |
| Practice progression | Start at 20 km/h in an empty lot; increase speed only after 10 consistent repetitions. |
| Emergency stops | Build force quickly but smoothly — never grab. A fast, staged build is still progressive. |
| ABS interaction | A smooth build reduces premature ABS activation and preserves steering control. |
The technique most learners get wrong on day one
Most new learners arrive with the same habit: they wait until they feel urgency, then apply full brake force in one motion. It works often enough on dry roads with ABS that it never gets corrected — until a wet surface or a tight stop exposes it.
The drill that fixes it fastest is also the simplest. Find a flat, empty car park. Set two cones 20 metres apart. Approach at 20 km/h. For the first 10 stops, focus on nothing except the initial touch — that first half-second of light pressure before the build. Do not worry about stopping distance. Do not try to stop hard. Just practise the touch.
After 10 stops, most drivers and riders can feel the difference between a touch and a grab. That feeling is the foundation everything else builds on.
Progressive braking does not mean braking slowly. It means braking in the right sequence. A well-executed emergency stop using progressive technique — quick initial touch, rapid smooth build to maximum force — is shorter and safer than a panic grab, because the tyres are loaded and gripping before maximum force arrives.
DBC Brakes builds brake kits with cross-drilled rotors engineered to handle consistent, high-quality braking inputs. Good technique and good components work together — neither substitutes for the other.
Useful sources and Canadian training resources
The following resources support further reading on progressive braking technique, provincial training, and brake system mechanics:
- Normal braking: three phases — SmartDriving: Phase-by-phase breakdown of progressive braking with vehicle balance notes.
- Advantages of progressive braking — DrivingTheory4All: Theory-test framing of the key benefits, useful for new drivers.
- Motorcycle braking skills — Motorcycle Training Concepts: Five practical tips for improving lever feel and avoiding grabby inputs.
- Emergency braking systems — DBC Brakes blog: Covers when to switch from progressive to emergency braking and the systems involved.
- CrossDrilledRotors.ca: DBC Brakes brake kits and cross-drilled rotors for cars, trucks, and performance vehicles, with free shipping on Canadian orders over $100.
To find certified instruction in Canada, search "motorcycle safety course [your province]" or "advanced driver training [your province]." Provincial programmes through MTO (Ontario), ICBC (British Columbia), and SGI (Saskatchewan) include supervised braking drills with instructor feedback.