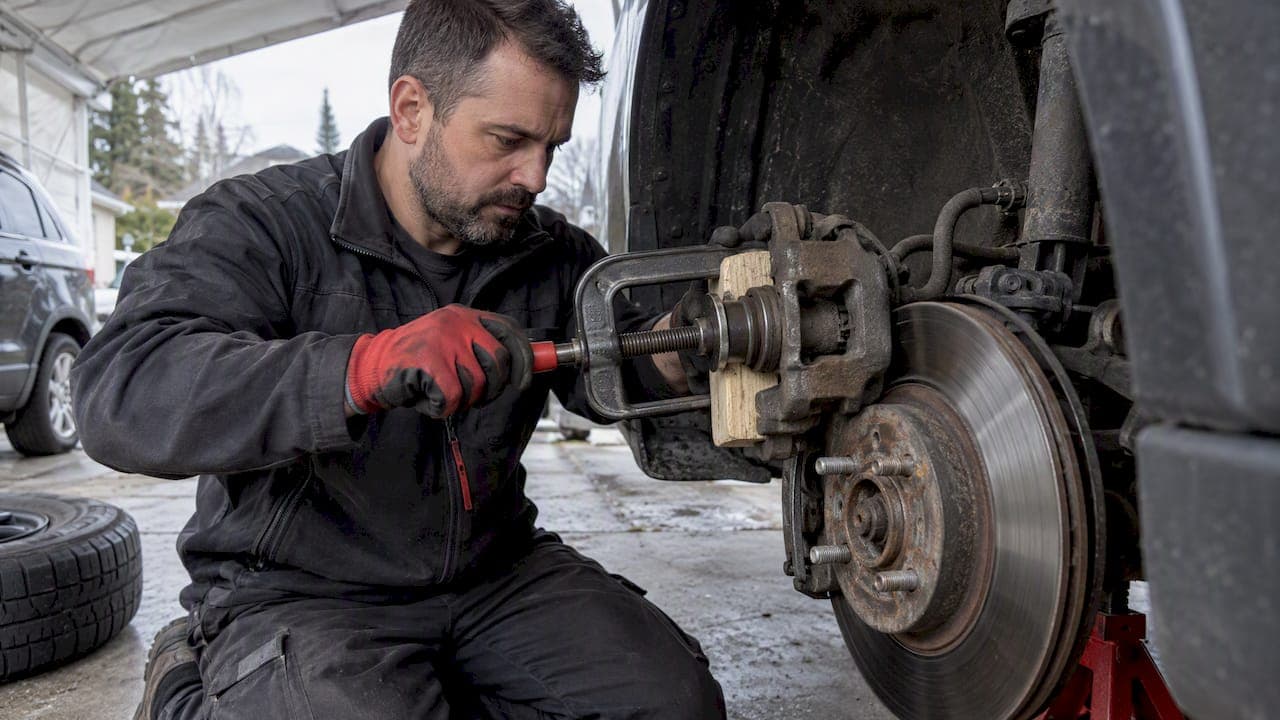
Try a controlled push first. Use a C-clamp or a dedicated piston tool to compress the piston back into the bore. If the piston or bore shows pitting, corrosion, or only moves after excessive force, plan to replace the caliper instead of forcing a repair. Before touching any tool, park on level ground, chock the wheels, support the vehicle on stands, and skip uncontrolled compressed air.
TL;DR:
- A stuck caliper piston often shows warning signs such as brake drag, uneven pad wear, or one wheel running hotter than the other, worsening over weeks.
- Initial attempts to free a piston should use a C-clamp or piston tool with controlled air pressure, supplemented by penetrating fluid and proper safety measures.
- If the bore is pitted, corroded, or shows flaking, replacing the entire caliper is advisable; rebuilding is only worthwhile when surfaces are smooth and lightly corroded.
- Proper inspection of the piston movement, seal condition, and guide pin lubrication during repairs significantly reduces the risk of repeat sticking.
- Routine maintenance, including guide pin lubrication and regular brake fluid changes, helps prevent caliper seizing, extending brake system reliability.
Table of Contents
- Symptoms and quick tests to confirm a stuck caliper piston
- Tools you need and safety precautions before you start
- Stepwise methods to free a stuck piston
- When to rebuild the caliper and when to replace it
- Concise procedural checklist to rebuild a single-piston caliper
- Brake bleeding and verification after freeing or replacing a piston
- Common errors and how to avoid repeat seizure
- Sam's expert notes and critical safety guidance
- Mechanic's quick checklist: habits to prevent seized pistons
- Where to get replacement rotors, pads and kits
- FAQ
- Sources
Symptoms and quick tests to confirm a stuck caliper piston
A stuck piston rarely announces itself all at once. It shows up as a pattern of small warning signs that get worse over a few weeks of driving.
Watch for these symptoms:
- Brake drag: the car feels like it's working against light resistance even with your foot off the pedal.
- Uneven pad wear: one pad wears thinner than its partner on the same axle.
- Hot wheel or rotor: one side runs noticeably hotter than the other after a short drive.
- Pulling to one side: the vehicle veers during braking because one caliper is grabbing more than the other.
- Reduced fuel economy: constant light drag forces the engine to work harder than it should.
These signs on their own point toward a sticking piston, but a few quick checks confirm it. Brake drag, uneven pad wear, and a hot wheel or rotor are widely recognized diagnostic signs that a caliper piston is sticking and needs inspection.
Start with the wheel spin test. Jack up the affected corner, support it on a stand, and spin the wheel by hand with the caliper still installed. A wheel that spins freely with light, even resistance is probably fine. One that drags, grinds, or stops quickly suggests the pad is pressing against the rotor when it shouldn't be.
Next, pull the caliper (leaving the brake line connected) and watch the piston as you apply light pressure with a C-clamp or pry bar. Smooth, even movement back into the bore means the seal and bore are in reasonable shape. Movement that's jerky, uneven, or requires real force points to corrosion inside the bore or a collapsed seal.
Finally, check the dust boot. A torn or cracked boot lets water and road salt reach the piston and bore, which is the most common cause of corrosion in the first place. Look for a greenish or brown crust around the piston edge. Visible pitting or scoring in the bore typically means the caliper should be replaced rather than rebuilt for long-term reliability.

For more detail on reading pad wear patterns, see what brake pad wear tells you about the condition of your calipers.
Soft, even piston movement during your test means you're likely dealing with a freeable piston. No movement, rough movement, or visible flaking means you're looking at a deeper problem that a quick push won't fix.
Tools you need and safety precautions before you start
A stuck piston job goes faster and safer with the right gear on hand before you start.
Gather these tools:
- C-clamp or dedicated piston compression tool: controls the push and avoids gouging the piston face.
- Penetrating fluid: works into the gap between piston and bore to loosen corrosion.
- Compressed-air regulator: lets you control pressure precisely rather than relying on a shop line's full output.
- Torque wrench: confirms caliper bolts and brake line fittings are tightened to spec, not guessed at.
- Jack stands: hold the vehicle securely while you work underneath or beside a wheel.
Safety comes first on every step:
- Chock the wheels that stay on the ground before you jack anything up.
- Support the vehicle on stands rated for its weight, never on a jack alone.
- Wear eye protection any time you're compressing fluid or using air pressure near a piston.
- Place a containment block, a wooden block or a loose C-clamp, over the piston path before using compressed air.
- Start air pressure at the lowest setting your regulator allows and increase gradually.
The compressed-air method deserves extra caution because a piston under pressure can become dangerous if it's ejected suddenly. According to Transport Canada's winter driving preparation guidance, technicians extracting a seized piston with air pressure should start at the lowest possible setting and use a wooden block or loose C-clamp as containment, since a sudden release can turn the piston into a high-velocity projectile. Skip any makeshift shield made from cardboard or plastic sheeting; neither stops a piston moving at speed.
Pro Tip: Thread the air nozzle into the brake line fitting rather than holding it loosely against the port. A secure connection keeps pressure consistent and keeps your hands clear of the piston's travel path.
Stepwise methods to free a stuck piston
Work through these methods in order. Each one is less invasive than the next, and you only move forward when the current method fails.
- C-clamp or piston tool compression. Position the clamp across the caliper body and piston face, then tighten slowly and steadily. Watch for smooth, even movement as the piston retreats into the bore. A careful push with a C-clamp or dedicated compression tool is the safest first-line method, and success shows up as controlled movement with restored clearance between pad and rotor. This takes 5 to 15 minutes. If the piston won't budge after firm, steady pressure, stop and move to soaking.
- Penetrating fluid soak. Remove the caliper from the mounting bracket, leaving the brake line attached, and spray a penetrating fluid like PB Blaster or Liquid Wrench around the piston edge where it meets the boot. Let it sit for 15 to 30 minutes, then try compressing again. Repeat the cycle two or three times if needed. A 15 to 30 minute soak is often enough to free stuck components safely, according to our guide on removing a stuck rotor, and the same soak principle applies to a seized piston. Smooth movement after a soak cycle means you're close; still no movement after three cycles means the corrosion is likely deeper than surface level.
- Controlled compressed-air push. With the brake line still connected and the clamp or wooden block in place over the piston path, apply the brake pedal gently or use a hand pump to build line pressure while a helper watches the piston. Alternatively, disconnect the line briefly and use a regulated air nozzle at the lowest setting, increasing gradually. The piston should ease out smoothly, caught by your containment block. If it jumps or resists at low pressure, stop immediately rather than increasing the air setting further.
- Local heat or soak to loosen seized seals. Apply moderate heat with a heat gun around the caliper body, not directly on the piston or rubber boot, for 5 to 10 minutes. This can soften rust bonding between the piston and seal. Keep the heat gun moving and protect nearby rubber lines and wiring from direct contact. If the piston still won't move after a heat cycle combined with fluid, the bore itself is probably compromised.
- Full caliper removal and piston extraction. At this stage, remove the caliper completely and bring it to a bench. Use a dedicated piston removal tool or a hydraulic press designed for the job, never pliers or channel locks, which can score the piston surface. Inspect the bore closely under good light for pitting, scoring, or flaking metal. If a piston moves only after repeated hard impacts or shows metal flakes, don't reuse the piston or seals; replace the caliper or install a remanufactured unit.
Across these five methods, the C-clamp push resolves the problem in the majority of straightforward cases where corrosion hasn't reached the bore itself. Using a piston-specific compression tool rather than improvised pliers also reduces the risk of misaligning the piston and damaging the dust boot during the push.
When to rebuild the caliper and when to replace it
Not every stuck piston deserves a rebuild. The decision comes down to what you find once the piston is out and the bore is visible.
Replace the caliper when you see:
- Pitting or scoring on the bore wall that you can feel with a fingernail.
- Flaking or crusted corrosion that doesn't clean off with fine abrasive pads.
- Repeated sticking after a prior rebuild, which suggests the bore itself is compromised.
Rebuilding is reasonable when the bore is smooth, the piston shows only light surface corrosion that cleans up easily, and the dust boot and seal grooves are undamaged. A clean rebuild with new seals can last several years under normal driving conditions, provided the bore wasn't already degrading.
Cost and time expectations differ meaningfully between the two paths. A rebuild kit with new seals and a dust boot is the cheaper route in parts, but it adds bench time for cleaning, inspecting, and carefully seating the new seal without nicking it. A reman or new caliper costs more upfront but installs in a fraction of the time, since you're bolting on a unit that's already sealed and tested.
The long-term trade-off matters more than the sticker price. Many DIYers manage to free a piston temporarily without addressing underlying bore corrosion or damaged seals. Technicians generally recommend replacing the caliper outright when the bore is compromised, because that's the only way to prevent the same failure from repeating within a season or two. For a closer look at the inspection criteria technicians use, see caliper problems: signs, causes, and fixes.
Concise procedural checklist to rebuild a single-piston caliper
A caliper rebuild rewards patience more than raw mechanical skill. Follow this order and you'll avoid most of the common failure points.
- Prepare the work area. Drain or clamp off the brake line to limit fluid loss, lay down a drain pan, and protect painted surfaces from brake fluid, which strips clear coat on contact.
- Remove the caliper. Unbolt it from the bracket, support the hanging weight so the brake line isn't stressed, and set it on a clean bench.
- Extract the piston. Use compressed air or a hydraulic piston tool with the containment block in place, following the same low-pressure approach described earlier.
- Clean and inspect. Wipe the bore and piston with brake cleaner, then check both surfaces under good light for pitting, scoring, or corrosion before deciding to proceed.
- Assess the seal groove. Run a fingernail around the inner seal groove; any roughness or corrosion there is a sign the caliper belongs in the replace category, not the rebuild one.
- Install the new seal. Lubricate it lightly with clean DOT brake fluid, not grease or petroleum products, which swell rubber seals and cause premature failure.
- Reinstall the piston. Push it in squarely and evenly, rotating slightly if your caliper design calls for it, to avoid cocking the piston sideways in the bore.
- Fit the new dust boot. Seat it fully in its groove on both the piston and bore sides so it seals out water and debris going forward.
- Reassemble and torque. Bolt the caliper back onto the bracket and torque the mounting bolts to the manufacturer's specification, not by feel.
- Bleed the system. Follow the bleeding sequence in the next section before considering the job finished.
- Verify at low speed. Test the brakes in a parking lot at low speed before driving in traffic, confirming firm pedal feel and even stopping.
Pro Tip: Torque specs only mean something if your torque wrench is accurate. A wrench that's drifted out of calibration will give you a false sense of security on a critical fastener, so check yours against a proper calibration procedure before you start tightening caliper bolts.
Brake bleeding and verification after freeing or replacing a piston
Any time you've opened the hydraulic system, whether by pushing a piston back or swapping a whole caliper, air gets introduced. Trapped air compresses under pedal pressure instead of transmitting force to the pads, which shows up as a soft or spongy pedal. After any piston work, the system must be bled and pedal firmness confirmed before a road test, since improper bleeding leads to that spongy feel and reduced braking performance.
Three bleeding approaches work for most DIY setups:
- Manual two-person bleeding: one person pumps the pedal while the other opens and closes the bleeder valve in sequence.
- Vacuum bleeding: a hand pump draws fluid and air through the bleeder valve without needing a second person.
- Pressure bleeding: a pressurized reservoir pushes fluid through the system from the master cylinder down, which is often the cleanest method for a solo job.
Work the bleeders in the sequence your vehicle's manual specifies, typically starting with the wheel farthest from the master cylinder and finishing with the closest.
Once bled, verify the repair before trusting it in traffic:
- Pedal should feel firm and consistent, not soft or sinking under steady pressure.
- A low-speed test in an empty lot should show even, straight stopping with no pulling.
- Check wheel temperature after a short drive to confirm both sides are warming evenly.
If your vehicle has an ABS-integrated system, simple manual bleeding may not fully clear air from the module, and the ABS light should be checked for function afterward. More on how the caliper fits into the overall braking system is covered in how brake calipers work.
Common errors and how to avoid repeat seizure
A handful of mistakes account for most repeat failures after a piston repair.
Avoid these practices:
- Unshielded compressed air: skipping the containment block risks an ejected piston at high speed.
- Reusing damaged seals: a seal that's already hardened or cracked will fail again within months.
- Ignoring guide-pin lubrication: dry or corroded guide pins cause the caliper to hang up even with a perfectly good piston.
Proper guide-pin lubrication and regular dust-boot checks during pad changes measurably lower the risk of pistons sticking again down the road. If your brakes still drag after a repair, check guide-pin movement first, then confirm the caliper slides freely on its bracket before assuming the piston itself failed again.
Some situations call for a professional rather than another DIY attempt. ABS-integrated calipers, seized slide pins that won't budge with penetrating fluid, and any sign of contamination in the hydraulic system are worth handing off. That's not a failure on your part, just a recognition that some systems need specialized bleeding or diagnostic equipment a home garage doesn't have.
Sam's expert notes and critical safety guidance
A rule worth following strictly: if the bore shows pitting, replace the caliper rather than gambling on a rebuild. A pitted bore will scrape the new seal with every stroke, and the piston will stick again within a short time regardless of how carefully the rest of the rebuild was done.
Containment matters more than most DIYers expect when using compressed air. Transport Canada's own guidance on handling pressurized components during vehicle preparation points to the same principle used here: start at the lowest air pressure available, and always keep a wooden block or loose clamp positioned over the piston's exit path. A piston under pressure doesn't behave like a dropped tool; it can travel with enough force to cause real injury if it's ejected unchecked.
Certain jobs are outside the scope of a home garage, and recognizing that early saves time. ABS-integrated calipers often need specific bleeding procedures tied to the module. Seized slide pins that won't release with fluid and gentle persuasion usually mean the bracket needs replacement, not more force. Any sign of contamination in the brake fluid itself, a milky colour or visible particles, means the whole system needs flushing, not just the one caliper.

Mechanic's quick checklist: habits to prevent seized pistons
Preventing a stuck piston takes less effort than fixing one. A few habits built into routine maintenance catch problems before they turn into a seized caliper.
Every time you change pads or rotors, push the piston back by hand and watch how it moves. Smooth, even resistance is normal; anything gritty or uneven is an early warning sign worth noting for next time.
Check guide pins and dust boots on the same schedule as pad changes, roughly every 20,000 to 30,000 kilometres depending on driving conditions. A quick wipe and a dab of brake-rated grease on the guide pins takes a couple of minutes and prevents most of the drag-related complaints covered earlier. More on this habit is in our guide to uneven braking and what to check.
Scheduled brake fluid changes, typically every two to three years, matter more than most owners realize. Old fluid absorbs moisture over time, and that moisture is what drives internal corrosion in the caliper bore long before any visible symptom shows up.
— Sam
Where to get replacement rotors, pads and kits
Once a caliper's bore is pitted or a piston keeps sticking, replacing hardware is often the more durable path forward, and that's where DBC Brakes fits into the picture.
We carry a few categories relevant to a caliper job:
- Brake rotors across a wide range of vehicle fitments, from our rotor collection.
- Brake pads in multiple material options, including our pad collection, to pair with new rotors.
- Complete brake kits for readers who'd rather replace the full corner than rebuild a single caliper, available in our brake kit collection.
Replacing pads and rotors at the same time as a caliper service is often recommended, since a worn rotor paired with a fresh caliper rarely delivers even braking. We check fitment against your vehicle before anything ships, our pricing has no hidden fees, and orders over $100 qualify for free shipping within Canada. Browse our full collections to see what fits your vehicle.
FAQ
How do you free up a stuck caliper piston?
Start with a controlled push using a C-clamp or a dedicated piston compression tool, which works for most cases where corrosion hasn't reached the bore. If that fails, a penetrating fluid soak followed by repeated compression cycles, or a carefully shielded compressed-air push, usually finishes the job.
Can I spray WD-40 on caliper piston?
A penetrating fluid designed for rusted or corroded metal works better than a general-purpose product, and it's commonly sprayed around the piston edge where it meets the dust boot before attempting to compress it again. Let it sit for 15 to 30 minutes before trying to move the piston, and avoid getting it on the rotor or pad surfaces.
Why can't I push the caliper piston back?
The most common cause is corrosion built up between the piston and the bore wall, often from a torn dust boot that let in water and road salt. A collapsed or swollen internal seal can also bind the piston, which usually means the caliper needs a rebuild or replacement rather than more force.
How to release brake caliper piston without tool?
A sturdy pry bar or a pair of large pliers positioned carefully around the caliper body can substitute for a C-clamp in a pinch, though a dedicated tool reduces the risk of scoring the piston face. If the piston resists hand pressure entirely, a makeshift approach isn't likely to succeed, and it's safer to move to a proper compression tool or penetrating fluid soak.