
Uneven braking means one wheel or side of the vehicle is producing more braking force than the other. The result is a pull to one side, pedal pulsation, or steering vibration when you apply the brakes. If you feel any of these symptoms, take these steps immediately:
- Reduce speed and avoid hard braking.
- Increase following distance to give yourself more stopping room.
- Check for smoke, burning smell, or a noticeably hot wheel at the next safe stop.
- Note whether your ABS warning light or brake warning light is on.
- If the pull is strong or a burning smell is present, stop driving and arrange an inspection.
Pro Tip: A quick wheel-temperature check after a short drive can confirm a dragging brake. Carefully hold your hand near each wheel (not touching the rotor). A significantly hotter wheel points to a stuck caliper or seized slide pin on that corner.
Transport Canada classifies brake system failure as a serious safety defect. Treat any confirmed brake imbalance as a priority repair, not a deferred maintenance item.
Table of Contents
- What causes uneven braking?
- How does uneven braking feel, look, and smell?
- Step-by-step diagnostic checklist
- How to fix each cause
- Typical Canadian repair costs and time
- When should you stop driving and call a mechanic?
- Routine maintenance that prevents brake imbalance
- Why "warped rotors" is often the wrong diagnosis
- Key takeaways
- A brake specialist's perspective
- Matched brake kits for Canadian drivers
- Useful sources and further reading
What causes uneven braking?
Brake balance issues stem from mechanical, hydraulic, or system-level faults. The most common root causes, in rough order of frequency:
Mechanical causes:
- Uneven pad wear or pad material deposits on rotors. Pads that wear at different rates, or that leave transfer deposits on the rotor face, create inconsistent friction from one side to the other.
- Sticking caliper pistons or seized slide pins. Seized slide pins cause one pad to drag or fail to clamp fully, producing asymmetric braking force and heat build-up on one wheel.
- Rotor surface problems. Scoring, transfer deposits, or true warpage all reduce consistent pad contact. These are often misidentified (see the misdiagnosis section below).
- Uneven drum brake adjustment. On vehicles with rear drums, a seized adjuster or weak wheel cylinder produces a rear axle imbalance.
Hydraulic causes:
- Collapsed or internally damaged flexible brake hose. A hose that swells internally under pressure restricts hydraulic flow to one caliper, leaving that side with less clamping force.
- Air or contaminated fluid in the brake lines. Air is compressible; contaminated fluid has a lower boiling point. Either condition reduces consistent pressure delivery.
- ABS modulator or proportioning valve fault. A failed proportioning valve can shift hydraulic balance between axles or sides. Mismatched brake configurations after a brake swap can also create dangerous bias.
Non-brake causes that mimic imbalance:
- Misaligned wheels, unbalanced tyres, or worn wheel bearings can produce pull or vibration that feels identical to a brake fault. If vibration occurs at cruising speed without braking, investigate tyres and suspension first.
Pro Tip: Always check tyre pressure on both sides of the affected axle before pulling a wheel. An under-inflated tyre on one side can mimic a brake pull and waste diagnostic time.
How does uneven braking feel, look, and smell?
Recognising which symptom you have narrows the likely cause quickly.
| Symptom | What you notice | Most likely cause |
|---|---|---|
| Pull to one side under braking | Car drifts left or right when brakes applied | Seized caliper, contaminated pad, collapsed hose |
| Steering-wheel vibration | Shudder through the wheel at moderate to high speed | Front rotor deposit or runout issue |
| Pedal pulsation | Rhythmic push-back through the brake pedal | Rear rotor or drum issue; sometimes front |
| Grinding or scraping noise | Metallic sound during braking | Worn pads, scored rotor, debris in caliper |
| Squealing | High-pitched noise when braking | Wear indicators, glazed pads, or resonance |
| Burning smell or hot wheel | Chemical odour; one wheel much hotter than others | Dragging caliper or seized handbrake cable |
| Soft or spongy pedal | Pedal travels further than normal | Air in lines, fluid leak, or master cylinder fault |
| Longer stopping distance | Vehicle takes more distance to stop | Multiple causes: air, worn pads, caliper fault |
A constant pull even when you are not braking points to a dragging caliper or a seized parking brake cable rather than a hydraulic fault. Steering-wheel shudder at highway speed that disappears when braking is almost always a wheel balance or bearing issue, not a brake problem. For a detailed breakdown of steering-wheel vibration causes, including how to separate brake-origin shudder from suspension issues, that distinction matters for accurate diagnosis.
Step-by-step diagnostic checklist
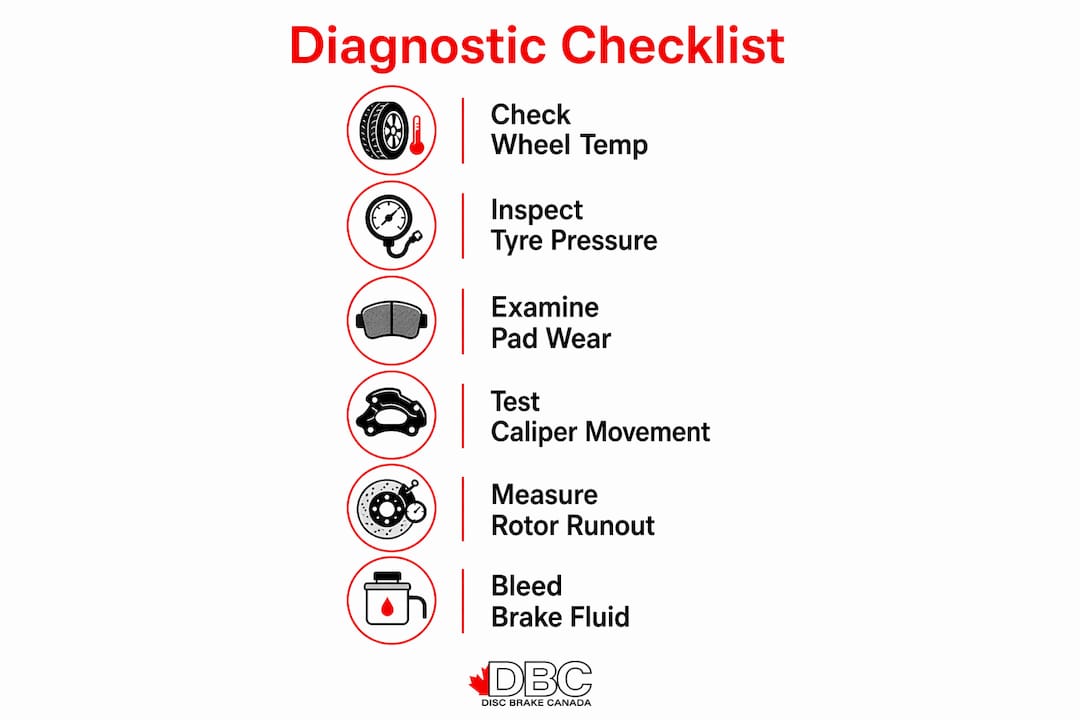
Work through these checks in order. Start at the roadside, then move to a lifted inspection if needed.
Roadside checks (no tools required):
- Park safely and look through the wheel spokes. Check for obvious pad wear, rotor scoring, or brake dust build-up on one side only.
- After a short drive, hold your hand near each wheel without touching the rotor. A significantly hotter wheel indicates a dragging component.
- Check for smoke or burning smell from any wheel.
- Note any warning lights: ABS, brake, or traction control.
Controlled test drive:
- Find a quiet, straight road. Accelerate to 40–50 km/h and apply moderate, steady brake pressure. Note whether the vehicle pulls and which direction.
- Repeat at low speed (20 km/h) and note whether the pull, vibration, or noise changes with speed. Speed-dependent symptoms point toward tyres or bearings; brake-only symptoms appear regardless of speed.
- Note which control transmits the sensation: steering wheel (front axle), brake pedal (often rear), or seat (rear or all-wheel).
Brake pedal feel test:
- With the vehicle stationary, press the pedal firmly. A firm, high pedal is normal. A spongy or low pedal suggests air in the lines or a fluid leak.
- Hold steady pressure for 30 seconds. A pedal that slowly sinks indicates a master cylinder fault or internal leak.
Lifted inspection (wheel removal required):
- Measure pad thickness on both inboard and outboard pads at each corner. Uneven thickness side-to-side confirms asymmetric wear.
- Inspect rotor faces for scoring, discolouration, or visible transfer deposits.
- Push each caliper slide pin by hand (with the caliper unbolted). Pins should move freely. Resistance or corrosion confirms seizure.
- Inspect caliper piston dust boots for cracking or swelling. A damaged boot allows moisture in and leads to piston corrosion.
- Check flexible brake hoses for bulging, cracking, or soft spots. Squeeze each hose gently; a hose that feels spongy under pressure may be collapsing internally.
Hydraulic and suspension checks:
- Check brake fluid level and colour in the master cylinder reservoir. Dark or contaminated fluid warrants a flush.
- Inspect around calipers and hose connections for fluid seepage.
- Check lug nut torque, tyre pressure, and visible tyre damage.
- Grab each front wheel at 9 and 3 o'clock, then 12 and 6 o'clock, and check for bearing play.
- Inspect tie-rod ends and ball joints for looseness to rule out suspension causes.
How to fix each cause
Uneven pad wear and rotor deposits
Replace pads as a full axle set, never one side only. Mixing old and new friction materials creates mismatched coefficients and can introduce new imbalance. Clean or replace rotors at the same time. Resurfacing is acceptable only when the rotor is within the manufacturer's minimum thickness specification; a rotor at or near minimum should be replaced.
Sticking caliper or seized slide pins
Seized slide pins are a common cause of tapered, wedge-shaped pad wear. Clean and re-grease pins with the correct caliper grease, and replace the rubber boots if cracked. If the caliper piston bore is scored or corroded, replace the caliper rather than rebuild it. Always replace pads on the full axle when servicing a caliper.
DIY scope: Slide-pin service and caliper replacement are within reach for a careful home mechanic with basic tools.
Rotor issues
Measure rotor runout with a dial indicator. A rotor with excessive runout or visible transfer deposits may be resurfaced if thickness allows. For recurring deposit problems, upgrading to engineered rotors with better heat dissipation reduces future build-up. See the misdiagnosis section for how to confirm deposits versus true warpage.
Collapsed brake hose
Replace the hose. Professional installation is recommended because the hose must be torqued correctly and the system bled afterward. Never reuse a hose that has shown internal collapse.
Brake fluid and bleeding
Flush and replace fluid with the grade specified in your owner's manual. Follow the correct bleed order for your vehicle (typically furthest wheel first). ABS-equipped vehicles may require a scan-tool bleed cycle to purge air from the ABS modulator; this step is best handled by a shop with the appropriate equipment.
ABS or proportioning valve faults
These require workshop diagnostic tools to confirm. Temporary workarounds are not safe. Book a professional inspection.
Non-brake causes
Torque lug nuts to spec, balance wheels, and repair worn suspension components before replacing brake parts. Identifying a tyre or suspension cause avoids unnecessary brake work and cost.
Pro Tip: When you pick up your vehicle after brake work, ask the shop to return your old parts. Inspecting the worn pads and rotors yourself confirms the diagnosis and shows whether the work was actually needed.
Typical Canadian repair costs and time
Cost ranges below reflect Canadian market pricing for parts and labour. Actual costs vary by vehicle make, model, and region.
| Repair | Estimated parts + labour (CAD) | Typical shop time |
|---|---|---|
| Brake pad replacement (one axle) | $150 | 1 hour |
| Rotor replacement (one axle, with pads) | $300 | 2 hours |
| Caliper replacement (one corner) | $250 | 2 hours |
| Flexible brake hose replacement | $150 per hose | 1–2 hours |
| Brake fluid flush | $80 | 1 hour |
| ABS modulator diagnosis and repair | $300 | 2–4+ hours |
A few practical points:
- OEM parts cost more upfront but are sized and rated for your vehicle. Premium matched kits (engineered rotors and compatible pads) often outlast budget parts and reduce the chance of repeat imbalance.
- Ask for a written estimate before work begins and confirm whether the quote includes both parts and labour.
- Request your old parts back. A shop that refuses without explanation is a red flag.
- Vehicle type matters: a light sedan costs less to service than a full-size truck or SUV because of part size and labour time.
When should you stop driving and call a mechanic?
Some symptoms require immediate action, not a scheduled appointment.
Stop driving if you notice any of the following:
- The brake pedal sinks to the floor or feels completely soft.
- The ABS or brake warning light is on and the pedal feel has changed.
- A strong pull under braking combined with a burning smell.
- Grinding metal noises that worsen with each stop.
- One wheel is visibly smoking or significantly hotter than the others after a short drive.
- The vehicle deviates sharply from a straight line during braking.
If the vehicle pulls hard enough to affect steering control, do not drive it to the shop. Arrange a tow. A mobile technician is a reasonable option if the vehicle is safe to keep stationary but not to drive. For a closer look at what grinding noises during braking indicate and when they cross into urgent territory, that guide covers the progression from minor wear to metal-on-metal contact.
A mild pull or light pulsation that appeared recently can usually wait for a same-week appointment, provided you drive cautiously and avoid highway speeds until the inspection is done.
Routine maintenance that prevents brake imbalance
Prevention is straightforward and less expensive than reactive repairs.
- Replace pads and rotors as axle sets. Single-side replacement is the most common DIY mistake. Mismatched friction coefficients between old and new pads create the exact imbalance you are trying to avoid.
- Follow the manufacturer's fluid flush interval. Brake fluid absorbs moisture over time, which lowers its boiling point and can cause inconsistent hydraulic pressure. Most manufacturers recommend a flush every two years or as specified in the service schedule.
- Bed in new pads and rotors correctly. A proper bed-in procedure involves a series of moderate stops from 50–80 km/h followed by cool-down periods. Skipping this step is a leading cause of uneven pad transfer deposits and early pulsation.
- Inspect slide pins and dust boots at every brake service. Degraded rubber boots allow moisture in and lead to caliper seizure. Replacing boots is inexpensive; replacing a seized caliper is not.
- Check wheel torque after any tyre service. Improperly torqued lug nuts can cause rotor runout, which mimics brake imbalance.
- Choose matched, engineered brake kits. Rotors and pads designed to work together dissipate heat more evenly and resist transfer deposits. DBC Brakes' matched kits are engineered specifically for this, pairing cross-drilled rotors with compatible pad compounds to maintain consistent friction across the axle.
Pro Tip: After any brake service, perform three to five moderate stops from 50 km/h before returning to normal driving. This seats the pads evenly and reduces the chance of deposit build-up that causes pulsation later.
Why "warped rotors" is often the wrong diagnosis
The term "warped rotor" is used to explain almost every case of brake pulsation, but uneven pad material transfer is the more common cause. True metallurgical warpage (a rotor that has permanently deformed) requires extreme, sustained heat. Most drivers never reach those conditions. What they have instead is a rotor with high and low spots of pad material deposited unevenly on the face, which produces the same pulsation symptom.
Measuring rotor runout with a dial indicator and inspecting the rotor face for discolouration or glazed patches confirms whether the issue is deposits or true warpage. A rotor with high runout but no visible deposits may be genuinely warped. A rotor with normal runout but visible transfer patches is a deposit problem. Resurfacing removes deposits if the rotor is within thickness spec; a warped rotor will often warp again after resurfacing because the underlying cause was overheating.
How to confirm the true cause:
- Measure runout at the rotor face. Runout above the manufacturer's specification (typically 0.05–0.10 mm) indicates a geometry problem.
- Inspect for discolouration, glazed rings, or uneven surface texture. These are deposit signatures.
- Review the brake history. Was a proper bed-in procedure followed after the last pad or rotor replacement? Skipped bed-in is the most common cause of early deposit build-up.
- Check pad-to-rotor compatibility. Mismatched compounds transfer unevenly, especially under heat.
Pro Tip: If new rotors and pads vibrate within the first few hundred kilometres, the bed-in procedure was almost certainly skipped or done incorrectly. Re-bed the brakes before condemning the parts. See the brake upgrade mistakes guide for the full list of installation errors that cause early pulsation.
Key takeaways
Uneven braking is almost always traceable to a seized caliper, mismatched friction materials, a collapsed hose, or uneven pad deposits — and replacing parts as axle sets is the single most effective way to prevent recurrence.
| Point | Details |
|---|---|
| Immediate safety steps | Reduce speed, increase following distance, and check for a hot wheel or burning smell before driving further. |
| Most common causes | Seized slide pins, uneven pad wear, collapsed hoses, and rotor deposits account for the majority of brake imbalance cases. |
| Replace by axle set | Mixing old and new pads or rotors on the same axle creates mismatched friction and can introduce new imbalance. |
| "Warped rotor" is often wrong | Most pulsation is caused by uneven pad deposits, not true warpage; measure runout and inspect the rotor face to confirm. |
| DBC Brakes matched kits | Cross-drilled rotors paired with compatible pads dissipate heat evenly and reduce transfer deposit build-up over time. |
A brake specialist's perspective
The most consistent pattern in brake complaints is that drivers replace the most visible part rather than the actual cause. A rotor gets swapped because it looks scored, but the seized slide pin that caused the uneven wear stays in place. Six months later, the new rotor has the same problem.
The fix that actually holds is methodical: check the caliper hardware first, replace components by axle, and follow the bed-in procedure without shortcuts. Hydraulic faults, ABS modulator issues, and proportioning valve problems are the exceptions where professional diagnosis genuinely saves time and money. A scan tool can confirm an ABS fault in minutes; guessing at it by swapping parts can cost hundreds of dollars and still miss the cause.
On the parts side, the gap between budget rotors and engineered matched kits is real. Budget rotors are often cast to looser tolerances and use pad compounds that transfer unevenly under heat. An engineered kit, where the rotor metallurgy and pad compound are matched, runs cooler and deposits more evenly. That is not a marketing claim; it is the reason professional technicians rarely use the cheapest available option on a vehicle they care about.
One last practical note: always ask for your old parts back after a brake job. If a shop replaced both front calipers and the old ones look fine, you have a conversation to have. If the old pads show wedge-shaped wear, you know the slide pins were the real problem and can verify they were addressed.
Matched brake kits for Canadian drivers
When the diagnosis points to worn rotors and pads, the replacement parts you choose affect how long the repair holds. DBC Brakes supplies matched brake kits to Canadian drivers, pairing cross-drilled rotors with compatible pad compounds engineered to resist uneven transfer deposits and manage heat consistently across the axle.

Cross-drilled rotors reduce heat build-up by increasing rotor surface airflow, which is one of the primary conditions that leads to uneven pad deposits. Matched pad compounds are selected to work with the rotor's thermal properties, so the friction layer transfers evenly during bed-in rather than building up in patches. DBC Brakes offers brake kits for a wide range of vehicles, with inclusive pricing and free shipping on orders over $100 within Canada. Fitment support is available from a real person, not an automated system, for drivers who want to confirm compatibility before ordering.
Useful sources and further reading
The sources below were selected for diagnostic accuracy, workshop-tested repair guidance, and relevance to Canadian drivers.
| Source | Why it is useful |
|---|---|
| Haynes Manuals — Common Brake Issues | Authoritative workshop reference covering hydraulic faults, caliper seizure, and pedal feel diagnosis |
| MOTOR Magazine — Brake Shop | Technician-level detail on caliper seizure, slide-pin failure, and collapsed hose diagnosis |
| Mechanics Stack Exchange — Brake Imbalance | Practitioner consensus on axle-set replacement and caliper hardware service |
| AutoVerseUSA — Shaking When Braking | Clear explanation of pad transfer deposits versus true warpage, with bed-in guidance |
| MotorTrend — Proportioning Valve | Technical guide on bias adjustment and proportioning valve solutions after brake swaps |
| MotorBiscuit — Uneven Pad Wear | Mechanic-observed causes of tapered pad wear and slide-pin failure patterns |
| DBC Brakes — Matched Brake Kits | Canadian source for engineered, matched brake kits with fitment support and free shipping over $100 |
| Brake Kit Installation Guide | Step-by-step DIY installation and bed-in procedure for matched kits |
| Brake Hardware Kits Guide | Details on slide pins, boots, and hardware that prevent caliper seizure |
This article provides general diagnostic and maintenance information. Brake system condition varies by vehicle, age, and driving history. Confirm repair decisions with a qualified technician for your specific situation.