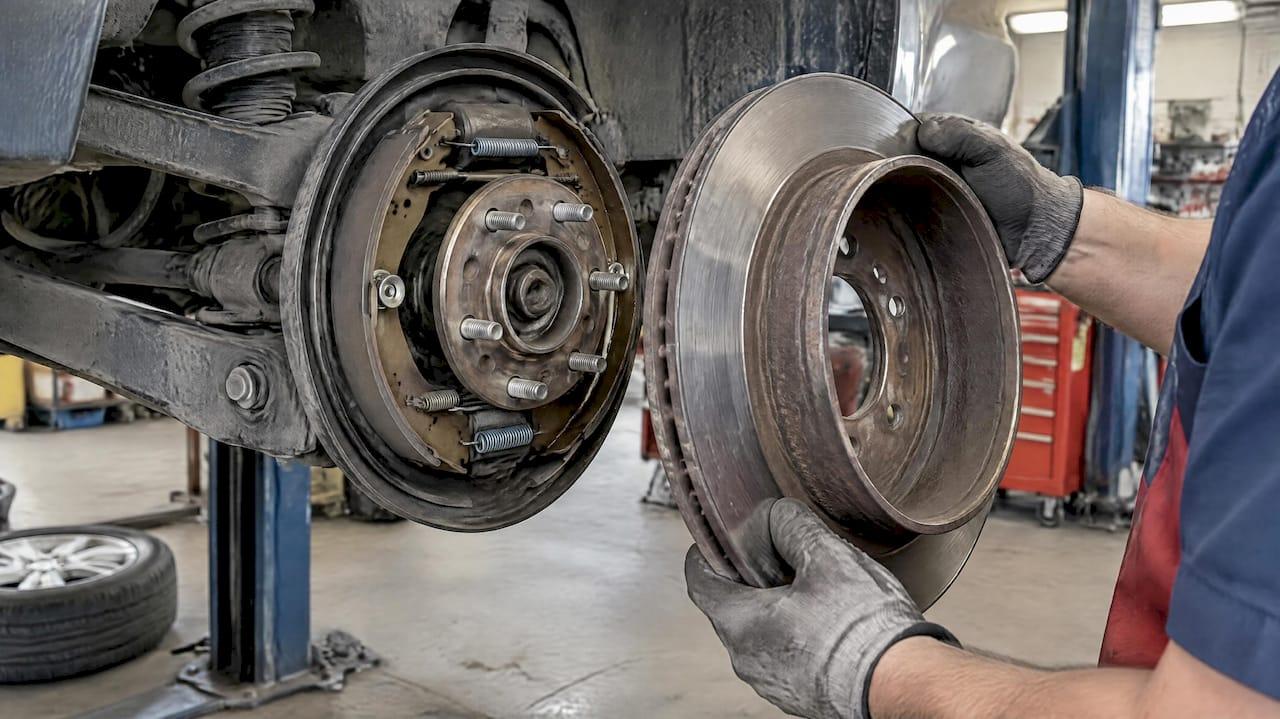
A drum in hat brake is a mechanical parking brake assembly built inside the rotor hat. It holds the wheel independently of the hydraulic disc service brake, which saves space on the rear axle. The trade-off is a star wheel and cable system that needs periodic adjustment to keep holding force where it should be.
TL;DR:
- The star wheel adjuster inside the rotor hat is prone to corrosion and seizing, which can reduce parking brake effectiveness and lead to uneven shoe contact.
- Proper inspection and adjustment of the star wheel and cable tension every few months prevent failure and ensure reliable holding force on grades.
- Machining a rotor to accept a drum in hat parking brake risks weakening the hat wall, causing fatigue cracks or mechanical failure due to improper thickness and heat handling.
- Replacement shoes, springs, and a clean, true mounting surface are key to restoring correct function and preventing pedal feel issues or uneven wear.
- Drum in hat parking brakes are space-efficient and reliable for static holding, but heat sensitivity and adjuster corrosion require regular maintenance to avoid performance issues.
Table of Contents
- Anatomy: the parts inside a rotor hat
- How it works: from cable pull to shoe expansion
- Advantages and disadvantages of the drum in hat layout
- Maintenance and adjustment: keeping the star wheel and cable in shape
- Common repairs: replacing shoes, springs, and the adjuster
- Modification and machining notes: turning a rotor into a hat
- Troubleshooting checklist: matching symptoms to causes
- How DBC supports owners of drum in hat equipped vehicles
- DIY versus professional service: where to draw the line
- Replacement parts and resources for drum in hat repairs
- FAQ
- Sources
Anatomy: the parts inside a rotor hat
A drum in hat unit lives inside the hollow centre section of a disc rotor, the part called the hat. That inner wall acts as the drum surface. Two curved brake shoes sit inside it, lined with friction material that contacts the hat when the parking brake is applied.
The shoes mount on a backing plate bolted to the spindle or axle flange, behind the rotor. An abutment post anchors one end of each shoe, while the other end connects to the actuator mechanism. Return springs pull the shoes back toward the centre when the brake is released, and hold-down springs keep the shoes seated flat against the backing plate so they don't wobble.
A star wheel adjuster sits between the lower ends of the shoes. Turning it lengthens or shortens the assembly, setting the resting gap between the shoe lining and the hat's inner surface. This is the same style of adjuster used in full drum brake systems, just scaled down to fit inside the rotor.
Key components you'll find on teardown:
- Hat's inner cylindrical surface: the machined wall the shoes press against, equivalent to a drum's friction surface.
- Brake shoes: curved friction components that pivot on the abutment post and expand outward.
- Return and hold-down springs: keep the shoes retracted and properly seated between applications.
- Backing plate and mounting studs: the fixed structure that carries the whole assembly and bolts to the axle.
- Star wheel adjuster: sets shoe-to-hat clearance and compensates for lining wear over time.
Clearance matters more than it looks. Mount wear at the hub face, play in the mounting studs, or an improperly seated backing plate all show up as pedal feel issues and uneven shoe contact, even though the hydraulic service brake is a separate system entirely. Shoes that aren't seated flat can also contribute to runout readings when you check the rotor, so a clean, true mounting surface is part of getting a drum in hat system right, not just the shoes themselves.
How it works: from cable pull to shoe expansion
The parking brake lever or pedal pulls a cable that runs to the actuator inside the rotor hat. From there, a mechanical linkage converts that pull into outward force on the shoes. US5180037A describes one common version of this mechanism: a pivotable lever connected to paired links that push the shoes apart against the hat's inner surface.
The sequence runs like this:
- The cable pulls on a lever arm mounted inside or near the backing plate.
- The lever pivots around a fixed point, converting linear cable motion into rotational force.
- Paired links transfer that rotational force to the base of each shoe.
- The shoes pivot outward from the abutment post and press their lining against the hat's inner wall.
- Friction between the lining and the hat holds the wheel in place.
Some designs route part of this linkage through a hollow abutment post, which saves radial space on axles with tight clearance between the hub and suspension components, a packaging concern on heavier trucks and SUVs where room inside the hat is limited. A related patent from Kelsey-Hayes Company describes actuator variants with pivoting body portions, lever arms, and spring returns, including a selectable boss position that lets engineers tune the mechanical advantage for a given vehicle without redesigning the whole assembly.
The leverage built into these linkages is what lets a cable pull of modest force translate into enough clamping force to hold a loaded vehicle on a grade. Every pivot point in the chain introduces some friction loss, which is why corrosion or a dry pivot can quietly reduce holding force well before the cable or shoes show obvious wear.
Mechanical advantage is the whole point of the lever and link arrangement. Each pivot amplifies force, but each pivot is also a place where corrosion, worn pins, or a stretched cable eats into that advantage. A system that held the vehicle firmly when new can lose a meaningful share of its holding torque if the linkage isn't inspected, which is why drum in hat units often fail quietly rather than all at once.

Advantages and disadvantages of the drum in hat layout
Manufacturers favour drum in hat parking brakes because they solve a packaging problem. Disc brakes don't have a built-in way to hold a vehicle parked without hydraulic pressure, and a drum in hat design adds that function without adding width to the axle. Drum style brakes in general remain common for parking brakes and rear axles because they integrate a purely mechanical hold and run cooler under light, intermittent use, according to Wikipedia's drum brake entry.
- Compact packaging: the parking mechanism fits inside existing rotor geometry, no extra axle width needed.
- Reliable mechanical hold: a cable and star wheel system works without electrical power or hydraulic pressure.
- Simple integration: pairs naturally with rear disc brakes on trucks, SUVs, and many sedans.
- Hidden wear items: shoes, springs, and the adjuster sit out of sight, which means they are easy to forget during routine service.
- Heat sensitivity: the small friction surface isn't built for repeated or sustained braking, only static holding.
- Adjuster seizure: corrosion and road salt can lock the star wheel, leading to drag or a parking brake that won't release fully.
Pro Tip: Check your parking brake's holding function every few months, not just when the dash warning light comes on. A seized adjuster rarely announces itself early.
Some vehicles use a caliper-integrated parking brake instead, where the service brake caliper itself provides the mechanical hold, or an electronic park brake that applies the caliper automatically. Either can make sense on a platform where hat space is tight or where automatic engagement matters more than a fully mechanical backup, but neither eliminates the need for periodic inspection of its own wear points.
Maintenance and adjustment: keeping the star wheel and cable in shape
A drum in hat parking brake rewards attention it rarely gets. Because the mechanism is hidden inside the rotor, most owners only think about it when the parking brake stops holding or starts dragging.
Start with inspection:
- Remove the wheel to expose the rotor and backing plate.
- Look through the inspection port, often a rubber plug on the backing plate, to check shoe lining thickness without full disassembly.
- Check the star wheel adjuster's threads for corrosion, binding, or stripped teeth.
- Confirm the cable moves freely at the equalizer and shows no fraying or stiff spots.
Adjustment follows a set order:
- Release the parking brake fully before adjusting anything.
- Turn the star wheel in the engaging direction through the inspection port, or by removing the rotor if no port exists, until the shoes drag lightly against the hat.
- Back the adjuster off until the wheel spins freely with no contact noise.
- Apply the parking brake lever or pedal and count the clicks or travel; a properly adjusted system holds firmly within the vehicle manufacturer's specified range.
- Check the equalizer for even cable tension on both sides and confirm there's no excess slack.
Star wheel adjusters aren't always threaded the same direction from side to side. Confirm the direction by feel or by reference before forcing anything, since applying pressure the wrong way can damage the threads inside the hat. Clean the adjuster and apply a light coat of high-temperature brake lubricant to the threads and contact points during service, never to the friction surfaces themselves.
Service intervals vary by climate and mileage, but checking the parking brake at every brake pad service catches most problems before they become failures. After any adjustment, verify the wheel rotates freely with the brake released and holds firmly with it applied, on level ground, before trusting the vehicle on a grade.
Common repairs: replacing shoes, springs, and the adjuster
Most drum in hat repairs follow a predictable path: worn shoes, a weak or broken spring, or a seized adjuster. The repair sequence matters as much as the parts themselves.
- Remove the wheel and rotor, taking care not to scratch or gouge the hub face or rotor hat during removal.
- Photograph or sketch the spring and shoe layout before disassembly, since left and right sides often differ.
- Remove the return springs and hold-down springs using brake spring pliers, keeping fingers clear of spring tension.
- Lift the shoes off the backing plate and abutment post, then separate the star wheel adjuster.
- Inspect the backing plate, cable end, and lever for wear or corrosion before reassembly.
- Install new shoes, always in matched pairs for the axle, to avoid uneven holding force side to side.
- Lubricate the adjuster threads lightly, reinstall it between the new shoes, and reattach springs in their original positions.
- Reinstall the rotor, cleaning the hub face and rotor hat mating surfaces first to avoid runout from debris.
- Torque the wheel fasteners to the vehicle's specification in the correct sequence.
- Adjust the star wheel per the process above, then verify the wheel spins freely before applying the brake.
Pro Tip: Replace springs whenever you replace shoes. A spring that's lost tension won't retract the shoes fully, and that alone can cause drag that looks like an adjuster problem.
Replacing shoes in matched pairs on the same axle keeps braking load balanced and helps prevent pedal pulsation from uneven wear. Once the parking brake side is reassembled, treat the rotor's friction surface the same way you would after any pad or rotor service: a proper bedding procedure transfers an even layer of friction material onto the rotor face and reduces the odds of glazing or an uneven pedal feel afterward. A short series of controlled stops, as outlined in a typical bedding routine, is a reasonable way to confirm the service brake is behaving normally before you call the repair done.
Modification and machining notes: turning a rotor into a hat
Some enthusiasts machine a solid rotor down to accept a drum in hat parking brake, usually when swapping axles or upgrading to a bigger rear disc setup that didn't come with one. This is a real modification with real engineering consequences, not a simple bolt-on change.

Removing material from a rotor's hat section changes its wall thickness and alters how it handles heat cycling and mechanical stress. A hat wall machined thinner than the original design can develop fatigue cracks at the transition between the hat and the rotor face sooner than a part engineered for that geometry from the start, particularly around any machined or welded transitions.
Removing drum in hat internals entirely, rather than converting to accept them, eliminates the vehicle's mechanical parking brake function. That's a safety and, depending on jurisdiction, legal problem, since many vehicles rely on this system as the only parking brake that works without hydraulic pressure or electrical power.
If you pursue a hat conversion, check these before trusting it:
- Hat wall thickness: confirm it meets or exceeds the thickness used on OEM parts designed for drum in hat service.
- Runout after machining: measure with a dial indicator before installation, not just after.
- Hub face condition: clean and inspect for burrs or corrosion that could throw off seating.
- Shoe and adjuster fitment: verify clearances match the new hat dimensions, not assumptions from the donor parts.
When precision machining isn't something you can verify yourself, a compatible rotor built for your application removes the guesswork that comes with a one-off conversion.
Troubleshooting checklist: matching symptoms to causes
A few quick checks narrow down most drum in hat problems before you pull anything apart.
- Dragging or dragging noise with the brake released: often a seized adjuster, a weak return spring, or a cable that isn't releasing fully at the equalizer.
- Poor holding force on a grade: check for worn shoe lining, a glazed hat surface, or an adjuster set too loose.
- Clicking or grinding noise when applying the parking brake: inspect for a broken shoe, a disconnected spring, or debris inside the hat.
- Uneven wear side to side: compare cable tension at the equalizer and confirm both adjusters are set the same way.
Two fast tests catch most of this without disassembly: spin the wheel by hand with the parking brake released to feel for drag, then apply the lever or pedal and count clicks or travel, comparing side to side if your vehicle allows it. A parking brake that fails to hold on a grade is a safety issue that needs attention before the vehicle is driven again, according to general guidance on drum brake maintenance from Wikipedia's overview of the system. A full rebuild makes sense once you've confirmed the shoes, springs, or adjuster are worn beyond adjustment rather than simply out of spec.
How DBC supports owners of drum in hat equipped vehicles
Most drum in hat problems trace back to the rotor hat itself, not just the internal hardware. We engineer our rotors, including the Performance XDB, Premium Black Kote, and Performance SS lines, with cross-drilling designed to reduce the warping that comes from repeated heat cycling, which matters just as much on a drum in hat axle as anywhere else on the vehicle.
We price every kit with no hidden fees, and offer free shipping on qualifying orders within Canada. Our support team answers fitment and compatibility questions directly, without routing you through an automated system first.
For readers working through fitment questions on a drum in hat application, our brake kit compatibility guide and step-by-step installation guide walk through the details that matter when you're removing a rotor with internal parking brake hardware attached.
DIY versus professional service: where to draw the line
Inspecting lining thickness, adjusting the star wheel, and lubricating cables are reasonable jobs for an experienced DIYer with basic hand tools and a service manual. Full shoe and spring replacement is doable too, provided you document spring positions before disassembly and torque fasteners to spec afterward.
Hat machining, axle swaps, and anything that changes how the parking brake mechanism mounts or actuates belong with a shop that has the tooling to verify runout and clearances properly. Keep a written record of any modification made to a braking system, including part numbers and measurements. That record matters if a problem shows up later, and it matters if the vehicle changes hands.
— Sam
Replacement parts and resources for drum in hat repairs
If your inspection turned up worn shoes, a seized adjuster, or a hat with too much runout to true up, the fix usually comes down to the right parts rather than more adjustment. We carry parking brake shoes and related hardware built to original fitment, so you're not guessing whether a universal part will seat correctly inside your rotor hat.
For the rotor itself, our cross-drilled rotor lineup is engineered to resist the warping that comes from heat cycling, a real concern on any axle that sees frequent stop-and-go driving. Every kit ships with transparent, all-in pricing, and orders over $100 qualify for free shipping within Canada.
If you're not sure which rotor or shoe set fits your application, support can help confirm fitment before ordering. For fleet operators managing multiple vehicles with drum in hat parking brakes, routine inspection intervals matter even more, a point echoed in preventive maintenance guidance for truck fleets. Browse our full rotor and brake kit selection to find the parts that match your vehicle.
FAQ
What is a drum in a hat parking brake?
A drum in hat parking brake is a mechanical assembly built inside the hollow hat section of a disc rotor. It uses small brake shoes that press against the hat's inner wall to hold the vehicle without relying on the hydraulic service brake.
What is a big disadvantage of the drum brake?
Drum brakes, including drum in hat designs, have limited surface area and heat capacity compared to disc brakes, which makes them less suited to repeated or sustained braking. They're also harder to inspect since the shoes and adjuster sit hidden behind a hat or full drum, according to Wikipedia's drum brake overview.
What are the three types of drum brakes?
Drum brake designs are generally grouped by shoe actuation: leading-trailing shoe, twin leading shoe, and duo-servo configurations, each differing in how force is applied to the shoes during braking. A drum in hat parking brake is a specialized application of this same drum brake principle, scaled down and built into a disc rotor's hat.
What is the hat on a brake rotor?
The hat is the raised, hollow centre section of a disc rotor that mounts to the wheel hub. On drum in hat applications, its inner wall doubles as the friction surface for the parking brake shoes.
Sources
- US5180037A - Drum-in-hat parking brake for a disc brake assembly - Google Patents
- Parking and emergency brake actuator for a drum-in-hat disc brake assembly - Kelsey-Hayes Company
- Drum brake - Wikipedia