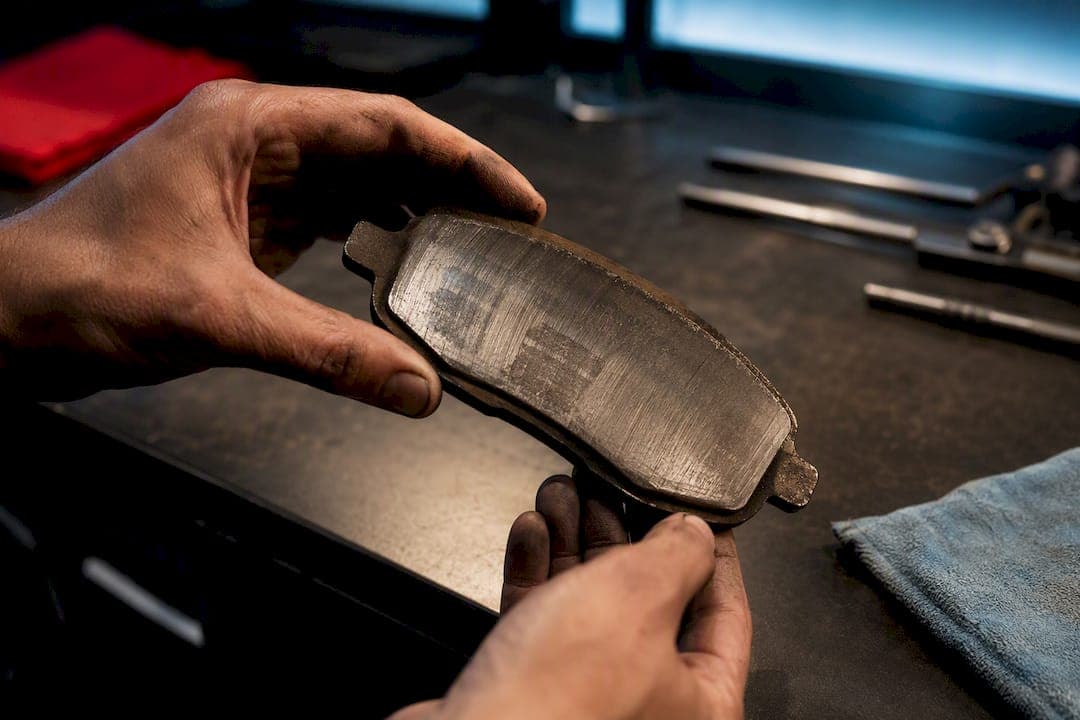
Light, even glazing on brake pads can often be corrected by sanding the surface and cleaning the rotor. Severe glazing, cracked pads, or heat-tempered friction material need replacement, not sanding. Before doing either, inspect the pads and rotors. If the vehicle shows brake fade, grinding, or a burning smell, stop driving and get it checked before attempting any pad glazing fix.
TL;DR:
- Light, even brake pad glazing can often be fixed by sanding the surface and cleaning the rotor, but severe glazing, cracks, or heat damage require replacement.
- Glazing results from heat buildup caused by riding the brakes, sticky calipers, warped rotors, or incompatible pad materials, especially in heavy-duty driving conditions.
- Confirmation of glazing involves checking for a shiny, glass-like pad surface, longer pedal travel, pulsation, or a burning smell, and inspecting pad thickness and rotor condition.
- Sanding is effective if glazing is light, even, and the pad has enough material left; severe or heat-tempered glazing, cracks, or contamination mean pads need replacement.
- Proper bedding, heat management, and caliper maintenance prevent glazing recurrence, with downhill engine braking and matching pad compounds to driving style being key.
Table of Contents
- What is brake pad glazing?
- What causes pad glazing?
- How do you confirm pad glazing before repairing it?
- Should you deglaze the pads or replace them?
- How to deglaze brake pads step by step
- Bedding in and testing after the repair
- How to prevent brake pad glazing from coming back
- Who wrote this and why the rotors matter
- Sources
What is brake pad glazing?
Brake pad glazing is a hard, shiny layer that forms on the friction material when heat and pressure-cook the compound instead of letting it wear normally. The surface hardens and smooths out, which reduces the pad's grip on the rotor and cuts stopping power. Instead of biting into the rotor, a glazed pad tends to skim across it.
That glassy layer also transfers unevenly onto the rotor face, leaving patches of built-up material that feel like pulsation under the pedal. Glazing is not the same as contamination. Oil or grease on a pad usually shows as a dark, blotchy stain rather than a uniform shine, and it often smells different, more chemical than burnt. It is also not the same as pad wear or cracking, which show as physical loss of material or visible fracture lines across the friction surface. Knowing which problem you are looking at determines whether deglazing brake pads will actually work, or whether it just delays a replacement that was coming anyway.
What causes pad glazing?
Glazing almost always traces back to heat that had nowhere to go. Riding the brakes, repeated hard stops in traffic, and long downhill descents are the most common driving habits behind it, especially in loaded vehicles or trailer towing.
Mechanical faults cause the same result from a different angle. A seized caliper piston or sticky slide pins keep the pad in constant, low-pressure contact with the rotor, generating the exact heat pattern that produces glazing. A warped rotor or worn hardware has the same effect. On the material side, an incompatible pad compound for your driving style, or a rushed bedding-in after installation, sets the friction surface up to glaze early. This is one of the most common pad glazing issues DIYers overlook, since a new pad job with poor bedding technique can glaze within the first week.
How do you confirm pad glazing before repairing it?
Don't guess. A glazed pad has a specific look and a specific feel on the road, and confirming both before you touch a wrench saves you from sanding a pad that actually needs to be thrown out.
While driving, watch for:
- A noticeably longer pedal travel before the brakes bite
- A high-pitched squeal or a low groan under braking
- Vibration or pulsation through the pedal or steering wheel
- A burning smell after moderate use, not just after a hard stop
- Stopping distances that feel longer than usual on a familiar route
A superficial glance through the wheel spokes will not tell you much. Pull the wheel, and where possible the caliper, for a direct look at the pad face. A glazed pad shows a smooth, shiny, almost glass-like surface where the friction material should look matte and slightly rough. Check the rotor at the same time for uneven, blotchy transfer marks rather than a consistent grey finish across the whole face.
While you're in there, check pad thickness against the wear indicator and look closely for cracks or flaking at the edges. If you see oily discolouration instead of a uniform shine, you're dealing with contamination, not glazing, and sanding will not fix it. Cracked or split friction material means the pad has already failed structurally. That's a replacement, full stop, regardless of how the surface looks.
Should you deglaze the pads or replace them?
Deglazing is worth attempting only under specific conditions. The glazing needs to be light and even across the pad face, the friction material needs enough thickness left to work with, and there should be no cracking or heat discolouration in the pad body.
Severe or heat-tempered glazing calls for new pads, not a sanding session. Once the compound has been cooked past a certain point, the chemistry of the friction material has changed, and no amount of surface prep restores its original bite. The same logic applies if pads show deep cracking, heavy contamination, or friction material worn down near the backing plate: replace rather than repair.
Rotors follow a parallel rule. Resurfacing is fine only if the rotor still falls within the manufacturer's minimum thickness spec after machining. If deep grooves or heavy transfer marks push it below that number, replacement is the safer call.
How to deglaze brake pads step by step
Deglazing is a mechanical job with a specific order of operations. Skipping steps, especially the cleaning and bedding stages, is why some pad glazing repair attempts fail within days.
Safety prep first. Park on level, solid ground, apply the parking brake, and chock the wheels you're not working on. Use a proper jack and rated jack stands, never a jack alone. Wear safety glasses and gloves before you start.
- Loosen the wheel lug nuts slightly while the vehicle is still on the ground, then jack it up, set the stands, and remove the wheel.
- Unbolt the caliper, following your vehicle's service steps, and slide it off the rotor. Support it so it doesn't hang on the brake hose. Remove the pads and check the slide pins, hardware, and caliper piston for binding while everything is apart.
- Sand the pad face using sandpaper suitable for restoring the surface without excessive removal of material, moving in straight, even passes across the surface rather than in circles. Light, even strokes restore a matte finish without removing too much friction material. A wire brush works for stubborn glaze but use it sparingly, and never grind through the compound to the backing plate.
- Clean the pad and rotor face thoroughly with brake cleaner to remove dust and loosened residue. Skip compressed air here, since it just launches fine dust into the air where you'll breathe it.
- Reinstall the pads, lubricate the slide points per your vehicle's spec, and torque the caliper bolts and lug nuts to the manufacturer's figures.
- Pump the brake pedal a few times before moving the vehicle to restore normal hydraulic pressure.
Pro Tip: Test after a short, deliberate bedding sequence before deciding whether the fix worked. Judging pad bite on the first cold stop out of the driveway will tell you almost nothing. For a fuller walkthrough of torque specs and reassembly order, DBC Brakes' brake kit installation guide covers the same reassembly logic for a full kit swap.
Tools, materials, and safety notes
Gather everything before you start so the job doesn't stall halfway through with the wheel off and the caliper hanging.
- Floor jack and a pair of jack stands rated for your vehicle's weight
- Torque wrench, lug wrench, and basic hand tools
- Sandpaper in the 120 to 220 grit range, plus a wire brush for stubborn spots
- Brake cleaner and clean rags
- A pad spreader if the caliper piston needs to be pushed back
- New hardware clips or pads and rotors on hand in case inspection shows replacement is the safer route
Avoid breathing brake dust and skip compressed air entirely. Older brake dust can contain materials you don't want in your lungs, so wear a mask along with your goggles and gloves, and wipe down rather than blow off dust. Dispose of used rags and cleaner according to your local hazardous waste rules rather than the regular trash.
Bedding in and testing after the repair
A deglazed pad needs a proper bedding-in sequence before you trust it in traffic. Run a series of moderate braking stops from moderate speed, easing off before you reach a full stop, with a short cooling interval between each one. Ten to fifteen progressive stops is a reasonable practical range for restoring an even friction layer, though the exact count matters less than giving the pads time to cool between cycles.
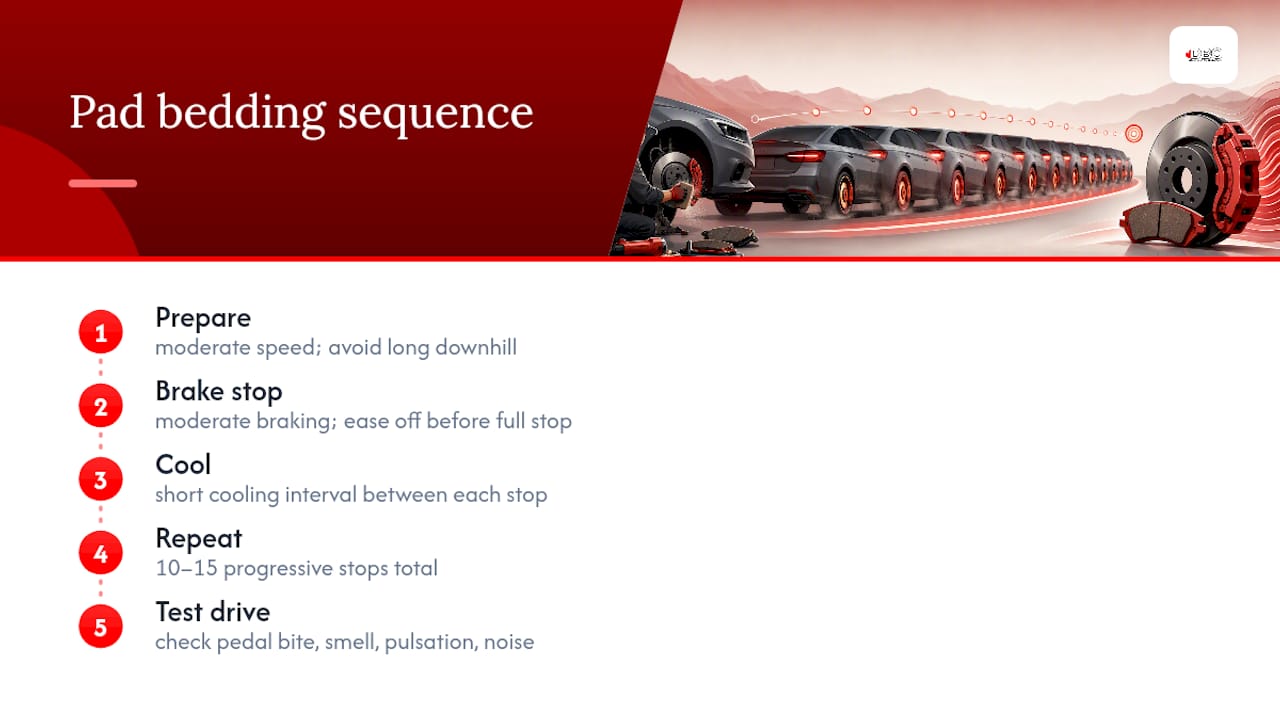
On the test drive, pay attention to pedal bite improving with each stop, no lingering burning smell, and no pulsation or noise carrying over from before the repair. Avoid one long downhill stretch immediately after the job. That's the same heat pattern that caused the glazing in the first place. If symptoms persist after a full bedding sequence, that's your signal to stop troubleshooting solo and get a shop to check the calipers and rotors. DBC Brakes' guide to bedding performance brakes breaks down the same sequence in more depth for a full pad and rotor swap.
How to prevent brake pad glazing from coming back
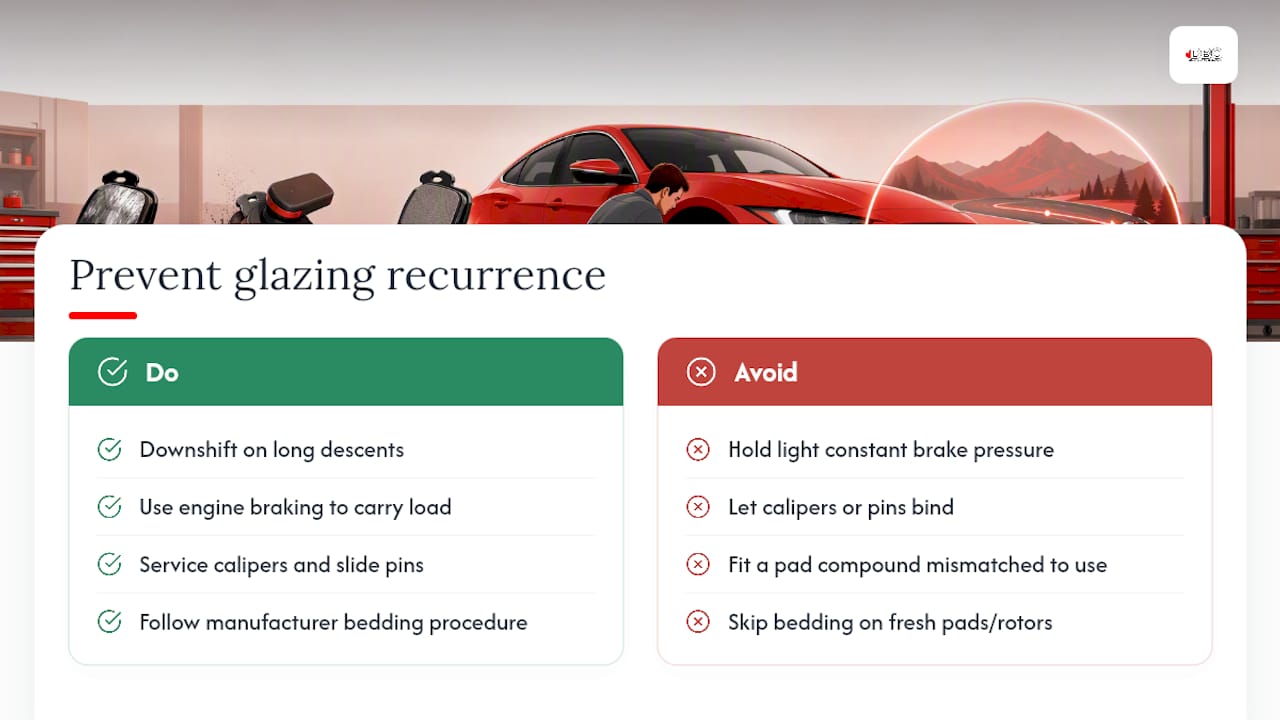
Prevention is mostly about heat management, not hardware. On long descents, drop into a lower gear and let engine braking carry more of the load instead of holding steady, light pressure on the pedal the whole way down. That constant light contact is exactly the riding-the-brakes pattern that glazes pads in the first place.
On the maintenance side, keep calipers and slide pins serviced so nothing binds and creates drag heat without your noticing. Match your pad compound to how you actually drive. A daily commuter and a track day car have different heat demands, and the wrong compound for the job glazes faster regardless of technique. Manufacturer-recommended bedding procedures for new pads and rotors matter here too. Skipping that step on a fresh install is one of the most preventable pad glazing maintenance mistakes DIYers make. DBC Brakes' notes on preventing rotor warping cover several of the same habits from the rotor side.
Who wrote this and why the rotors matter
This guide was put together by Sam for a Canadian manufacturer of premium brake kits engineered around cross-drilled rotors built to resist warping under sustained heat. Pad glazing and rotor heat problems tend to travel together, so a kit designed to manage heat better reduces how often you'll be back here sanding pads.
DBC Brakes prices its performance brake kits with no hidden fees and ships free within Canada on orders over $100. A quality rotor and pad kit is worth the investment once you're replacing rather than patching, particularly if your glazing traced back to a rotor that was already past its useful life.
A technician's take on when to sand and when to walk away
If you find glazing, the first move is always inspection, not sanding. Pull the wheel, look at the pad face and the rotor, and only reach for sandpaper once you've ruled out cracking, contamination, and thin friction material.
Some symptoms mean stop guessing and get a professional look immediately: brake fade under sustained load, visible cracks anywhere on the pad or rotor, or any sign of fluid leaking near the caliper. None of those are a sanding job, and driving on them while you figure that out is the actual risk here.
The habit that prevents most repeat glazing is boring but effective: stop riding the brakes on descents and let the engine do some of the work instead. Fix that one behaviour and you'll sand a lot less brake dust in the years ahead.
— Sam
Sources
- What Does It Mean When Brakes Are Glazed? | Firestone Complete Auto Care
- Glazed brake pads: Symptoms, causes, and DIY fixes | Tread Magazine
- What Is Brake Pad Glazing and How Do You Fix It? | AllRotors
- How to deglaze brake pads? Restore performance - CarsBibles