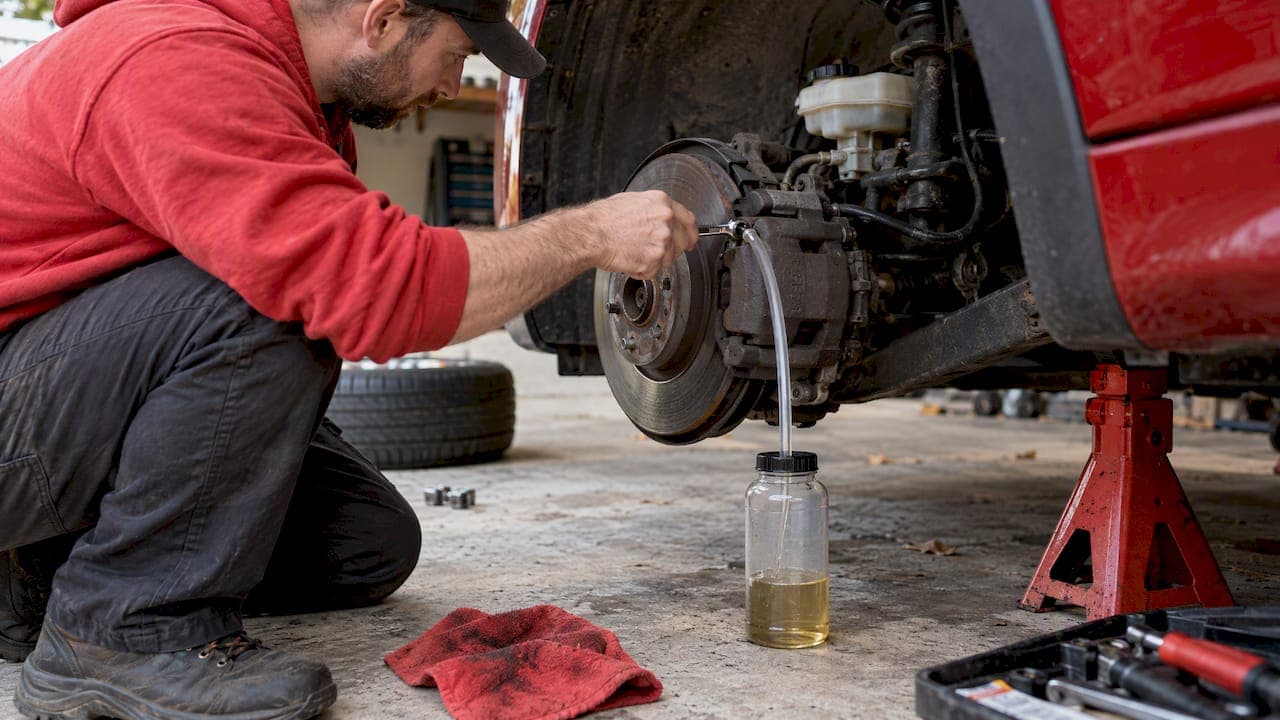
Gravity bleeding is a slow, hands-free method that removes small pockets of air by letting brake fluid flow under gravity. It works for topping up or clearing minor air in most conventional hydraulic brake systems when the master cylinder sits higher than the calipers or wheel cylinders. It is not reliable on ABS modules or systems with check valves. Expect a variable amount of time per wheel, often from several minutes up to about half an hour, and confirm success with a bubble-free stream and a firm pedal.
TL;DR:
- Use the DOT grade specified in the owner’s manual, never mix silicone DOT 5 with DOT 3, 4, or 5.1, and start with sealed fluid.
- Route clear tubing in an upward loop above the reservoir, then into a catch bottle, and keep the reservoir filled throughout to prevent air returning.
- Bleeding all four wheels on a straightforward system can take up to a couple of hours, while stubborn air pockets may take longer.
- After bleeding, confirm the reservoir level, check for firm, progressive pedal resistance, and take a cautious, low speed test drive before returning to traffic.
- After two full passes, switch methods if the pedal stays soft; if softness returns overnight, suspect a leak or failing master cylinder.
Table of Contents
- What gravity bleeding is and how it works
- When to use gravity bleeding: a quick decision checklist
- Tools, materials, and prep before you start
- Step-by-step gravity bleed procedure
- How long gravity bleeding takes
- Common mistakes, troubleshooting, and safety precautions
- Parts, fluid, and support for your brake maintenance
- A mechanic's honest read on gravity bleeding
- FAQ
- Sources
What gravity bleeding is and how it works
Gravity bleeding uses the natural downhill flow of brake fluid to push trapped air out through an open bleeder screw. Fluid sits higher in the master cylinder reservoir than in the calipers or wheel cylinders at each wheel. Once a bleeder opens, gravity pulls fluid down the line, and any air bubbles travel along with it and out through the bleeder port.

This only works correctly when line routing allows air to rise naturally toward the open bleeder rather than get trapped in a low spot. According to the Haynes repair guide, gravity bleeding depends on the master cylinder being higher than the wheel cylinder or caliper, which lets fluid flow downward and carry air out through the bleeder port.
Fluid compatibility matters as much as technique:
- Use the DOT grade your owner's manual specifies, whether DOT 3, DOT 4, or DOT 5.1.
- Never mix incompatible fluids. Mixing silicone-based DOT 5 into a DOT 3, 4, or 5.1 system risks seal damage and braking failure.
- Pour from a sealed, fresh container. Old or open fluid absorbs moisture over time.
When to use gravity bleeding: a quick decision checklist
Gravity bleeding fits certain systems well and struggles in others. Check your setup against these traits before committing to the method.
Good fit:
- Bleeder screws are accessible and in good condition.
- The master cylinder sits clearly higher than the caliper or wheel cylinder.
- You expect only a small amount of trapped air, such as after a pad or caliper job.
Poor fit:
- The vehicle has an ABS module in the circuit you're bleeding.
- The system includes residual or one-way check valves, which can trap air behind them and resist gravity alone.
- The pedal stays spongy after several gravity bleed attempts.
If your system checks every box under "good fit," proceed. If any "poor fit" trait applies, a pump-and-hold or vacuum method is the better starting point.
Tools, materials, and prep before you start
Gather everything first. Running back to find a wrench mid-bleed lets air re-enter the line and wastes the progress you've made.
- Correct DOT-grade brake fluid in a sealed container, matched to your owner's manual.
- Clear vinyl tubing sized to fit snugly over the bleeder screw.
- A catch bottle or jar to collect spent fluid.
- The correct wrench or flare-nut socket for your bleeder screws.
- A jack and jack stands, rated for your vehicle's weight.
- Nitrile gloves and safety glasses.
Before opening any bleeder, clean dirt and grime away from the reservoir cap and bleeder screws so debris doesn't fall into the system. Top the reservoir with fresh, sealed fluid, and route the clear tubing with an upward loop above the reservoir before it drops to the catch bottle. This loop helps stop air from migrating back into the caliper and lets you watch bubbles rise as they clear. Set the vehicle securely on stands before working underneath it; our brake replacement safety checklist covers safe jacking and wheel removal in more detail.
Pro Tip: Lay a shop towel over any nearby painted surface before you start. Brake fluid strips paint on contact, and a quick wipe-down beats a trip to the body shop.
Step-by-step gravity bleed procedure
Work one wheel at a time, and don't rush the waiting period. Gravity does the work; your job is to monitor it.
- Jack the vehicle and set it on stands. Remove the wheel if it gives you better access to the bleeder.
- Clean the reservoir cap area, then top the reservoir with fresh fluid.
- Fit the clear tubing snugly over the bleeder screw, route it upward in a loop above the reservoir, then down into the catch bottle.
- Open the bleeder a quarter-turn. Fluid should begin a slow, steady drip or trickle.
- Watch the tubing for bubbles. Top up the reservoir as fluid drains out so it never runs dry.
- Let fluid run until the stream turns clear and continuous with no bubbles.
- Close the bleeder to the correct torque before moving to the next wheel.
A common bleed sequence for many vehicles runs far-right rear, far-left rear, near-right front, near-left front, though you should always check your owner's manual for the manufacturer's specified order. Repeat the process at each wheel until no bubbles appear anywhere in the system.
Before you consider the job done:
- Confirm the reservoir fluid level sits at the correct mark.
- Clean any spilled fluid from calipers, wheels, or painted surfaces.
- Press the pedal several times and check for firm, progressive resistance with no sponginess.
Reinstall the wheel, lower the vehicle, and take it for a cautious, low-speed test drive in an empty area before returning to regular traffic. The Haynes guide and other workshop manuals recommend this road test as standard practice after any bleed procedure, confirming pedal firmness before driving at normal speed.
How long gravity bleeding takes
Timing depends heavily on how much air is trapped and how your system is built.
- A single wheel with minor air can clear in several minutes.
- A wheel with more stubborn air can take 15 to 30 minutes before the stream runs clear.
- A full four-wheel gravity bleed on a straightforward system can take up to a couple of hours total.
- A stubborn system can take considerably longer, and some hobbyist accounts describe multi-hour sessions for difficult air pockets.
Several technical and maintenance sources note that gravity bleeding depends on the master cylinder sitting higher than the wheel cylinder or caliper, a condition confirmed in the Haynes repair manual. Systems that don't meet this condition will struggle regardless of how long you wait.
ABS components, long brake lines, residual valves, and larger fluid volume all slow the process down. If a wheel shows no improvement after a lengthy period of steady dripping, consider switching to a pump-and-hold or vacuum method rather than waiting longer.
Common mistakes, troubleshooting, and safety precautions
Most gravity bleed problems trace back to a handful of avoidable errors.
- Letting the reservoir run dry, which draws fresh air straight back into the line.
- Using the wrong DOT grade or fluid from an already-opened, moisture-contaminated container.
- Routing tubing without the upward loop, which lets air slip back toward the caliper.
- Opening the bleeder too far, which can strip threads or cause uneven flow.
If bubbles persist after a reasonable wait, try a gentle pump-and-hold cycle with a helper, or switch to a vacuum bleeder. A bleeder screw that won't budge needs penetrating oil and patience rather than force; a stripped or sheared screw turns a simple job into a repair. Our guide on freeing a stuck brake caliper piston covers a related seized-component scenario.
Dispose of used brake fluid at a hazardous waste or recycling facility rather than pouring it out. Wipe spills immediately since fluid damages paint on contact, and our partner's guide on removing brake dust without harming paint offers related surface-protection steps. Confirm a firm, consistent pedal before driving.
Pro Tip: If the pedal feels firm immediately after bleeding but turns soft again overnight, suspect a leak or a failing master cylinder rather than leftover air.
Parts, fluid, and support for your brake maintenance
Gravity bleeding often follows a pad, caliper, or rotor job, and worn components can bring you back to the reservoir sooner than expected. There are rotor lines engineered with cross-drilling to resist warping and extend service life under repeated heat cycles.
- Rotors showing scoring or uneven wear pair well with our brake rotor collection.
- A full refresh after bleeding is a natural point to check pads from our brake pad range.
- For step-by-step installation after a parts swap, our brake kit installation guide walks through the process.
- Readers upgrading fluid type alongside a bleed should see our brake fluid upgrade guide for grade-specific detail.
A mechanic's honest read on gravity bleeding
Gravity bleeding rewards patience over speed. If you've got a clean reservoir, visible bleeders, and a conventional system, it's a reasonable solo task for a quiet afternoon. If the pedal still feels soft after two full passes, stop guessing and move to a pump-assisted or vacuum method, or hand it to a shop. Always finish with a slow, deliberate road test before trusting the pedal at speed.
— Sam
FAQ
How do I bleed my brakes using the gravity method?
Open the bleeder screw a quarter-turn with clear tubing routed into a catch bottle, then let fluid drip until it runs clear with no bubbles. Keep the reservoir topped up throughout, and repeat at each wheel following your owner's manual sequence.
What is the 30/30/30 rule for brakes?
This isn't a standardized term defined in major repair manuals or manufacturer documentation, so treat any specific numeric rule with caution. If you've seen it referenced as a bleeding or burn-in guideline, check your vehicle's owner's manual for the actual recommended procedure instead.
How do I flush brake fluid?
Flushing replaces all old fluid with fresh fluid of the correct DOT grade, typically by bleeding each wheel until the fluid coming out runs clean and matches the colour of new fluid. Gravity bleeding, pump-and-hold, or a vacuum bleeder can all perform a flush, provided you keep the reservoir filled throughout.
Can I bleed brakes with the vehicle still on the ground?
Bleeding is possible with wheels on the ground if the bleeder screws are reachable, though raising the vehicle on stands usually gives easier access and a clearer view of the tubing and catch bottle. Either way, keep the vehicle secure and never work under a vehicle supported only by a jack.
Does gravity bleeding work on ABS-equipped vehicles?
Gravity bleeding can struggle on ABS-equipped systems because air trapped inside the ABS module often needs a scan tool cycle or a pump-and-hold approach to clear fully. If your pedal stays soft after a standard gravity bleed on an ABS vehicle, a shop with the right diagnostic equipment is the more reliable next step.