
Yes, you can fit bigger rotors and keep your stock calipers, but only if the caliper can still centre over the new rotor and sweep the pad correctly. That almost always means adding a caliper relocation bracket or an OE-style carrier rather than simply bolting a larger disc onto the existing hub, according to guidance from Engineerskill.
Before you order parts, run through these checks:
- Wheel inner-barrel clearance: does your current wheel have room for a bigger disc and caliper?
- Swept pad area alignment: will the pad still cover the friction surface correctly at the new radius?
- Hub and knuckle compatibility: does the mounting face match, or does it need an adapter?
- Parking-brake and ABS/tone ring clearance: mechanical handbrake shoes and tone rings are common casualties of a rotor upsize.
- Bracket or carrier need: assume you'll need one unless the kit explicitly states otherwise.
If any of these checks require you to modify suspension geometry, relocate the caliper beyond a bolt-on bracket, or touch the hydraulic system, stop and get a second opinion from a shop familiar with brake fitment before you spend money on parts.
Key Takeaways
Bigger rotors work with stock calipers when caliper offset, swept pad area, and wheel clearance are matched correctly, usually through an OE-style carrier or bracket.
| Point | Details |
|---|---|
| Measure before buying | Record hub-to-barrel clearance, caliper position, and pad swept width before ordering any parts. |
| Brackets solve offset | OE-style carriers or relocation brackets keep the caliper centred on a larger rotor's friction ring. |
| Gains taper without matched hardware | Rotors-only helps heat capacity and torque but won't shorten stopping distance past tire and pad limits. |
| Hydraulics only matter with caliper changes | Stock caliper swaps skip master-cylinder matching; only larger-piston calipers require checking piston area. |
| Bed in before daily use | Test at low speed, recheck torque, and bed in progressively before trusting the new setup in traffic. |
| DBC Brakes offers documented fitment | DBC Brakes' cross-drilled rotor kits are built for VIN-confirmed compatibility with stock calipers, with inclusive pricing and Canada-wide free shipping over $100. |
Table of Contents
- Bigger rotors stock calipers: what actually changes
- Fitment checklist: measure before you shop for bigger rotors
- Common fitment problems and the fixes that actually hold up
- How to measure your car for a larger rotor: step by step
- Realistic performance gains: when rotors-only is worth it
- How enthusiasts commonly keep stock calipers with bigger rotors
- What to look for in a ready-made rotor kit
- DIY install overview: what a weekend job actually looks like
- What a rotors-only upgrade costs and how long it takes
- Why measurement beats optimism every time
- Where DBC Brakes fits if you'd rather skip the adapter hunt
- Sources
Bigger rotors stock calipers: what actually changes
Bolting on a larger rotor increases the lever arm the caliper's clamping force acts through, and that raises braking torque even with the exact same caliper. Torque at the wheel is a function of force multiplied by the distance from the axle centre to the pad's contact point, so a rotor that's 25mm larger in radius genuinely gives the same clamping force more leverage to slow the wheel. That's the whole case for improving brake performance with a rotors-only upgrade, and it's real. But it stops being useful the moment something else in the system becomes the limiting factor.
Three things determine whether a bigger rotor delivers a meaningful gain: leverage, thermal mass, and swept pad area. Leverage is the torque advantage described above. Thermal mass is simply more metal to absorb heat, which matters on a track day or a mountain descent where brakes see repeated, sustained use rather than the odd stoplight. Swept pad area is how much of the rotor's face the pad actually contacts as it spins past. If the caliper stays in its stock radial position while the rotor grows, the pad may end up riding closer to the rotor's edge or missing part of the ideal friction band entirely.
Heat soak is the enemy of consistent braking, and it's where larger rotors earn their keep. A rotor with more mass and better ventilation sheds heat more slowly into a spike and dissipates it faster afterward, which is why repeated hard stops on a stock-diameter rotor often fade while a properly upsized one holds up. Allow at least 3 to 5 millimetres of clearance between the caliper body and the inner wheel barrel, because rotors and calipers both expand slightly under heat and you don't want metal touching metal at speed.
Where the law of diminishing returns kicks in is tire grip and pad contact area. A bigger rotor doesn't add clamping force. The caliper's piston area and the master cylinder's output haven't changed, so peak deceleration is still capped by how much force those components can generate and how much grip the tires can convert into stopping distance. If your tires are already at their traction limit under hard braking, a larger rotor mostly buys you consistency under repeated stops, not a shorter first stop.
A bigger rotor changes how long your brakes can work hard before they fade. It does not change how hard they can work in a single stop, because that number is set by caliper piston area, pad compound, and tire grip, not rotor diameter.
Picture the geometry for a second: the caliper sits at a fixed radial distance from the hub, gripping the rotor at that point. Swap in a rotor with a larger outer diameter and the caliper needs to sit further out, or the pad ends up contacting the wrong band of the disc. A simple diagram showing the caliper's mounting position, the rotor's radius, and the resulting lever arm makes this instantly clear, and it's worth sketching before you buy anything.
Fitment checklist: measure before you shop for bigger rotors
Do these checks in this order and you'll know whether a rotors-only approach is realistic for your vehicle before you spend a dollar. Skipping ahead to ordering parts is the single most common reason DIY brake upgrades end up back in a box headed for a return label.
- Measure hub face to wheel inner barrel. This is your ceiling for total rotor and caliper stack height. Use a straight-edge across the wheel's inner lip and a tape measure down to the hub face.
- Check the caliper's current radial position. Note where the caliper mounting ears sit relative to the hub centre. This tells you how far outward a bracket needs to move the caliper for a given rotor diameter.
- Confirm pad swept width against the target rotor's friction ring. The pad needs to land fully within the new rotor's friction surface, not hang off the inner or outer edge.
- Check wheel inner-barrel clearance with feeler gauges. Slide feeler gauges between the caliper body and the wheel spokes or barrel at the tightest point.
- Inspect dust shield, ABS sensor, and tone ring clearance. A bigger rotor's hat and outer diameter can contact a factory dust shield or crowd a wheel-speed sensor.
- Verify parking-brake compatibility. Mechanical drum-in-hat handbrakes and cable-actuated parking brake calipers are sensitive to hat depth changes.
Write every number down as you go. A callipers, a steel straight-edge, a set of feeler gauges, and a decent tape measure are the only tools you actually need for this stage, and all four together cost less than a single rotor.
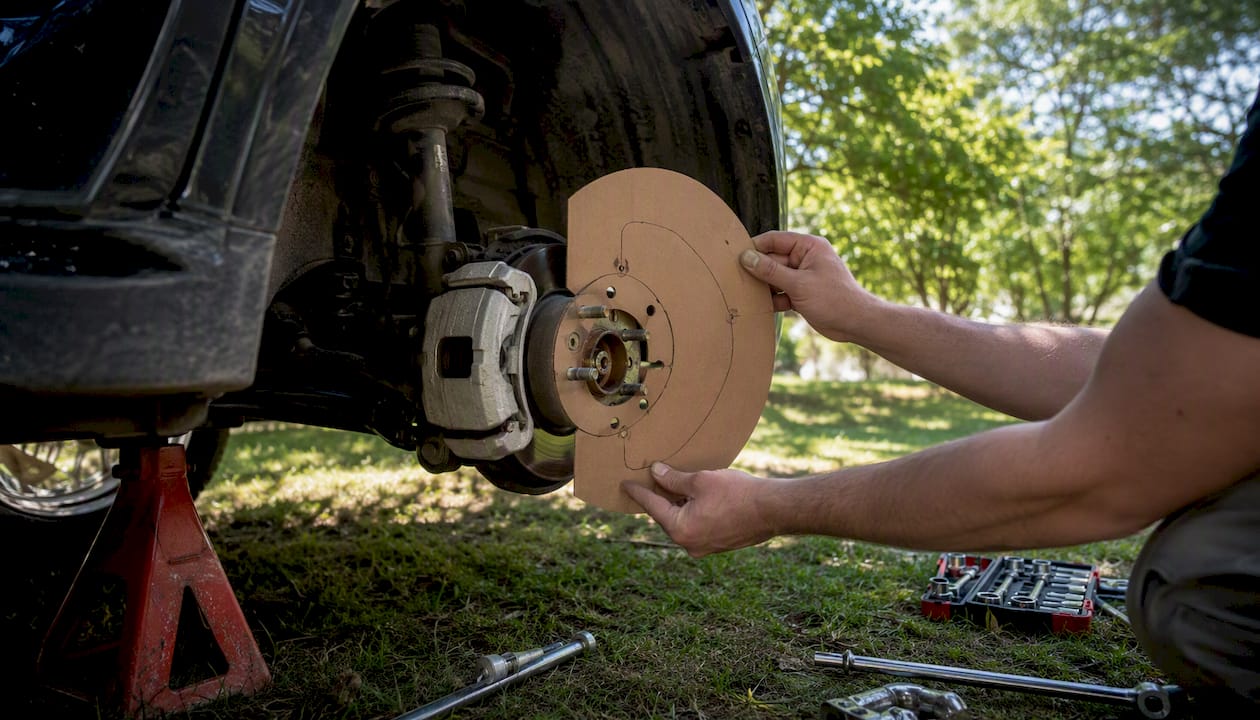
Pro Tip: Once you have your numbers, mount the wheel on jack stands with the tire off and do a dry test-fit using the old caliper and a cardboard template cut to the new rotor's outer diameter. It takes ten minutes and it will catch a clearance problem before you've spent a cent on the actual parts.
Common fitment problems and the fixes that actually hold up
The same handful of interference points show up again and again once you start swapping rotor sizes: caliper mounting ear position, hub face to rotor hat offset, wheel barrel clearance, dust shield contact, ABS tone ring proximity, and the parking-brake interface. None of these are exotic problems, and all of them have proven solutions, provided you use the right part instead of an improvised one.
Caliper relocation brackets or OE-style carriers solve the offset problem by moving the caliper's mounting point outward to match the larger rotor's radius. This is the correct, structural fix, and it's what separates a safe upgraded brake rotor swap from a dangerous one. A rotor hat with the correct offset addresses the hub-to-friction-ring distance, letting a larger rotor sit at the right depth relative to the hub face without the caliper needing to move at all in some designs. Longer caliper bolts with correct thread engagement and torque are needed whenever a carrier adds thickness between the caliper and the knuckle, and where a parking brake cable or mechanical caliper arm is affected, expect to source updated hardware for that interface specifically.
Never rely on an improvised spacer or a self-tapping screw to hold a caliper in place. That mounting point sees enormous cyclic load every time you brake, and hardware not rated for it will eventually fatigue and fail, usually without warning.
Here's the warning that gets skipped most often: hydraulic matching. If you're keeping the stock caliper and stock master cylinder, this typically isn't an issue. It only becomes relevant if the fix you choose also swaps in a different caliper with a larger piston area, because piston area and master-cylinder output have to stay proportional or the pedal will feel soft, long, or inconsistent. Rotors-only with the original caliper sidesteps this entirely, which is one more reason it's the simpler upgrade path.
How to measure your car for a larger rotor: step by step
Record these five numbers and you can determine fitment without guessing, whether you're comparing parts yourself or asking a vendor to confirm compatibility for your VIN.
- Hub face to wheel inner barrel distance. Your absolute maximum stack height for rotor plus caliper plus any bracket.
- Rotor mounting face diameter (the hat). This has to match your hub's bolt pattern and centre bore exactly, or you need an adapter designed for that mismatch.
- Caliper mounting ear centre distance from hub axis. The number a bracket manufacturer needs to calculate correct offset.
- Pad swept width on the current setup. Compare this to the target rotor's friction ring width to confirm coverage.
- Wheel minimum inner-barrel diameter. The smallest clearance point inside your current wheel, measured at the spokes closest to the caliper.
Tools: a digital calliper for the hat and bolt pattern, a tape measure for stack height and barrel clearance, feeler gauges for tight spots, and a notepad or phone to log every figure against the wheel and tire size you're running.
A rough example: if your stock rotor is 300mm and you're targeting 330mm, that's 15mm of added radius. The caliper's mounting ears need to move outward by roughly that same 15mm to keep the pad centred on the new friction ring, which is exactly what a matched carrier is machined to do. If your current wheel's inner barrel clearance is already tight at the stock rotor size, that 15mm can easily push you into needing a wheel with a larger diameter or a different offset.
- Support the vehicle on rated jack stands, never a jack alone, before you start measuring underneath it.
- Chock the wheels still on the ground and confirm the parking brake is engaged on those wheels.
- Never work with a wheel off and the vehicle supported only by a floor jack.
Realistic performance gains: when rotors-only is worth it
Rotors-only upgrades improve braking torque and thermal capacity, but the gains taper off fast if pad contact area and hydraulic geometry stay unchanged. That's not a knock against the upgrade. It's a reason to be precise about what you're actually trying to fix before you spend money.
If your problem is brake fade on repeated hard stops, whether that's a mountain pass or a few hot laps at a track day, a properly bracketed larger rotor with the stock caliper genuinely helps because you've added thermal mass and often better ventilation. If your problem is short stopping distances from a single hard application, the ceiling is set by tire grip and pad compound, not rotor size, and a bigger disc alone won't move that number much. Upgraded brake rotors change the story over time and heat, not the peak number on a single stop.
Rotors-only is the right call when your goal is consistency under repeated use. It's the wrong call when your goal is a shorter single stopping distance, because that's a tire and pad problem first.
Use this as your decision checklist. Stay with rotors-only if you're seeing a minor diameter increase (under roughly 20 to 25mm) for street driving or occasional light track use. Move up to better pads, braided lines, and fresh high-temperature fluid if you're chasing fade resistance and pedal firmness under sustained hard use, a step covered well in this brake fluid upgrade guide. Buy a full big brake kit only when you need more clamping force itself, which requires a caliper with larger pistons matched correctly to your master cylinder.
One caveat worth taking seriously: any change to rotor mass, pad compound, or caliper offset can shift pedal feel, sometimes subtly, sometimes not. If the pedal feels noticeably different after a rotor swap, it's worth reading up on what a brake feel change actually means before assuming something's wrong, and verifying hydraulic matching if you touched anything beyond the rotor itself.
How enthusiasts commonly keep stock calipers with bigger rotors
A handful of proven approaches show up repeatedly across DIY builds and shop installs, and picking the right one usually comes down to how much rotor diameter increase you're after and what your wheels allow.
- OE-style carrier swap: bolts a factory-engineered bracket between the knuckle and caliper to relocate it for a specific larger rotor, often sourced as part of a documented kit.
- Hub-swap with a larger rotor hat: some platforms share hub families across trims, so a hub upgrade from a higher-spec version of the same model brings a compatible larger rotor mounting point with it.
- Custom-machined caliper relocation brackets: CNC brackets built to precise offset specs for enthusiasts running non-stock wheel and rotor combinations.
- Two-piece floating rotors sized for stock calipers: engineered specifically to match factory caliper geometry while adding diameter and reducing unsprung weight, an approach used on certain BMW M platforms where the hat offset and rotor thickness are matched to the factory caliper.
Most of these approaches push you toward a slightly larger wheel. A rotor and caliper stack that clears comfortably at 18 inches might be uncomfortably tight at 17, simply because there's less room inside the barrel. If you're not planning a wheel change, factor that constraint in before you commit to a rotor size, not after.
What to look for in a ready-made rotor kit
Choose a kit that states plainly it's designed to work with factory calipers, or one that includes an OE-style carrier with fitment documented against your specific VIN, not a generic "fits most" listing. That single sentence on a product page tells you whether the engineering work has already been done for your exact vehicle.
Run through this checklist before buying:
- Correct hat offset for your specific hub and caliper combination, not an approximate fit.
- Rotor thickness and vane design that match or exceed factory cooling specs.
- Confirmed compatibility with stock pads, so you're not also sourcing new friction material.
- Documented minimum wheel size the kit requires to clear.
- Vehicle fitment listed by VIN or by trim year, not just by generic model name.
Ask the seller directly about VIN-specific fitment confirmation, return policy on parts that don't clear your wheels, warranty coverage on the rotors and any included hardware, and whether fitment support is available if something doesn't line up on install day. Manufacturer and kit listing pages that publish these fitment tables upfront are doing you a favour; treat vague listings as a red flag.
Pro Tip: Some OE-style kits are built specifically so you never have to crack the hydraulic system open at all, meaning no bleeding and no master-cylinder changes. That's worth asking about directly, because it can turn a full weekend job into an afternoon one.
DBC Brakes' cross-drilled rotor collection is engineered against exactly this checklist, with cross-drilled designs built to resist warping under repeated heat cycling and documented fitment support so Canadian buyers can confirm compatibility before ordering.
DIY install overview: what a weekend job actually looks like
An experienced DIYer with the right tools and a helping hand can swap rotors and carriers in a weekend, provided the fitment checks from earlier came back clean. If the job requires structural modification beyond a bolt-on bracket, that changes the calculation, and it's worth a professional's eyes before you start.
- Support the vehicle on jack stands rated for its weight and remove the wheel.
- Support the hub and remove the caliper, hanging it safely with a hook or wire so it doesn't stress the brake line.
- Remove the caliper mounting bracket if a carrier swap is part of the job.
- Fit the new rotor and hat, then install the carrier or bracket per its specified torque values.
- Reinstall the caliper onto the new bracket, using new bolts if the kit specifies them, torqued to spec.
- Bleed the system only if a line was disconnected or air entered the circuit; a straightforward rotor and carrier swap on the stock caliper often doesn't require it.
- Bed in the new rotors and pads with a series of moderate stops from speed, allowing cool-down time between each.
Before the car goes back on the road, recheck every torque spec on the caliper bolts and carrier hardware. Do a series of low-speed stops in an empty lot to confirm the pedal feels normal and nothing binds or drags. Only after that progressive bed-in and a thermal check should you drive normally, and if anything about the pedal or noise feels off, get it inspected before you rely on it in traffic. Common DIY missteps are covered in more depth in this brake upgrade mistakes guide, and it's worth a read the night before you start.
Never treat the first drive after a brake job as a normal commute. Test on a quiet street first, and if you have any doubt about torque, bracket rigidity, or pedal feel, have a shop check the work before you put it through daily traffic.
What a rotors-only upgrade costs and how long it takes
Cost and time depend almost entirely on whether you need carriers or adapter brackets, a hat swap, or new wheels to clear the larger rotor. A straightforward rotor-only swap using the stock hat and caliper position is the cheapest and fastest version of this job; adding carriers, brackets, or wheels stacks time and dollars quickly.
| Job Complexity | Parts Involved | Estimated Time on Lift |
|---|---|---|
| Low | Direct-fit larger rotors, stock caliper, stock hat | 1 to 2 hours |
| Medium | Rotors plus OE-style carrier brackets and new bolts | 3 to 5 hours |
| High | Rotors, carriers, hat swap, and a wheel change to clear the new stack | Full weekend or more |
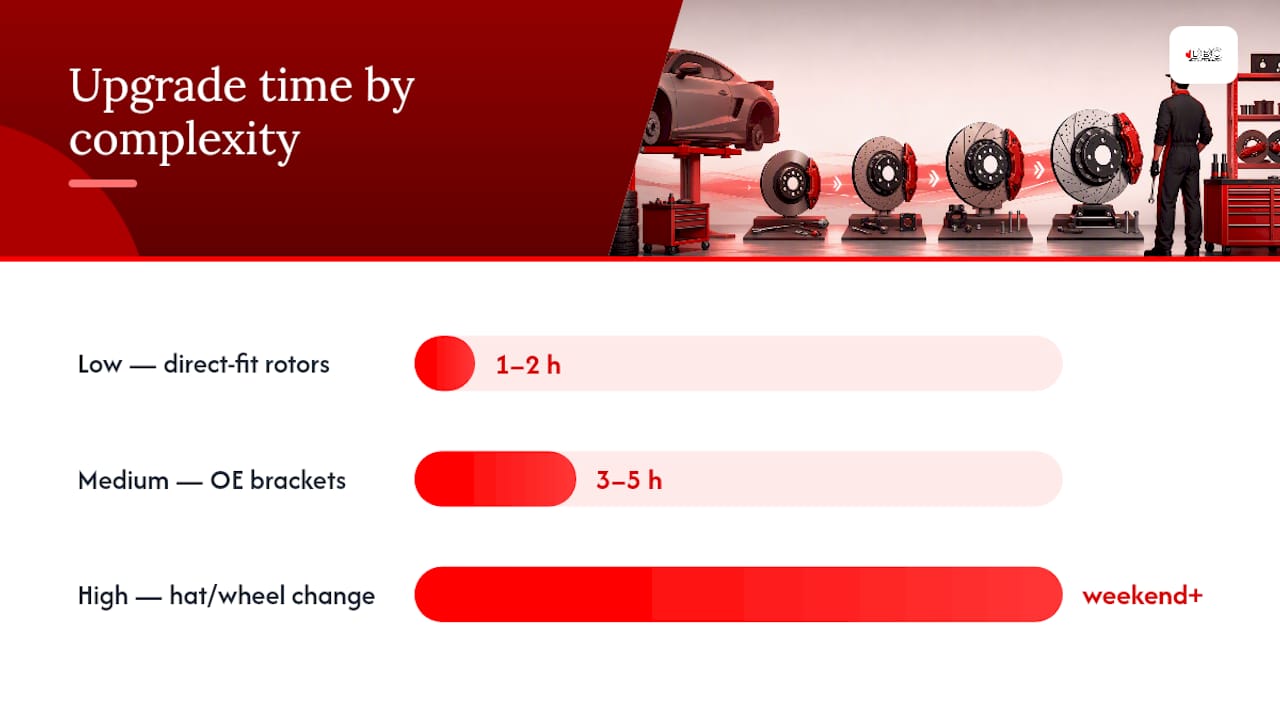
A low-complexity job is essentially a standard rotor and pad replacement scaled up in size, something most home mechanics can knock out in an afternoon. A medium-complexity job adds bracket fitment and torque verification, which is where most of the extra time goes. A high-complexity job usually means the fitment checklist flagged wheel clearance as a problem, and sourcing a new wheel and tire combination adds both cost and lead time well beyond the brake parts themselves.
Order parts using your VIN whenever the seller offers it, and build in a return-window cushion. Even with careful measuring, an unexpected clearance issue on install day is common enough that you don't want to be stuck with non-returnable brackets.
Why measurement beats optimism every time
If there's one thing worth repeating from everything above, it's that a tape measure will tell you more than any forum thread ever will. Enthusiasts get into trouble not because bigger rotors are inherently risky, but because they skip the fitment checklist and assume "close enough" applies to brake hardware the same way it does to a stereo install. It doesn't.
The physics genuinely favour larger rotors for heat management and torque, and OE-style carriers are a mature, well-proven way to keep your stock calipers in the mix rather than paying for a full caliper upgrade you don't need. Where I'd push back on the enthusiasm you see online is the assumption that a bigger rotor alone transforms stopping distance. It doesn't, and treating rotor diameter as a substitute for better pads or fresh fluid is a common, avoidable mistake.
If your fitment checklist turns up anything involving structural brackets, hub swaps, or hydraulic changes, get a second set of eyes on it before you drive on it daily. That's not caution for caution's sake. It's the difference between a brake job that lasts and one that comes back to bite you on a wet on ramp.
Where DBC Brakes fits if you'd rather skip the adapter hunt
DBC Brakes builds cross-drilled rotor kits designed around keeping installs simple for exactly the kind of measurement-first upgrade this article walks through. Where a custom bracket search means sourcing parts from three different suppliers and hoping the offsets agree, DBC Brakes' kits are engineered with documented fitment so you can confirm compatibility with your stock calipers before you order, not after.

Every kit ships with inclusive pricing and no hidden fees, and orders over $100 ship free within Canada, which matters when brackets, hardware, and rotors would otherwise arrive as three separate charges. Customer support comes from people who know brake fitment, not a script, so if your VIN throws up a question the checklist above didn't answer, you get an actual answer. Browse the cross-drilled rotor collection or the full brake kit range, check fitment against your VIN, and order with the returns cushion built into the process from the start.
Sources
Verifying fitment claims against real installs and manufacturer documentation beats relying on assumptions, especially since clearance issues vary by model year even within the same platform. These sources cover the physics, the common pitfalls, and documented kit examples referenced throughout this article.