
A brake caliper is a metal clamp that straddles the rotor and presses the brake pads against it to slow the wheel. To spot one through your wheel spokes, look for a rectangular or U-shaped metal housing hugging the edge of the disc, with a rubber brake hose attached near the back. Transport Canada and the CAA both list brake inspection as a core vehicle safety check, and DBC Brakes recommends confirming caliper condition at every seasonal service. For a deeper look at how the caliper creates stopping force, see this overview of the caliper's role in stopping.
Pro Tip: Angle your smartphone camera through the wheel spokes with the flash on. The bleeder screw and brake hose connection are usually visible in a single shot, even without removing the wheel.
Table of Contents
- What does a brake caliper look like from outside the wheel?
- How do you tell a floating caliper from a fixed one?
- How to safely view your caliper through the wheel or with the wheel off
- How do you know if a caliper is sticking or failing?
- What does caliper repair or replacement typically cost and take?
- Canada-specific caliper maintenance: salt, cold, and inspection intervals
- Key takeaways
- Why visual ID is the first step in brake maintenance
- Useful sources and further reading
What does a brake caliper look like from outside the wheel?
The caliper sits at the outer edge of the brake rotor, perpendicular to the wheel's rotation. Its housing is typically cast iron or aluminium, shaped like a squared-off clamp or a thick rectangular bracket. On most passenger cars, the caliper is roughly fist-sized, though truck and SUV calipers tend to be larger.
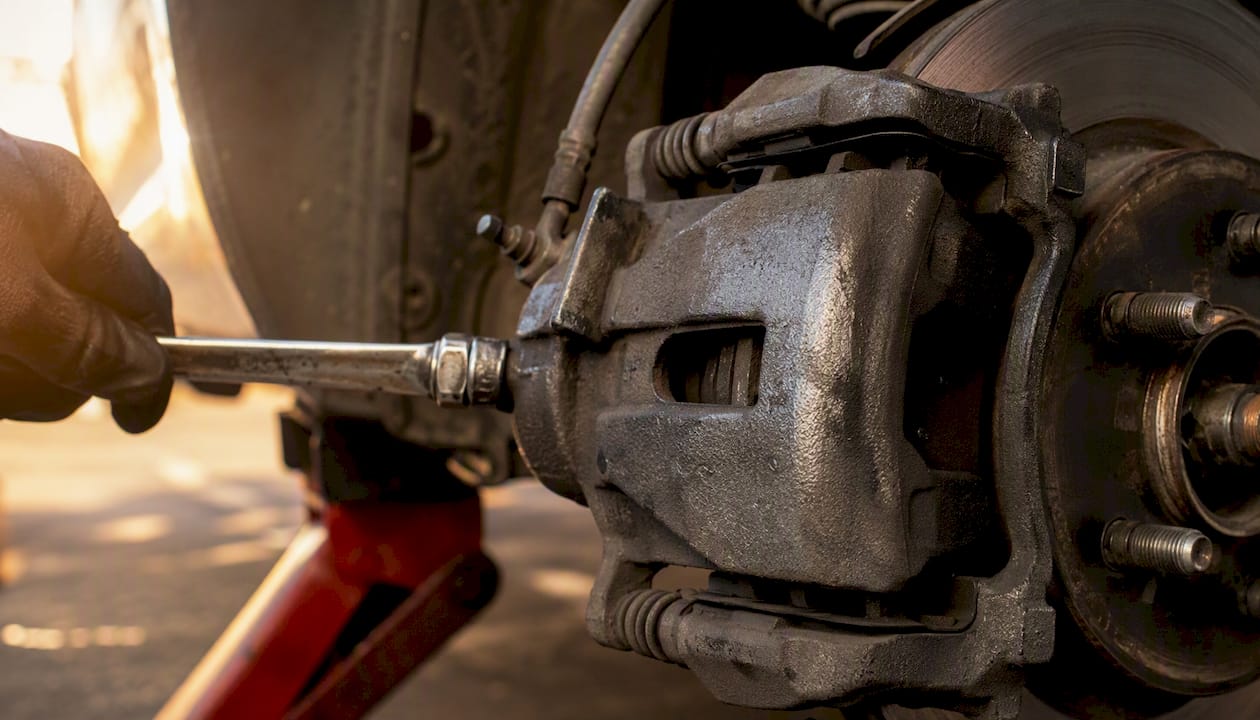
According to HowStuffWorks, the caliper fits over the rotor the way a clamp fits over a board, with brake pads on each side of the disc. Through standard five-spoke wheels, you can usually see the inboard face of the caliper directly. Through tighter spoke patterns, turning the steering wheel to full lock gives a better sightline to the front calipers.
Key visual clues to look for:
- A hydraulic brake hose or hard line connecting to the back of the housing
- A small hex-head bleeder screw on the upper face of the caliper body
- Piston outlines or arched covers on the inboard face
- A mounting bracket bolted to the steering knuckle or axle flange
- Stamped or cast part numbers on the housing face
Visual inspection guides note that manufacturer casting marks and part numbers are often readable through the spokes without removing the wheel.
Pro Tip: Turn the steering wheel to full lock before photographing a front caliper. This rotates the hub and opens the sightline through the spokes considerably.
| Feature | Front caliper | Rear caliper |
|---|---|---|
| Typical size | Larger | Smaller |
| Visibility through spokes | Usually clear | Often partially blocked |
| Parking brake hardware | Absent | Often present (lever or screw) |
| Hose routing | From strut or inner arch | Along axle or trailing arm |
How do you tell a floating caliper from a fixed one?
The single fastest visual check: look for slider pins. A floating (sliding) caliper has two visible guide pins or bolts that allow the housing to move laterally across the rotor. A fixed caliper has no slider pins; instead, it is bolted rigidly to the knuckle and shows piston outlines on both the inboard and outboard faces.
NAPA Canada's brake caliper guide confirms that most passenger vehicles use floating calipers, while fixed calipers are larger, carry pistons on both sides, and appear most often on performance cars. Brands like Brembo and Akebono both produce fixed multi-piston calipers for performance and OEM fitments respectively.
| Type | Visual cues | Typical use |
|---|---|---|
| Floating (sliding) | Two guide pins visible, single piston outline on inboard face | Most passenger cars and trucks |
| Fixed | No guide pins, piston outlines on both faces, larger housing | Performance vehicles, some SUVs |
HitchesGuide's visual breakdown identifies slider pins and single-sided piston outlines as the quickest photographic clues for floating calipers. For a detailed comparison of caliper types on performance builds, the brake caliper types guide covers fixed versus floating in depth.
Heavy-duty and air-disc calipers, common on commercial trucks, use different mounting hardware and often single or twin pistons in a larger housing. Wayne Truck's air disc brake resource illustrates these component differences clearly.
How to safely view your caliper through the wheel or with the wheel off
The best vantage points, in order of effort: through the spokes with the wheel turned to lock, with the wheel removed, or via a mechanic's inspection lift.
Safe inspection steps:
- Park on a flat, level surface and apply the parking brake.
- Place wheel chocks behind the opposite wheels before lifting.
- Use a floor jack at the manufacturer's designated jack point, then lower the vehicle onto a jack stand before reaching under.
- With the wheel still on, turn the steering to full lock for front calipers.
- Photograph the caliper face, bleeder screw, hose connection, and slider pin boots.
- If the wheel is removed, check pad thickness visually and look for fluid weeping around the piston seal.
The brake replacement safety checklist covers jack stand placement and torque specs for wheel reinstallation.
Pro Tip: Never rely on a scissor jack alone when reaching under a vehicle. A jack stand rated for your vehicle's weight is the minimum safe setup.
If the caliper is not clearly visible through the spokes and the vehicle is not safely supported for wheel removal, a shop inspection is the right call.
How do you know if a caliper is sticking or failing?
AutoZone's symptom guide lists the most common signs of a sticking or failed caliper: the vehicle pulling to one side under braking, uneven pad wear across an axle, and a wheel running noticeably hotter than the others after a short drive.
Visible and felt symptoms to check:
- Car pulls left or right when braking, even on a straight road
- One brake pad worn significantly thinner than its pair on the same axle
- Burning smell from one wheel after normal driving
- Visible fluid weeping or wet residue around the piston seal area
- Rotor surface showing heavy scoring on one side only
Pro Tip: After a 10-minute drive at normal speeds, carefully hold your hand 5–8 cm from each wheel without touching it. A wheel that radiates noticeably more heat than the others points to a dragging caliper on that corner.
Stop driving and arrange service if the vehicle pulls sharply, if brake fluid is visibly leaking, or if a burning smell persists after the vehicle is parked.
What does caliper repair or replacement typically cost and take?
Costs vary by vehicle make, model, and region. A shop replacing a single caliper on a passenger car typically completes the job in one to two hours of labour. Replacing both calipers on an axle, which most shops recommend for even braking, adds time accordingly.
Steps to get an accurate local quote:
- Call or email two to three local shops and ask for an itemised quote: parts cost and labour cost listed separately.
- Confirm whether the quote includes a brake fluid flush, which is often recommended when opening the hydraulic circuit.
- Ask specifically about rebuilt versus new calipers; rebuilt units are lower cost but quality varies.
- In Canadian winter-service contexts, ask whether the shop applies anti-seize to mounting hardware, since road salt accelerates bolt seizure.
Lonsdale Auto Works recommends replacement when there are leaks, seized pistons, or corrosion that prevents free sliding, and advises getting local quotes for accurate pricing.
Pro Tip: Ask the shop to show you the worn or failed caliper before it is discarded. Seeing the actual damage confirms the diagnosis and helps you understand what to watch for next time.
Regional note: Canadian shops in provinces with heavy road salt use (Ontario, Quebec, the Maritimes) may charge additional labour for seized hardware removal. Booking brake work in autumn, before winter salting begins, often avoids this surcharge.
Canada-specific caliper maintenance: salt, cold, and inspection intervals
Road salt and thermal cycling are the two main accelerators of caliper wear in Canada. Salt penetrates slider pin boots, corrodes guide pins, and causes piston seals to harden faster than in milder climates. Repeated freeze-thaw cycles work moisture into any small crack in a boot or seal.
Practical maintenance points for Canadian conditions:
- Inspect slider pin boots and piston seals every spring, after salt season ends.
- When rebuilding or replacing a caliper, ask for high-temperature brake grease on guide pins and anti-seize compound on mounting bracket bolts.
- New seals are standard in a proper rebuild; confirm this before approving the work.
- Inspect brake hoses for cracking or swelling at the same interval; cold temperatures accelerate rubber degradation.
In Canadian climates, a caliper that slides freely in September may be partially seized by March. Annual spring inspection is the minimum reasonable interval for vehicles driven through winter.
DBC Brakes supplies premium brake kits with cross-drilled rotors engineered for Canadian conditions, free shipping on orders over $100, and direct support from knowledgeable staff. For guidance on avoiding common errors during a brake upgrade, the brake upgrade mistakes guide covers the most frequent missteps.
Key takeaways
A brake caliper is the metal clamp over the rotor that holds the pads; identifying it by shape, slider pins, and hose connection takes less than a minute through the wheel spokes.
| Point | Details |
|---|---|
| Basic visual ID | Look for a rectangular metal housing straddling the rotor edge, with a brake hose at the back. |
| Floating vs fixed | Slider pins visible on the housing mean floating; piston outlines on both faces mean fixed. |
| Parts to inspect | Check slider pin boots, piston seal area, and bleeder screw for cracks, corrosion, or fluid weeping. |
| Failure symptoms | Pulling to one side, uneven pad wear, or one hot wheel after a short drive all point to a sticking caliper. |
| Canadian maintenance | Inspect boots and seals every spring; request high-temp grease and anti-seize on mounting hardware. |
Why visual ID is the first step in brake maintenance
Most brake problems start as something you can see before they become something you feel. A cracked slider pin boot or a weeping piston seal is visible through the wheel spokes on a Sunday afternoon. Left unnoticed, either one becomes a seized caliper, uneven rotor wear, and a repair bill that a five-minute inspection would have prevented.
The practical advice here is straightforward: photograph your calipers now, while the brakes are working normally. That reference photo is what lets you or a mechanic spot a change at the next inspection. Share it in a support chat or bring it to a shop. Clear visual documentation shortens diagnosis time and removes guesswork from the conversation.
Useful sources and further reading
Vetted resources for deeper reading on brake caliper identification, inspection, and service in Canada:
- How Brake Calipers Work | HowStuffWorks
- What is a brake caliper? - NAPA Auto Parts Blog
- Discover the secret: How to tell what brake caliper you have – MPH Diary
- What Is A Brake Caliper Look Like? - Visual Guide - CarsBibles
- What Does a Brake Caliper Look Like - HitchesGuide
- How to Tell if Brake Caliper is Bad: Signs & Symptoms to Look For | AutoZone
- When to Replace Brake Calipers - Lonsdale Auto Works
- Understanding Air Disc Brake Calipers | Wayne Truck