
If your steering wheel or brake pedal vibrates when you slow down, the most likely causes are disc thickness variation (DTV), uneven pad deposits, a sticking caliper, or a wheel and tyre issue. This brake vibration causes solutions guide covers what each problem feels like, how to check for it safely, and what repairs cost in Canada.
Stop driving and call a tow if you notice any of these:
- Brake pedal feels soft or sinks toward the floor
- Vehicle pulls sharply to one side under braking
- Burning smell coming from a wheel after stopping
- Vibration is severe enough to affect steering control
Quick checks you can do right now:
- Look through the wheel spokes at the rotor surface. Scoring, rust grooves, or a lip at the outer edge are visible signs of wear.
- Check pad thickness visually. Less than 3 mm of friction material means replacement is due.
- Crouch beside each wheel after a short drive and hold your hand near (not on) the hub. One wheel noticeably hotter than the others points to a dragging caliper.
- Check that all lug nuts are present and snug. A loose lug nut after recent wheel work can cause runout and vibration.
- Note whether the shake is in the steering wheel or the brake pedal. That single observation narrows the problem to the front or rear axle.
If the pedal feels normal and the car tracks straight, it is generally safe to drive slowly and directly to a shop. If any of the stop-driving signs above are present, do not drive the vehicle.
Key takeaways
Brake vibration most often traces back to disc thickness variation, pad deposits, or a sticking caliper, and the fix is straightforward once the root cause is confirmed by measurement.
| Point | Details |
|---|---|
| Locate the vibration first | Steering-wheel shake points to the front axle; pedal pulsation points to the rear. |
| Stop driving if safety signs appear | Soft pedal, severe pull, or burning smell means tow, not drive. |
| Hub and torque checks cost nothing | Clean the hub face and re-torque lug nuts before authorising any parts replacement. |
| Resurface vs replace | Machine only if the rotor is above minimum thickness and has no hot spots; replace otherwise. |
| DBC Brakes kits reduce recurrence | Cross-drilled, high-carbon rotors with correct installation resist DTV and hot-spot formation. |
Table of Contents
- How brake vibration actually happens
- Common causes of brake vibration and what each one feels like
- How to diagnose brake vibration step by step
- Repairs that fix brake vibration: how to choose the right one
- Why higher-quality rotors reduce the chance of vibration coming back
- An experienced view on brake vibration
- DBC Brakes premium kits address the root causes of repeat vibration
- Sources
How brake vibration actually happens
Every time you press the brake pedal, the caliper squeezes two pads against a spinning rotor. The friction slows the wheel. When that contact is perfectly even, braking is smooth. When it is uneven, the braking torque fluctuates with each rotation and you feel a pulse.
Two mechanical conditions create most of that unevenness:
- Disc Thickness Variation (DTV): The rotor is not perfectly uniform in thickness around its circumference. As it spins, the pad is pushed in and out slightly with each revolution. DTV as small as 12–15 microns can produce a perceptible shake at the steering wheel.
- Lateral Runout (LRO): The rotor wobbles side to side as it spins, rather than rotating in a flat plane. Over time, LRO causes uneven pad contact and leads to DTV.
Why the location of the shake matters:
- Steering-wheel shake usually points to the front axle, because the front rotors are connected to the steering column through the suspension and tie rods. Any pulse in the front rotors travels directly to your hands.
- Pedal pulsation usually indicates rear-axle rotor problems, because the rear brakes are not linked to the steering system.
Key terms:
- DTV: Disc Thickness Variation — the difference in rotor thickness measured at multiple points around the disc.
- LRO: Lateral Runout — side-to-side wobble of the rotor as it turns.
- Pad deposit / transfer film: A layer of pad material bonded unevenly to the rotor face, creating friction variation.
- Glazing: Hardening of the pad surface or rotor face from overheating, reducing friction and causing noise or judder.
Common causes of brake vibration and what each one feels like
Damaged rotors, pad deposits, and sticking calipers are the most frequently reported causes, but wheel and suspension problems can produce nearly identical symptoms. The table below maps each cause to where you feel it and at what speed.
| Symptom | Most likely cause | Where you feel it | Speed range |
|---|---|---|---|
| Steering-wheel shake under braking | Front rotor DTV or LRO | Steering wheel | 80 km/h, eases at low speed |
| Pedal pulsation, no steering shake | Rear rotor DTV | Brake pedal / seat | Any speed |
| Shake at highway speed, braking or not | Wheel/tyre imbalance or bent rim | Steering wheel or seat | Usually highway speed |
| Shake only under hard braking | Pad deposits / transfer film | Steering wheel | Mid to high speed |
| Vehicle pulls + vibration | Sticking caliper or slide pins | Steering wheel, pulls to one side | Any speed |
| Clunk or looseness + vibration | Worn ball joints, tie rods, or control arm bushings | Steering wheel | Low to mid speed |
| Vibration after recent wheel work | Loose or uneven lug-nut torque | Steering wheel or seat | Any speed |
| Rumble that changes with steering angle | Worn wheel bearing | Steering wheel / cabin | Any speed |
Cause-by-cause breakdown:
- Rotor DTV and LRO: The most common root cause of steering-wheel shake. DTV builds gradually through normal wear or is introduced by hub debris and uneven lug-nut torque. LRO at installation can convert to DTV within a few thousand kilometres.
- Pad deposits and transfer film: Uneven transfer of pad material creates sticky spots on the rotor face. Heavy braking followed by a stationary stop is a common trigger. The shake mimics a warped rotor and is often misdiagnosed.
- Worn or uneven pads: Pads worn past 3 mm, or worn unevenly across the pad face, apply inconsistent pressure and can cause judder. Uneven wear often signals a caliper problem.
- Sticking caliper or slide pins: A seized slide pin keeps one pad dragging, creating uneven heat and rotor distortion. The affected wheel will be noticeably hotter than the others.
- Wheel/tyre imbalance or bent rim: Imbalance causes vibration at cruising speed regardless of braking, but it gets worse under braking when weight transfers forward. If the shake is present at highway speed without touching the brakes, start here before any brake work.
- Suspension and steering wear: Worn ball joints, control arm bushings, or tie-rod ends amplify small rotor pulses into noticeable shake. A rotor with only minor DTV can feel much worse when the suspension is loose.
- Hub debris causing runout: Rust, dirt, or a small stone chip on the hub face pushes the rotor off-plane. Even a thin layer of corrosion can create enough LRO to cause vibration.
- Loose or uneven lug-nut torque: A tiny particle on the hub face or uneven torque can magnify into significant lateral runout at the rotor edge. Many shop-return complaints trace back to this step.
- Worn wheel bearing: A failing bearing creates a rumble or growl that shifts with steering input. It can also allow enough hub movement to cause rotor runout and vibration under braking.
Pro Tip: Worn lower control arm bushings are a frequently missed amplifier. A rotor with borderline DTV may feel acceptable on a vehicle with tight suspension, but the same rotor will produce noticeable shake once the bushings soften. Always check suspension condition before condemning the rotors.
How to diagnose brake vibration step by step
Work through these checks in order. Each step either confirms or rules out a cause, so you avoid replacing parts unnecessarily.
DIY checks
- Reproduce the symptom safely. Find a quiet road or empty car park. Brake from 80 km/h to 30 km/h with moderate pressure. Note: does the shake appear in the steering wheel, the pedal, or both? Does it start at a specific speed and fade as you slow? Record these details before any inspection.
- Visual rotor and pad inspection. With the vehicle parked and wheels cool, look through the spokes. Check the rotor face for deep scoring, a raised lip at the outer edge, or blue heat discolouration. Check pad thickness; less than 3 mm means replacement. Uneven pad wear across the face points to a caliper issue.
- Lug-nut torque check. If vibration started after recent wheel work, use a torque wrench to verify lug-nut torque against the vehicle's specification (typically 100–140 N·m for most passenger cars). Tighten in a star pattern. Many vibration complaints after tyre changes resolve at this step alone.
- Hot-wheel test. After a short drive, hold your open hand 5–10 cm from each wheel without touching it. One wheel significantly hotter than the others indicates a dragging caliper or stuck slide pin.
- Wheel balance check. If the shake is present at highway speed without braking, inspect the wheels for missing balance weights (small metal clips on the inner rim edge). A missing weight is a quick indicator that balance is off.
- Suspension wiggle test. With the vehicle safely on jack stands, grip each front tyre at the 9 o'clock and 3 o'clock positions and push and pull. Any looseness indicates worn tie-rod ends or ball joints. Grip at 12 and 6 o'clock and repeat for wheel bearing play.
For a complete step-by-step safety checklist, see the brake replacement safety checklist published by DBC Brakes.
What a technician will check
- Rotor thickness at multiple points with a micrometer (checking for DTV)
- Lateral runout with a dial indicator mounted to the suspension (checking LRO)
- Hub face for corrosion or debris before refitting any rotor
- Caliper slide pin movement and lubrication
- Wheel bearing play
- Suspension component condition (ball joints, bushings, tie rods)
- Pad thickness and even contact across the pad face
Tell the mechanic:
- Exactly when the shake appears (speed, braking pressure, hot or cold)
- Whether it is in the steering wheel, pedal, or seat
- Any recent work done (tyre change, brake service, alignment)
- Any noise, smell, or pulling that accompanies the vibration
Pro Tip: Ask the shop to measure rotor thickness and runout before deciding on resurface versus replace. A shop that skips measurement and goes straight to machining may return the car with the same problem.
If the vehicle cannot be driven safely, mobile brake service is an option for on-site diagnosis and caliper or pad work without moving the vehicle.
Repairs that fix brake vibration: how to choose the right one
The right repair depends on what the diagnosis found. Work through the decision points below before authorising any parts.
Decision flow:
- Start with no-cost checks: Clean the hub face, re-torque lug nuts to spec in a star pattern, and road-test. If vibration is gone, the job is done.
- Resurface (machine) rotors when: DTV is confirmed, the rotor is above minimum thickness after machining, and there are no metallurgical hot spots (blue discolouration or hard spots). Machining is sometimes a temporary fix; it removes metal, reduces heat capacity, and will not fix cementite hot spots.
- Replace rotors when: the rotor is at or below minimum thickness, hot spots are present, or the rotor has been machined before. Replacement is the longer-lasting option in most cases.
- Replace pads whenever rotors are replaced or resurfaced. Fitting new rotors against old pads causes uneven transfer film from the first use.
- Caliper service: If one wheel runs hot or pads wear unevenly, clean and lubricate the slide pins. If the caliper piston is seized, rebuild or replace the caliper.
- Wheel balance and rim inspection: If the shake appears at highway speed without braking, balance all four wheels and inspect rims for bends before any brake work.
- Suspension repairs: Replace worn ball joints, bushings, or tie-rod ends if the wiggle test found looseness. Suspension wear amplifies brake vibration and should be corrected at the same time as brake work.
Typical Canadian repair costs (per axle)
| Repair | Typical cost range (CAD) |
|---|---|
| Hub cleaning and lug-nut re-torque | $50 (shop labour only) |
| Rotor resurfacing (machining) | $60 to $100 |
| Rotor and pad replacement | $250 to $500 |
| Wheel balance (all four wheels) | $60 to $100 |
| Caliper slide pin service | $80 to $100 |
| Caliper rebuild or replacement | $150 to $400 |
| Suspension component (ball joint, tie rod) | $200 to $400 per component |
| Tow (local, within city) | $100 to $200 |
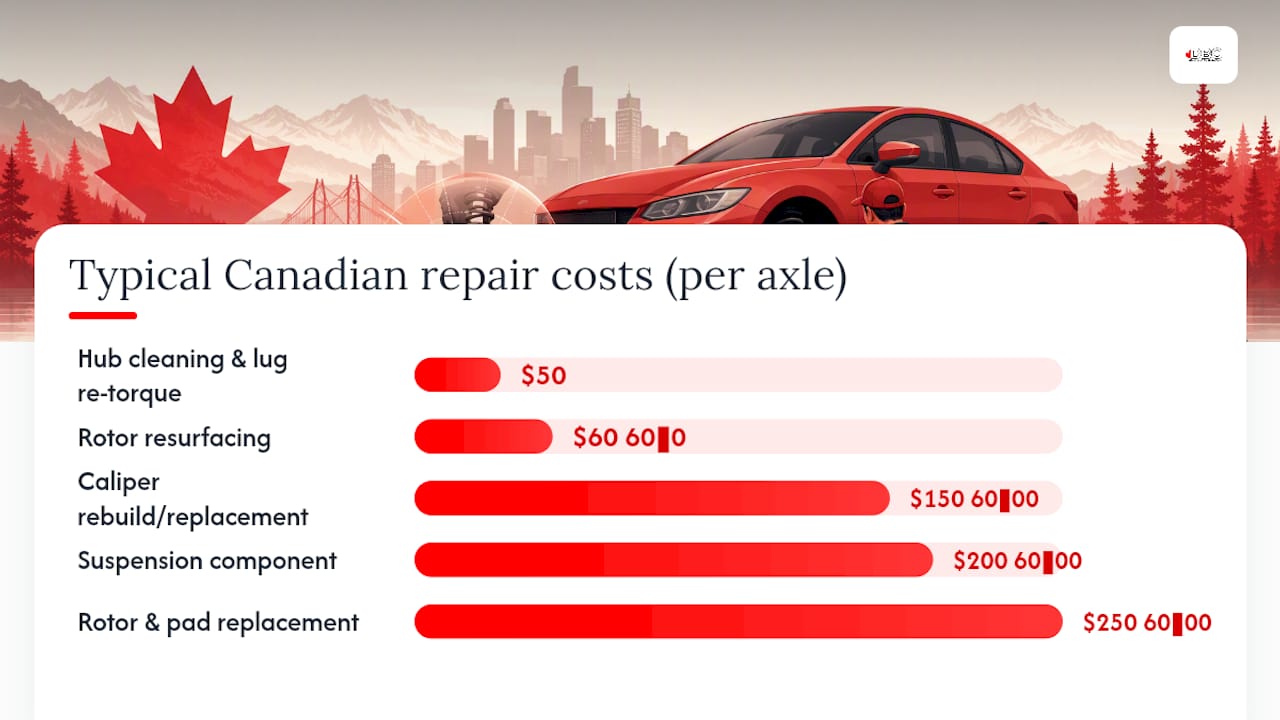
Costs vary by vehicle make, model, and region, with dealerships often charging more than independent shops.
Pro Tip: Bed in new pads and rotors correctly to prevent early pad transfer deposits. Drive at moderate speed and apply the brakes firmly 6–8 times, allowing the brakes to cool between each stop. Avoid coming to a complete standstill with the brakes applied while the rotors are hot. A proper bedding-in cycle leaves an even transfer layer and significantly reduces the chance of vibration returning within the first few thousand kilometres.
Why higher-quality rotors reduce the chance of vibration coming back
Not all rotors wear the same way. Standard grey-iron rotors are adequate for light use, but they are more prone to hot-spot formation and uneven wear under repeated heavy braking or in demanding Canadian conditions.
Technical advantages of engineered rotors:
- Improved thermal dissipation: Cross-drilled and slotted rotors move heat away from the pad contact zone faster, reducing the peak temperatures that cause pad glazing and cementite formation.
- Reduced hot-spot formation: High-carbon iron castings have a more uniform grain structure, which resists the localised hardening (cementite) that machining cannot remove.
- Better damping: Higher-carbon content and quality casting reduce the micro-vibrations that build into perceptible judder over time.
- Protective coatings: Zinc or other corrosion-resistant coatings on the hat and vane areas reduce rust buildup, which is a direct contributor to LRO on vehicles that sit between uses.
Canada-specific considerations:
Road salt, freeze-thaw cycles, and pothole impacts are harder on rotors than dry-climate driving. Vehicles used for towing or driven in hilly terrain generate more heat per kilometre. For Canadian drivers, the gap between a standard rotor and a high-carbon or coated rotor tends to show up faster, particularly through winter and spring when corrosion accelerates.
Correct installation matters as much as rotor quality. A premium rotor fitted over a dirty hub face, or torqued with an impact gun without a final torque-wrench check, will develop runout within weeks. The rotor is only as good as the surface it sits on.
Installation checklist (non-negotiable):
- Clean the hub face with a wire brush or abrasive pad before fitting any rotor
- Seat the rotor flat and hand-tighten lug nuts before torquing
- Torque lug nuts in a star pattern to the vehicle manufacturer's specification.
- Re-torque after some driving distance, as recommended by vehicle guidelines.
- Complete a proper bedding-in cycle before any hard stops
For more on rotor features that affect long-term reliability, see the brake kit features for reliability guide from DBC Brakes.
Pro Tip: Ask the shop to clean the hub face before fitting any new rotor, whether it is a budget part or a premium one. This single step eliminates one of the most common causes of vibration returning after a brake service.
An experienced view on brake vibration
Brake vibration is one of the most misdiagnosed problems in a shop. The rotor gets condemned first, but the real cause is often the hub, the lug nuts, or the caliper slides. Replacing the rotor without addressing those factors means the new rotor develops the same problem within months.
The habit that prevents most repeat visits is straightforward: at every pad and rotor service, clean the hub face, verify caliper slide pin movement, re-grease the pins with the correct high-temperature lubricant, and torque the lug nuts in a star pattern with a calibrated wrench. These steps take less than 15 minutes and eliminate the three most common causes of early vibration recurrence.
When talking to a shop, ask specifically: "Did you measure rotor runout with a dial indicator, and did you clean the hub face before fitting the new rotor?" A shop that cannot answer yes to both questions is skipping steps that matter.
DBC Brakes premium kits address the root causes of repeat vibration

DBC Brakes manufactures cross-drilled, high-carbon rotors engineered to resist the hot-spot formation and uneven wear that cause vibration to return after a standard repair. The kits include matched pads and rotors with inclusive pricing and no hidden fees, and ship free within Canada on orders over $100.
Cross-drilled rotors dissipate heat faster than standard grey-iron discs, which directly reduces the cementite formation that machining cannot fix. For Canadian drivers dealing with road salt and temperature swings, the corrosion-resistant coating on the hat and vane areas also slows the rust buildup that contributes to lateral runout between services.
DBC Brakes recommends having a shop clean the hub face and verify lug-nut torque at installation. The kit performs as designed only when fitted correctly. Fitment support is available directly from DBC Brakes, with knowledgeable staff rather than automated responses.
Browse the full range of premium brake kits at CrossDrilledRotors.ca to find the right fit for your vehicle.
Sources
- Why does my car shake when I brake? | RAC Drive
- Steering Wheel Shakes When Braking? Brake Judder Fix Guide – AME Motorsport
- Brake Noise
- Why Does My Car Vibrate or Shake When Braking? - AutoZone