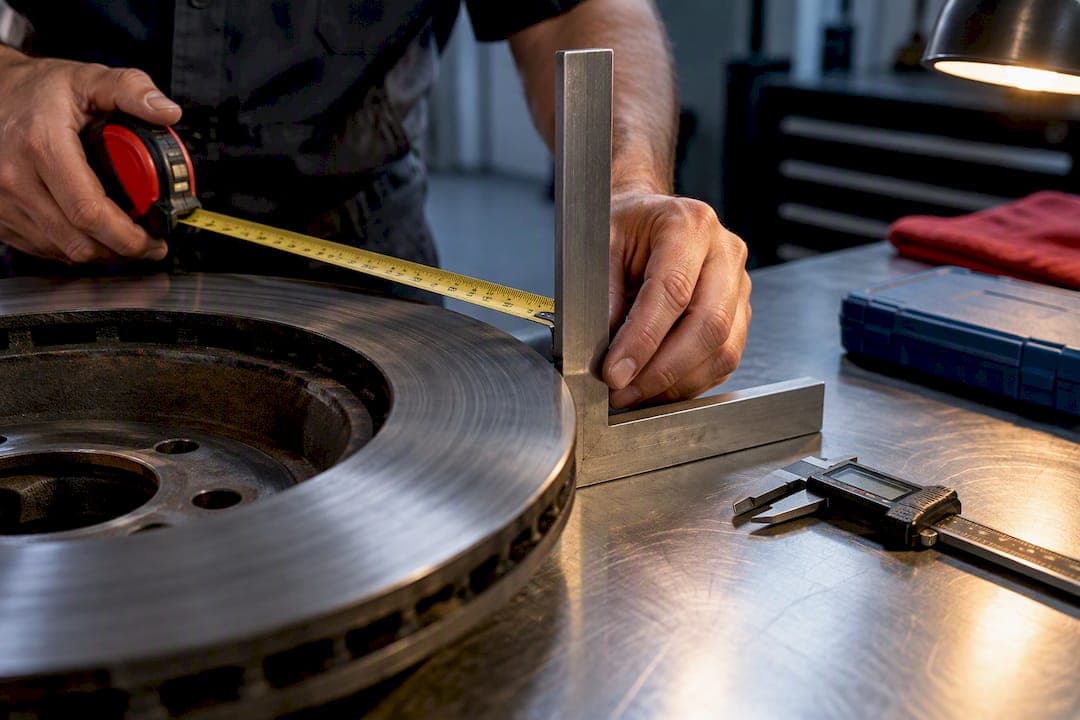
Measure the rotor from one outside edge straight across the centre to the opposite edge, then record that number in millimetres. A removed rotor on a flat surface gives the most reliable reading. Measuring in place works too, with care. Support the vehicle on rated stands, chock the wheels, and keep hands clear of the rotor edge while you work.
TL;DR:
- Measuring a removed rotor on a flat surface with squares ensures the most accurate outside diameter, especially avoiding errors caused by drilled or slotted areas.
- Using a straightedge and taking measurements on two axes verify the true diameter, with larger, repeatable readings being more trustworthy.
- Installing a rotor requires thorough hub cleaning and torqueing to specification to prevent runout issues that can cause vibration or pulsation.
- When measuring through spoke gaps with the wheel on, multiple readings should be taken to identify the largest consistent diameter, avoiding angled chord errors.
- Confirming dimensions with catalogues and support from vendors helps prevent incorrect parts, especially when dealing with used vehicles or performance upgrades.
Table of Contents
- Tools and terms you need before you measure rotor diameter
- How to measure a removed rotor accurately
- How to measure an installed rotor when the wheel stays on
- How to verify your measurement and avoid common mistakes
- Converting units and using a VIN lookup correctly
- Checks to run after measuring or replacing a rotor
- When a DIY measurement is enough, and when it isn't
- Get the right rotor once you've confirmed your measurement
- Where these measurement standards come from
- Sources
- FAQ
Tools and terms you need before you measure rotor diameter
Three tools cover almost every rotor on the road. A steel rule or tape measure handles the full outside diameter (OD). A straightedge confirms the tape crossed the true centre instead of a shorter chord near the edge. A digital caliper handles thickness and smaller dimensions, but it usually cannot span the full diameter of a passenger vehicle rotor because most calipers max out around 150mm to 200mm of jaw travel.
A few terms come up constantly in parts listings and service manuals:
- OD (outside diameter): the full swept diameter of the rotor, measured edge to edge through the centre.
- ID (inside diameter): the diameter of the centre bore or hat section, relevant mainly for fitment on the hub.
- Thickness: the rotor's disc width, measured with a caliper at several points around the face.
- Lateral runout (LRO): how much the rotor face wobbles side to side as it spins, measured with a dial indicator against a fixed point.
Knowing which figure a listing wants (OD versus thickness versus ID) prevents a lot of wasted returns.
How to measure a removed rotor accurately
A rotor off the vehicle gives you the cleanest, most repeatable reading, which is why most technicians default to this method whenever the wheel is already off for pad or caliper work.
- Clean the rotor face and edge so dirt, rust flakes, or old pad dust don't throw off your reading.
- Set the rotor flat on a bench or the floor, friction surface up.
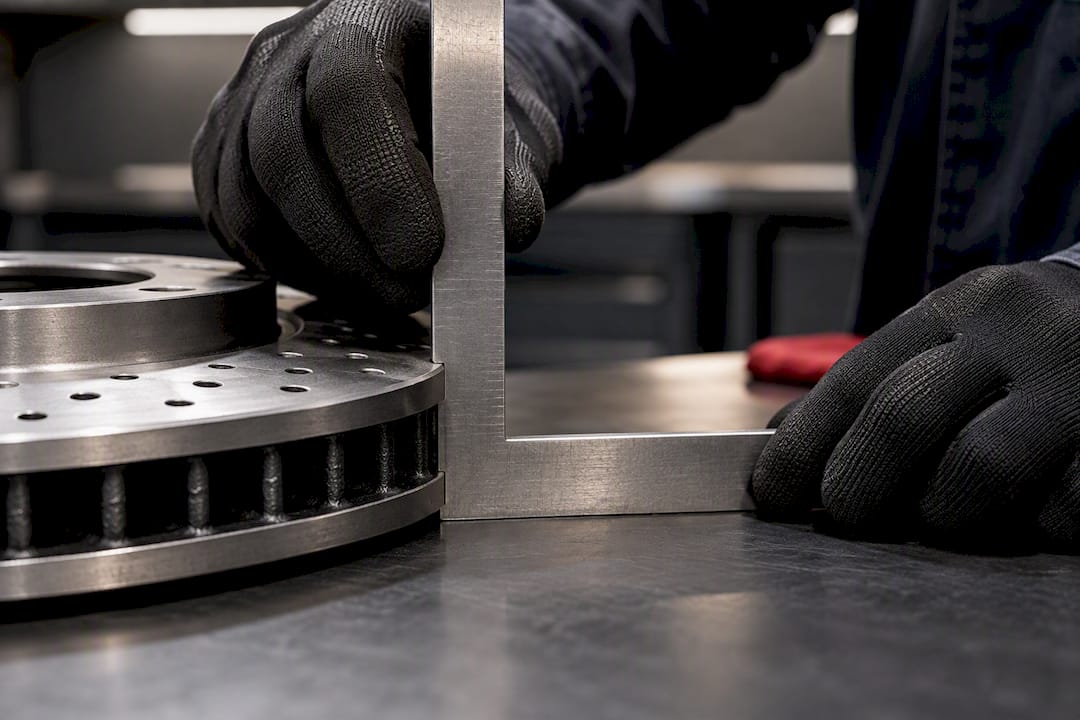
- Brace one square or straightedge against one outside edge of the rotor.
- Slide a second square across until it just touches the opposite edge, keeping both squares vertical and flush against the rotor rather than tilted inward or outward.
- Read the distance between the two parallel faces on your rule or tape. That distance is your OD in millimetres.
- Rotate the rotor roughly 90 degrees and repeat the measurement on a second axis.
Bracing the rotor against squares and measuring between parallel faces is the standard method for avoiding chord errors, where a tape measure crosses close to the centre but not exactly through it, quietly shaving a few millimetres off your reading. Two matching axis readings confirm you crossed the true diameter both times.
Drilled or slotted rotors add a wrinkle: don't let your square catch in a slot or drilled hole at the very edge, since that gives a false, slightly larger reading. Rest the square against the solid metal edge just beside any hole or slot instead.
Pro Tip: Write your reading down immediately in millimetres, not inches. Most rotor part numbers and catalogues list OD in mm first, and converting later is where transcription errors creep in.
How to measure an installed rotor when the wheel stays on
Pulling a wheel isn't always practical, especially if you're just double checking a size before ordering. Measuring through the wheel's spoke gaps works, but it demands more care than measuring a removed rotor.
- Chock the wheels you're not working on, set the parking brake, and support the vehicle on rated jack stands placed on level ground. Never work under a vehicle held only by a hydraulic jack.
- Locate two spoke gaps on roughly opposite sides of the wheel that give you a clear line of sight to the rotor edge.
- Extend a long steel rule or tape measure through one gap, across the rotor face, to the opposite gap.
- Use a straightedge or a second rule braced against the near edge to confirm you're reading a straight line through the centre, not an angled path.
- Take three or four readings through different spoke gap combinations and note the largest consistent value.
The biggest error source here is measuring a chord instead of the true diameter. Any angle away from dead centre reads shorter than the real OD, so when your readings disagree, trust the highest one that repeats more than once.
How to verify your measurement and avoid common mistakes
A single reading is a guess dressed up as data. Confirming true diameter means checking your own work before you ever add a part to your cart.
- Take a second measurement on a different axis and use the larger of the two consistent readings as your true OD.
- Never measure across a raised rust lip at the rotor's outer edge. It sits higher than the actual friction surface and inflates your reading.
- Avoid taking a single chord measurement near the edge. It always reads shorter than the true diameter.
- Brace a straightedge so it passes through the hub centre bore before you take your final reading, confirming you crossed the true centre rather than a near miss.
One detail trips up a lot of first time measurers: SAE J3111 recommended practice outlines bracing a rotor between two squares and reading between the parallel faces specifically to eliminate chord error, the same technique described above for removed rotors. When you compare your measured figure to a parts listing, expect small nominal rounding differences, and always confirm you're checking the correct position (front or rear), since the two often differ on the same vehicle.
Converting units and using a VIN lookup correctly
Most catalogues list rotor diameter in millimetres, but older service manuals and some U.S. parts listings still use inches. The conversion is simple: multiply millimetres by 0.0394 to get inches, or multiply inches by 25.4 to get millimetres. A 300mm rotor works out to roughly 11.8 inches, and catalogues often round that to 11.81" or even a flat 11.8", so don't be alarmed by a fraction of a millimetre difference between your tape reading and the listed spec.
A VIN lookup has real value and a real limit. Decoding a VIN through a parts lookup tool can surface the factory build configuration and original equipment part number, which is a useful starting point. What it can't do is account for a previous owner's brake upgrade, a big brake kit swap, or a rotor size change done years before you bought the vehicle.
- Check the OE parts fiche or service manual for factory rotor dimensions.
- Ask a dealer parts counter to cross reference the VIN against original specs.
- Always confirm the final number against your own measurement before ordering, especially on a used vehicle with an unknown service history.
Checks to run after measuring or replacing a rotor
Getting the diameter right is half the job. Runout is the other half, and it's the step most DIY jobs skip.
Lateral runout describes how much a rotor face wobbles as it spins, and it's measured with a dial indicator rather than a tape measure. Industry guidance is consistent on this point: rotor dimensions and runout both need verification before and after service, because even a brand new rotor can develop a vibration if it's seated against a dirty or corroded hub flange. Stacked tolerances between an old flange and a new rotor are one of the most common causes of a pulsing brake pedal that shows up weeks after a replacement, and DBC Brakes has covered why that pulsation often gets misdiagnosed as rotor warping when the real cause is runout stacking.
- Clean the hub flange thoroughly before mounting any new rotor. Rust flakes and old brake dust are common culprits.
- Torque wheel lugs to spec, in the correct sequence, before checking runout.
- Measure runout with a dial indicator after installation, not just before.
- A partner resource on safely clearing brake dust before you measure or reinstall helps keep contaminants off the mating surfaces.
Pro Tip: If you want the full walkthrough on dial indicator setup and reading runout numbers, DBC Brakes has a dedicated rotor runout measurement guide that goes deeper than a diameter check alone.
When a DIY measurement is enough, and when it isn't
A careful tape measure and straightedge reading is genuinely enough if you're buying a same size OE replacement rotor. That's the most common job, and it doesn't need a dial indicator or a shop's precision fixtures.
Where DIY hits its limit is runout verification and any performance upgrade involving a different rotor diameter or hat design. If a pulsation persists after a fresh install, or you're stepping up to a bigger rotor that changes caliper clearance, a shop's tools and experience are worth the visit.
— Sam
Get the right rotor once you've confirmed your measurement
Some manufacturers build cross-drilled rotors engineered to resist warping and sometimes offer inclusive pricing without hidden fees commonly found in aftermarket brake shopping.

Once you've confirmed your rotor's true OD using the steps above, matching it to the right part is straightforward. Browse the brake rotor collection by vehicle to confirm published diameters against your own reading, or check the front rotor listings directly if you already know your position and size. Customer support teams often answer fitment questions personally rather than using automated scripts, so if your measurement falls between listed sizes or you're unsure about hat height, consider contacting support before ordering. Some suppliers offer free shipping within Canada on orders over a certain amount, and kits may come with inclusive pricing regardless of whether replacing a single axle or upgrading a full set. Start at the DBC Brakes homepage to browse Performance XDB, Premium Black Kote, and Performance SS rotor lines and confirm your fitment today.
Where these measurement standards come from
These references back the methods covered above:
- SAE J3111 recommended practice sets the formal measurement method for rotor thickness variation and lateral runout.
- Vehicle VIN decoding tools help confirm factory build data and OE part numbers, with the limits explained above.
FAQ
How do I know what diameter my rotors are?
Measure the rotor edge to edge through the centre with a tape measure or steel rule, ideally with the rotor removed from the vehicle. A removed rotor braced between two squares gives the cleanest reading, and checking a second axis confirms you crossed the true centre.
How do you measure rotor size without taking the wheel off?
Support the vehicle safely, then run a long tape measure or steel rule through two opposite spoke gaps across the rotor face. Take several readings through different gap combinations and use the largest consistent value, since an angled read through a spoke gap often measures short.
Can I look up my rotor size by VIN number?
A VIN lookup tool can surface the factory OE part number and original build configuration, which is a useful starting point. It won't reflect a later brake upgrade or rotor swap, so always confirm the final size with a physical measurement.
What is the best measuring tool for rotors?
A steel rule or tape measure paired with a straightedge covers the full outside diameter, which is usually too large for a standard digital caliper to span. A caliper is still the right tool for checking rotor thickness and smaller dimensions like the centre bore.
Does DBC Brakes help confirm rotor fitment before I buy?
Yes. DBC Brakes' rotor collection lists dimensions by vehicle, and customer support can confirm fitment questions directly if your measurement falls between listed sizes.